Settings
Details regarding what each of the Configuraton Settings is found within their Description field.
Status Updates
The information panels in the middle section of the KPI Status screen capture the state of the project at the time of the Status Update creation. They are a snapshot in time and cannot be updated via the UI once they are saved.
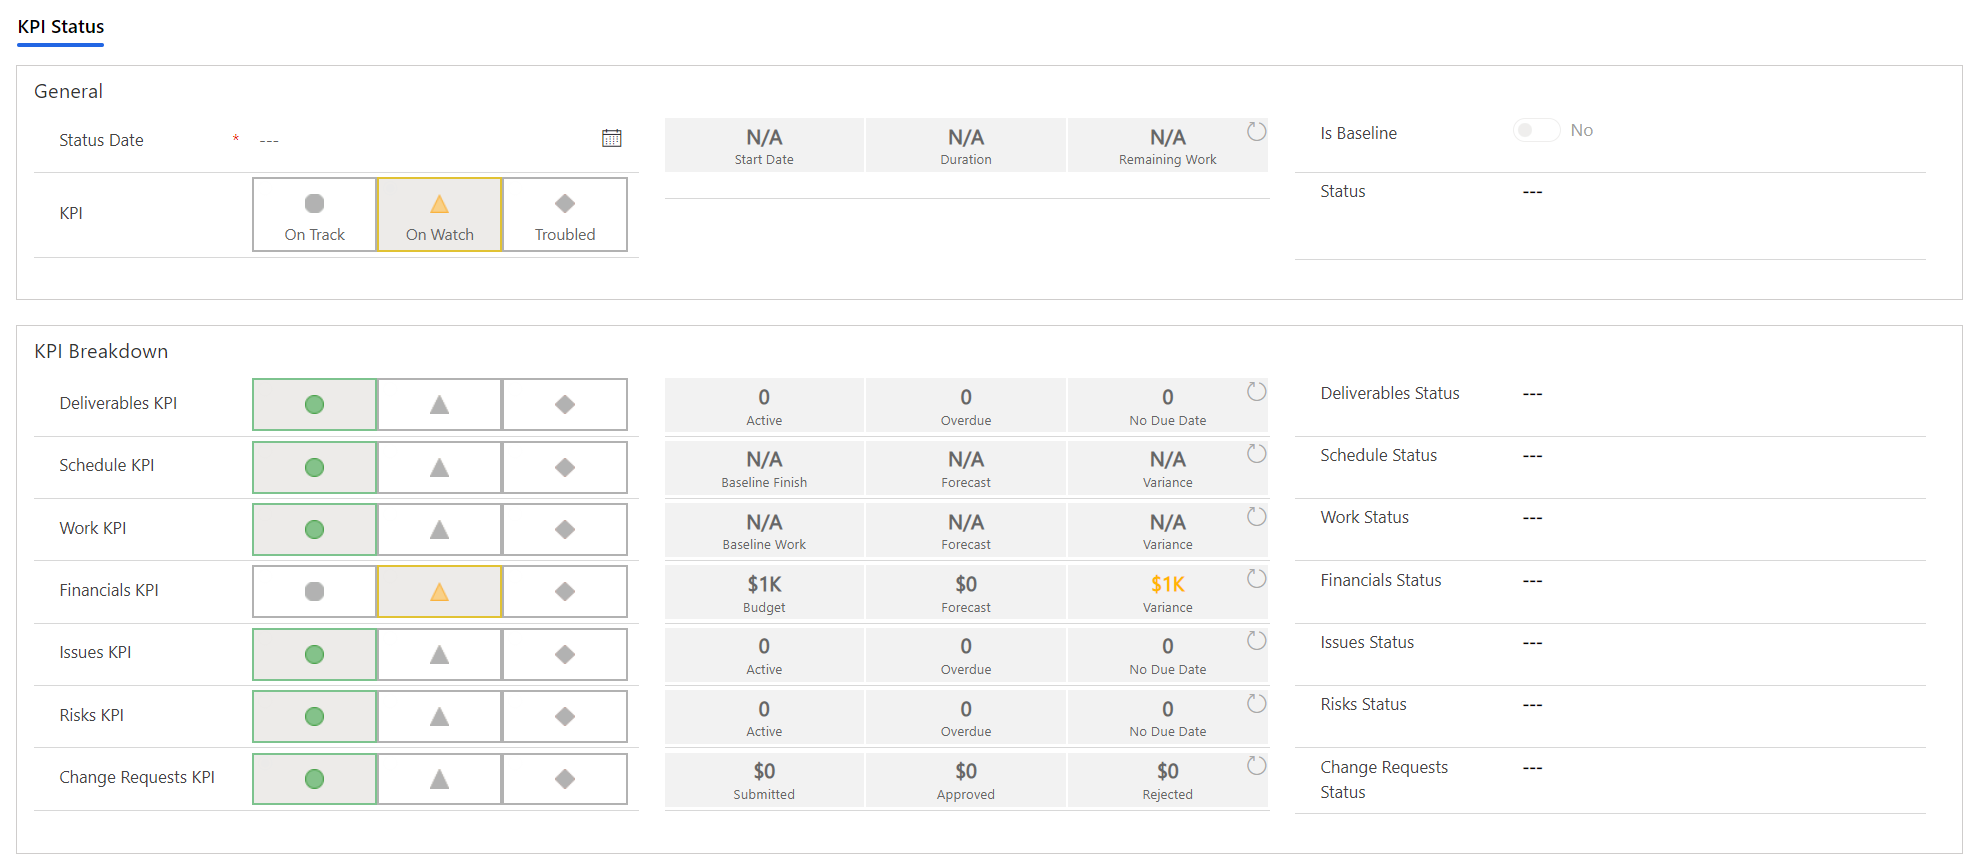
Except for the finance values, all the information panels are driven by the system configuration settings. The numbers and the default state for each KPI can be customised via the Status Update - Information Panel Calculations configuration setting.
These settings are shipped blank so that defaults can be adjusted over time. However, each number can be overwritten via the settings, and once overwritted the default configuration will no longer apply.
If you require the default configuration as a basis for customisation, please contact support.
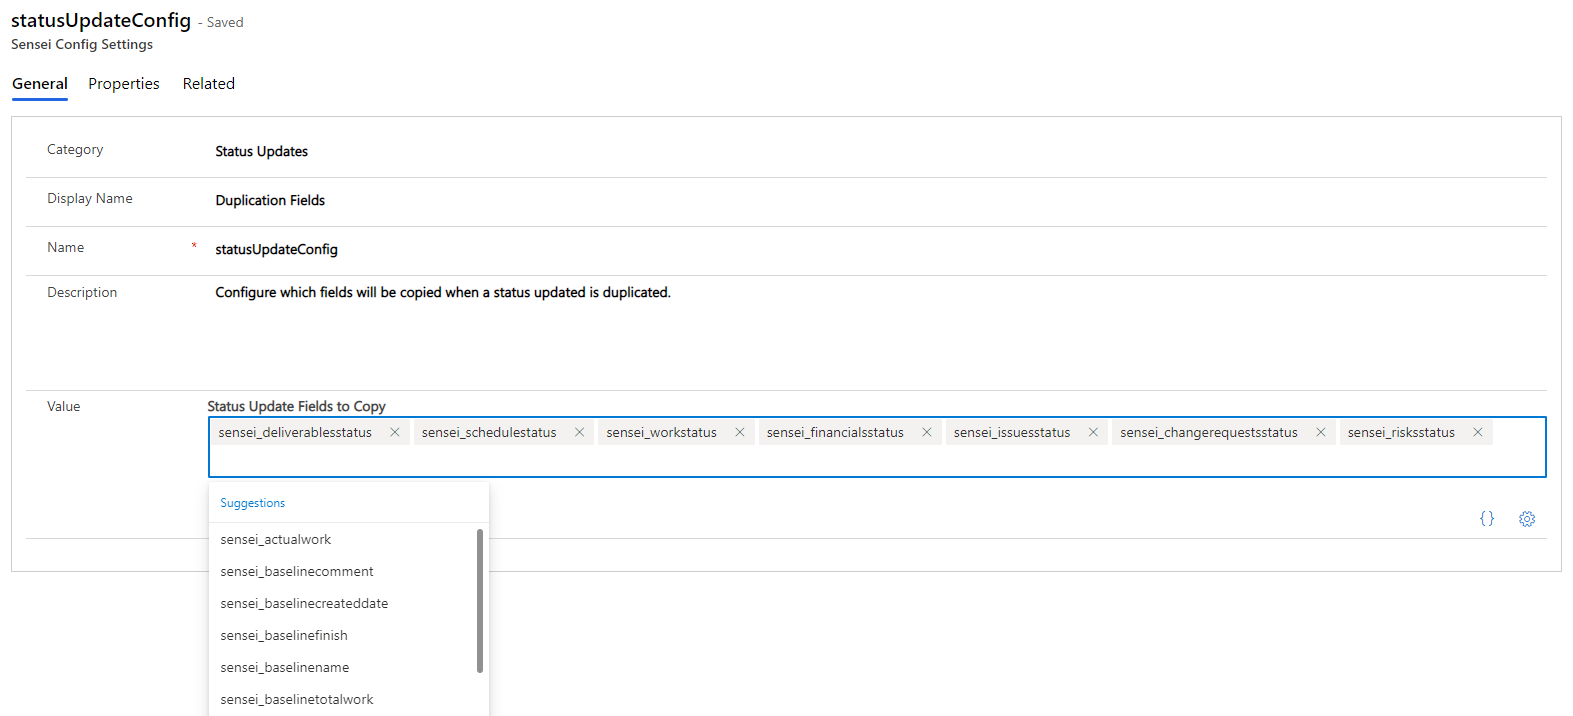
Status Update - Duplicate Config Setting
The statusUpdateConfig configuration setting allows adminstrators the ability to setup which fields are to be copied and/or cleared by the Duplicate Status Update and Clear Status Update ribbon buttons.
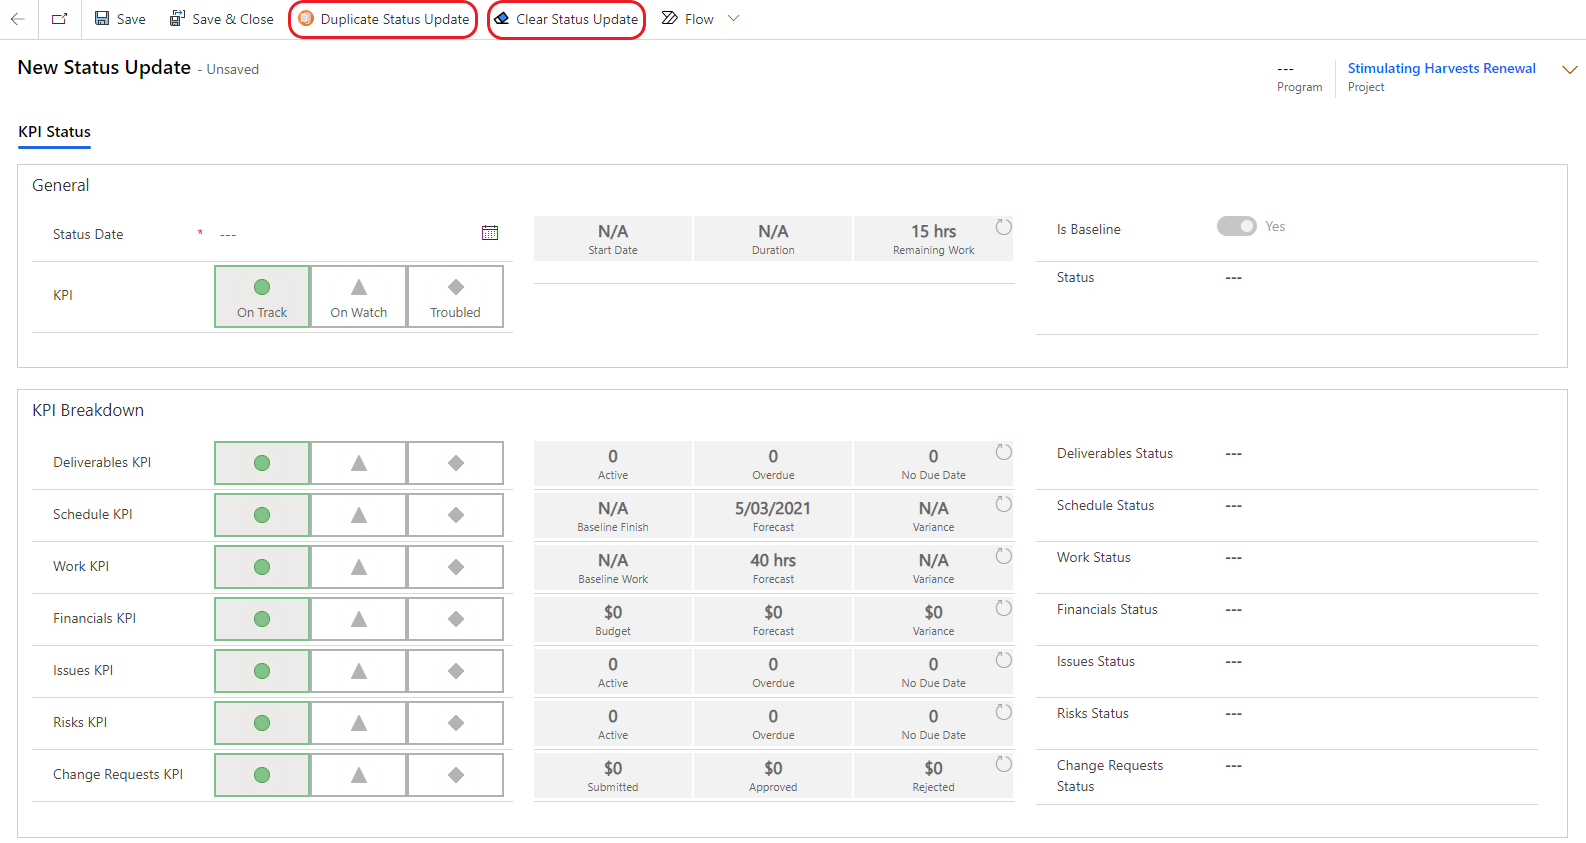
Out of the box, the following fields will be duplicated.
[
  "sensei_deliverablesstatus",
  "sensei_schedulestatus",
  "sensei_workstatus",
  "sensei_financialsstatus",
  "sensei_issuesstatus",
  "sensei_changerequestsstatus",
  "sensei_risksstatus"
]
Ths statusUpdateConfig configuration will allow for all fields barring Lookup fields from being copied from the previous status update (previous status is determined by the most recent update sorted by Status Date).
The setting is an array of fields, which is populated by the helper widget to avoid user errors when entering fields.
Status Update - Information Panel Calculations Setting
The statusUpdateInformationPanels_IQA configuration setting allows the administrator to setup new or override existing information panel calculations in the status report.
If you make changes to the Status Updates please make sure you reference this statusUpdateInformationPanels_IQA setting and not the default statusUpdateInformationPanels_IQ setting.
The statusUpdateInformationPanels_IQA screen contains the following fields:
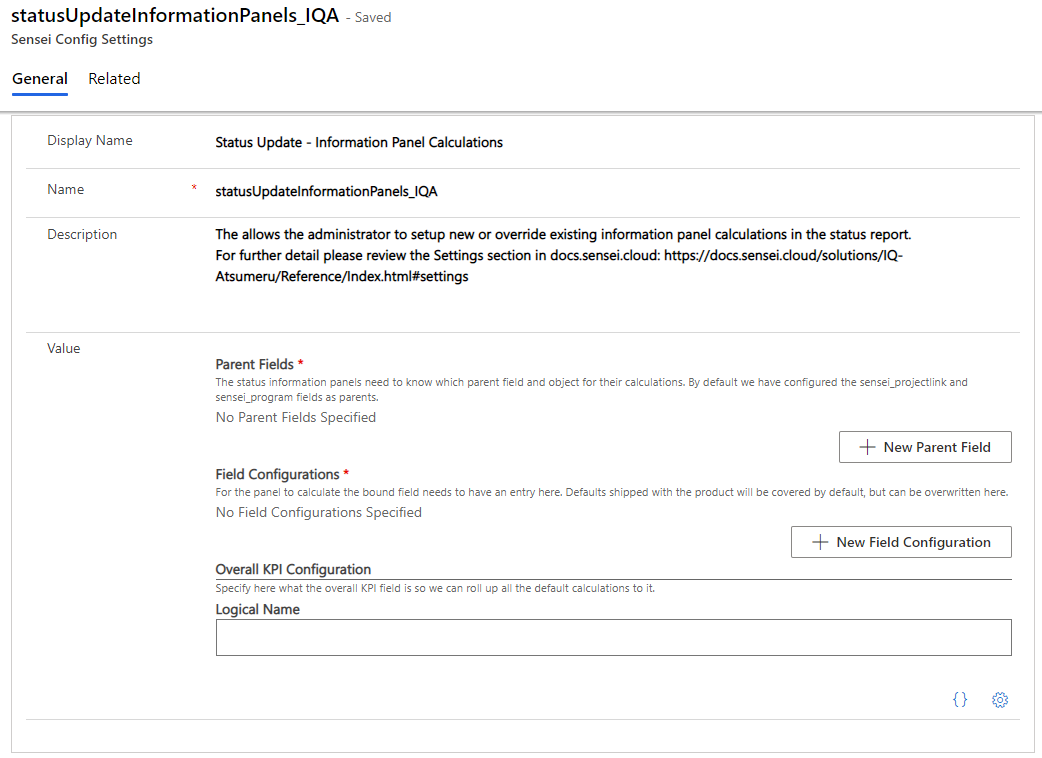
- Parent Fields: The status information panels need to know which parent field and target object for their calculations. By default the sensei_projectlink and sensei_program fields are configured as parents.
- Field Configurations: For the panel to calculate the bound field needs to have an entry here. Each value maps to a field on the sensei_statusupdate table. Defaults shipped with the product will be covered by default, and can be overridden here. To add a new value you will need to create a field or to change a given value you will need to determine which field name is used for a given value.
- Overall KPI Configuation: Specifies the overall KPI field so we can roll up the other default calculations to it.
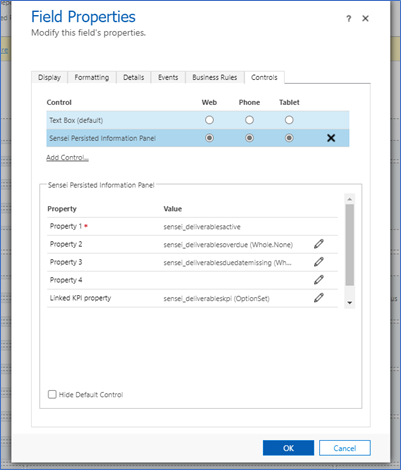
The Control
In the classic form designer for Status Update, you can see which fields the control are bound to. As you can see from the image below each control supports 4 properties as well as linking to one KPI property which determines which KPI to set the default to.
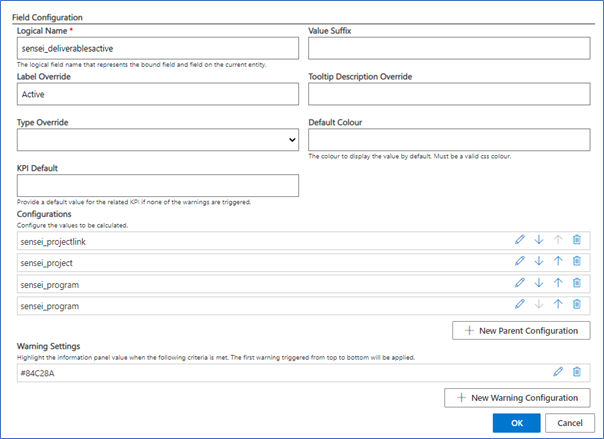
Field Configurations
Once you have the field name you can set up the configuration for its calculation. In the active Deliverables example, you can see the field internal name is configured in the Logical Name field and this maps the configuration for its calculation.
Note: The finance field configurations are hard coded as their complexity is too high to make this configurable.
At this level the fields are:
- Value Suffix: This allows you to append a suffix to the value at run time such as hrs or days. This is not saved to the field.
- Label Override: By default, the label below the value will come from the table field, however if you wish to customise it for this form, you can do so here.
- Tooltip Description Override: Like the label you can customise the tooltip used here for the value.
- Type Override: By default, we will try and coerce the value to the target field type, however here you can select a type for us to try and convert the value to. Supported types are Date Only, Date and Time, Currency, Decimal as well as Integer.
- Default Colour: To customise the colour of the number when in a normal state you can do so here. You can use any valid CSS colour.
- KPI Default: One field on each control can be responsible for setting the KPI default. This is where you determine what the default is. This value needs to one of the valid option set values set for the KPI. The options we ship with are 955000000 = On Track, 955000001 = On Watch, 955000002 = Troubled
Configurations
Depending on which parent entity (e.g. Program or Project) the status update is attached to, the calculation for the value may be different. This section allows you to configure how this is calculated, if at all. At run time the control will determine which relationship is active and then use the appropriate configuration to calculate the value.
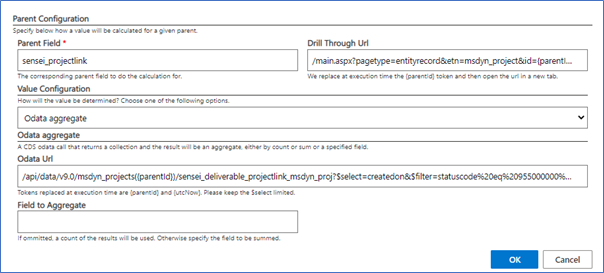
At the general level you specify what parent the configuration is for and then if required a drill through URL which is navigated to when the user clicks on the value.
Then there are several ways the value is calculated.
Fixed value from parent
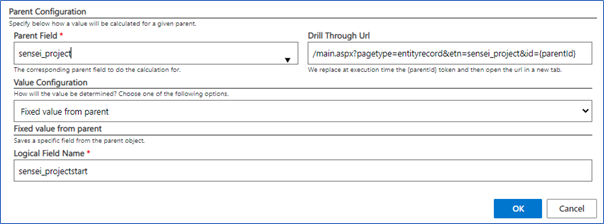
This is the most straight forward in that it will save a field value from the parent entity. In the above example for the sensei_startdate field it will save the sensei_projectstart date field from the sensei_project relationship.
Date diff based on values from parent object in days
Coming soon!
OData aggregate
This will allow you to execute a query against DataVerse to retrieve and aggregate the data you want. Query data using the Web API (Microsoft Dataverse) - Power Apps | Microsoft Docs
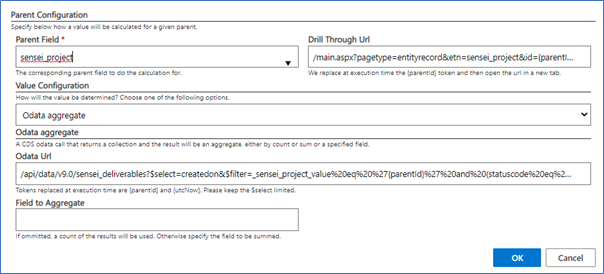
In the above example for Active Deliverables it is querying for all deliverables for a given project and in a given state. As there is no field specified we will simply do a count of the rows returned.
Be careful to use a $select to load only the minimum fields you need to ensure optimal performance.
Note: that the tokens {parentId} and {utcNow} will be replaced at execution time, and be sure to correctly URL encode any query parameters provided.
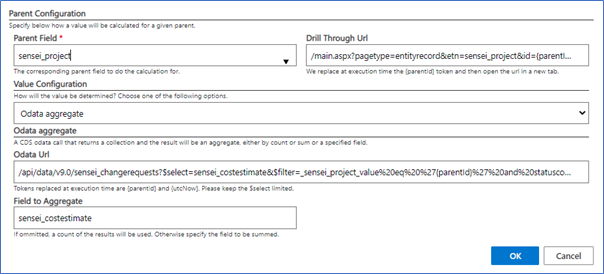
In the above example for Rejected Change Requests it is adding up all the sensei_costestimate fields that are returned by the query of rejected change requests in the project.
/api/data/v9.0/sensei_changerequests?$select=sensei_costestimate&$filter=_sensei_project_value%20eq%20%27{parentId}%27%20and%20statuscode%20eq%20955000002
Note: In this case you can use an aggregate in the next mode, however here we are using it to show you in case you are struggling with the aggregation.
OData query
This option allows you to simply use an odata query and save a given value from the response.
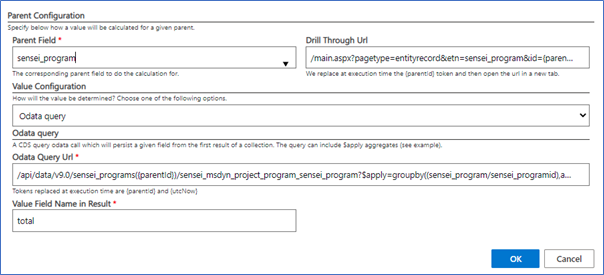
In the above example for Remaining Work for programs, it is using aggregations to do the calculation of summing up all the effort remaining for a Program on the server side and then use the total provided.
/api/data/v9.0/sensei_programs({parentId})/sensei_project_sensei_program?$apply=groupby((sensei_program/sensei_programid),aggregate(sensei_effortremaining%20with%20sum%20as%20total))
Note: that the tokens {parentId} and {utcNow} will be replaced at execution time.
Variance
The variance option allows you to store a variance between 2 fields on the form. It has 2 modes, a basic numerical variance, as well as a date diff.
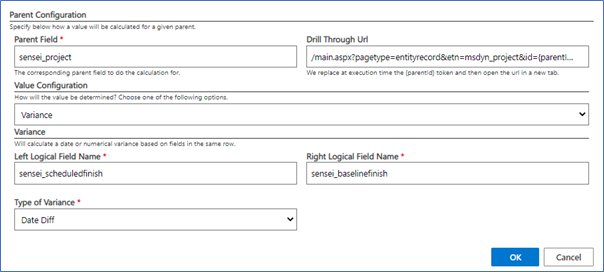
The above example for Schedule Variance will calculate the difference in days between the calculated scheduled finish and the calculated value provided by the baseline finish field.
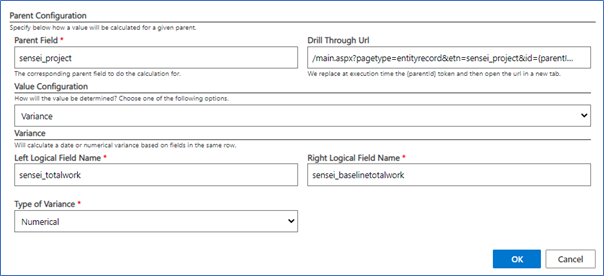
In the above example for Work Variance, it will store the numerical difference between the total work field calculation and the baseline total work calculation.
Warnings

Warning calculations allow you to highlight the value at runtime based on its value. They will execute from top to bottom and stop when a warning has been triggered.
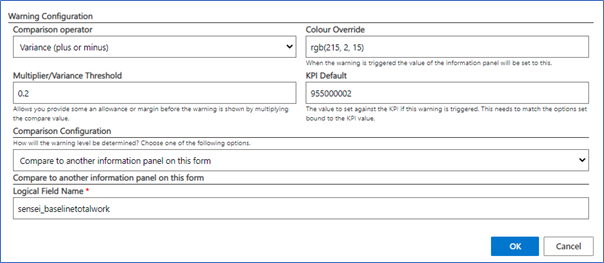
The comparison operator determines how we will compare the value and hence if the warning has been breached. Most are straight forward (greater than, equal, less than, etc.) “Variance (plus or minus)” is the only one that is a little out of the ordinary in that if the value is within the threshold it will be fine, only if it is greater than this will it be triggered.
In the above example for Work Variance, it is saying if the variance is greater than or less than 20% of the baseline total work, then trigger the warning.
What happens when it is triggered is determined by the Colour Override and KPI Default values as mentioned in their descriptions.
Note: The KPI Default value only needs to be set if the field is the one determining the KPI default.
Comparison Configuration
This is how you determine what the value will be compared to.
Compare to static value
The simple warning configuration will which compare the field value to a static value.
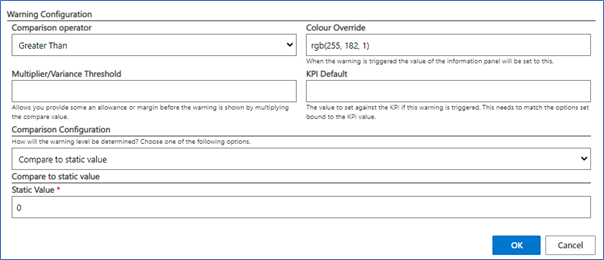
In this example for Risks Due Date Missing, the warning will be triggered if the value is greater than 0.
Compare to another information panel on this form

In the above example it is comparing to another field on the form.
Duration comparison
This allows you to compare the value to a calculation of a duration between 2 other fields on the form.
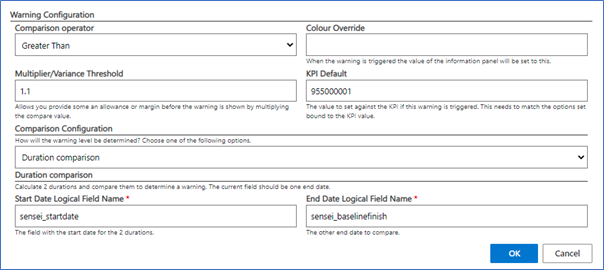
In the above example for Scheduled Finish, we will calculate the duration between the start date and the scheduled finish and the duration between the start date and the baseline finish, then compare the 2.
Here is the scheduled finish duration is greater than 10% over, the warning will be triggered.
Status Update - KPI defaults
The default behavior of the Status Update KPIs are as follows:
| KPI | Red - Trouble | Amber - On Watch | Green - On Track |
|---|---|---|---|
| Overall | Any other KPIs are Red | Any other KPIs are Amber | All other KPIs are Green |
| Deliverables | NA | Any active deliverables are overdue | No active deliverables are overdue |
| Schedule | NA | The duration between the scheduled finish and start date is more than 10% (+/-), compared to the duration between the baseline scheduled finish and start date | The duration between the scheduled finish and start date is less than 10% (+/-), compared to the duration between the baseline scheduled finish and start date |
| Work | The work variance to the baseline total work is more than 20% (+/-) | The work variance to the baseline total work is (+/-) 10% | There is no variance to the baseline total work |
| Financials | NA | The financial variance is greater than 10% +/- of the budget | The financial variance is less than 10% +/-of the budget |
| Issues | NA | Any active issues are overdue | No active issues are overdue |
| Risks | NA | Any active risks are overdue | No active risks are overdue |
| Change Requests | NA | Any change requests are in status Submitted | No change requests are in status Submitted |
Teams App - Channel Tab Configuration Setting
The teamsAppChannelTabs configuration setting allows the administrator to specify the channel tabs that will be created by the Teams app for each project. The array contains a list of the Microsoft Graph objects to create a channel tab.
The following tokens will be replaced with the project specific value. {projectId}, {orgUrl}, {appId}
See: https://docs.microsoft.com/en-us/graph/api/resources/teamstab?view=graph-rest-1.0#json-representation For information on configuration of the different supported app tabs see https://docs.microsoft.com/en-us/graph/teams-configuring-builtin-tabs#power-bi-tabs
For information on using filters in an embed url see here https://powerbi.microsoft.com/en-us/blog/easily-embed-secure-power-bi-reports-in-your-internal-portals-or-websites/
The teamsAppChannelTabs screen contains the following fields:
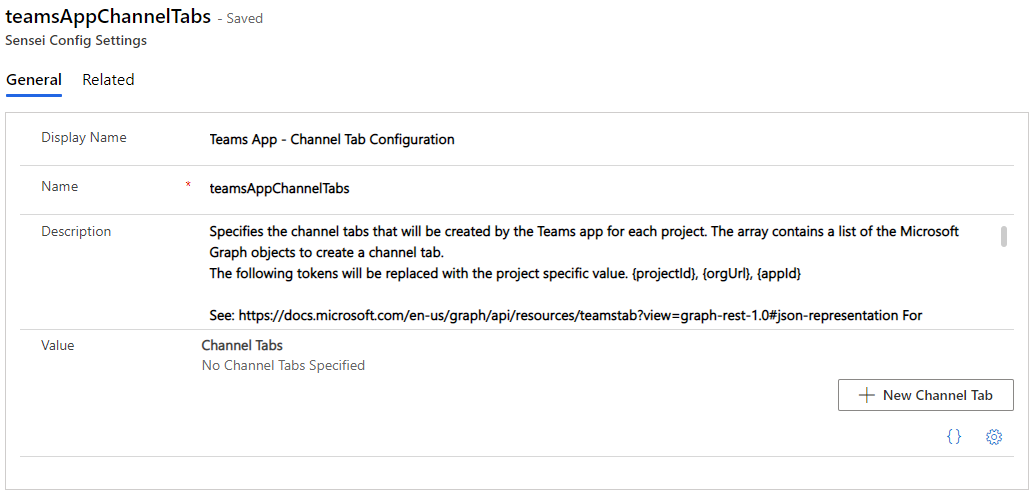
- Value: Click + New Channel Tab to create the New Channel Tab.