Deployment
Note
A Sensei deployment engineer will perform the following steps. This information is for reference to provide visibility over the changes that will be made to your environment.
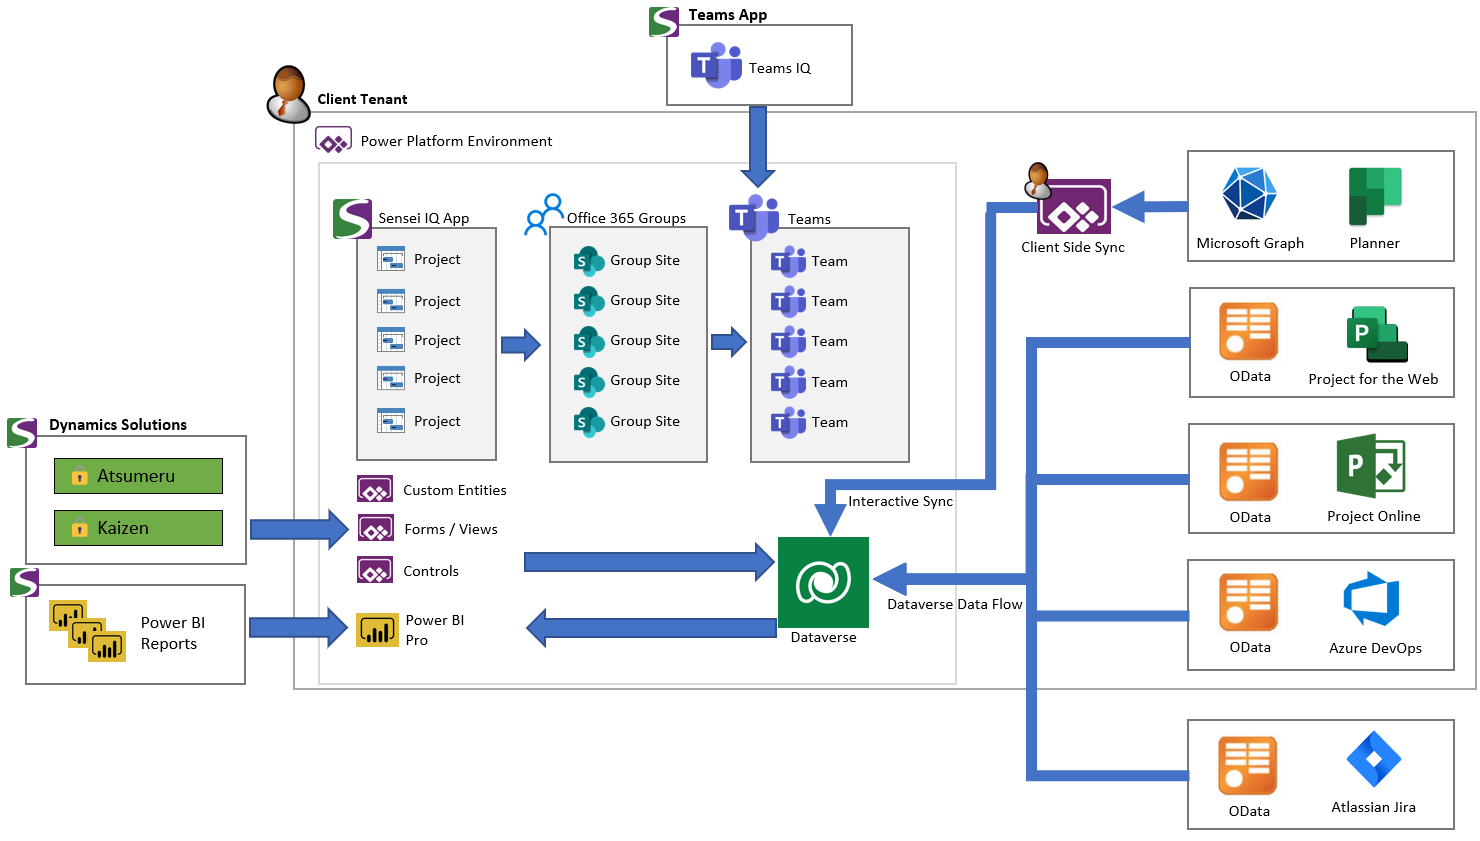
Sensei IQ deploys components that utilize the customer's own Microsoft 365 Tenant to provide a tight security posture and defined data sovereignty. Once the technical readiness requirements are met, a Sensei deployment engineer will work with you to deploy the IQ solution into your environment.
The deployment consists of:
- Dynamics Solutions
- Power BI Reports
- My Work Canvas App
- Teams App
Technical Readiness validation
Use the following steps to validate that technical readiness has been achieved:
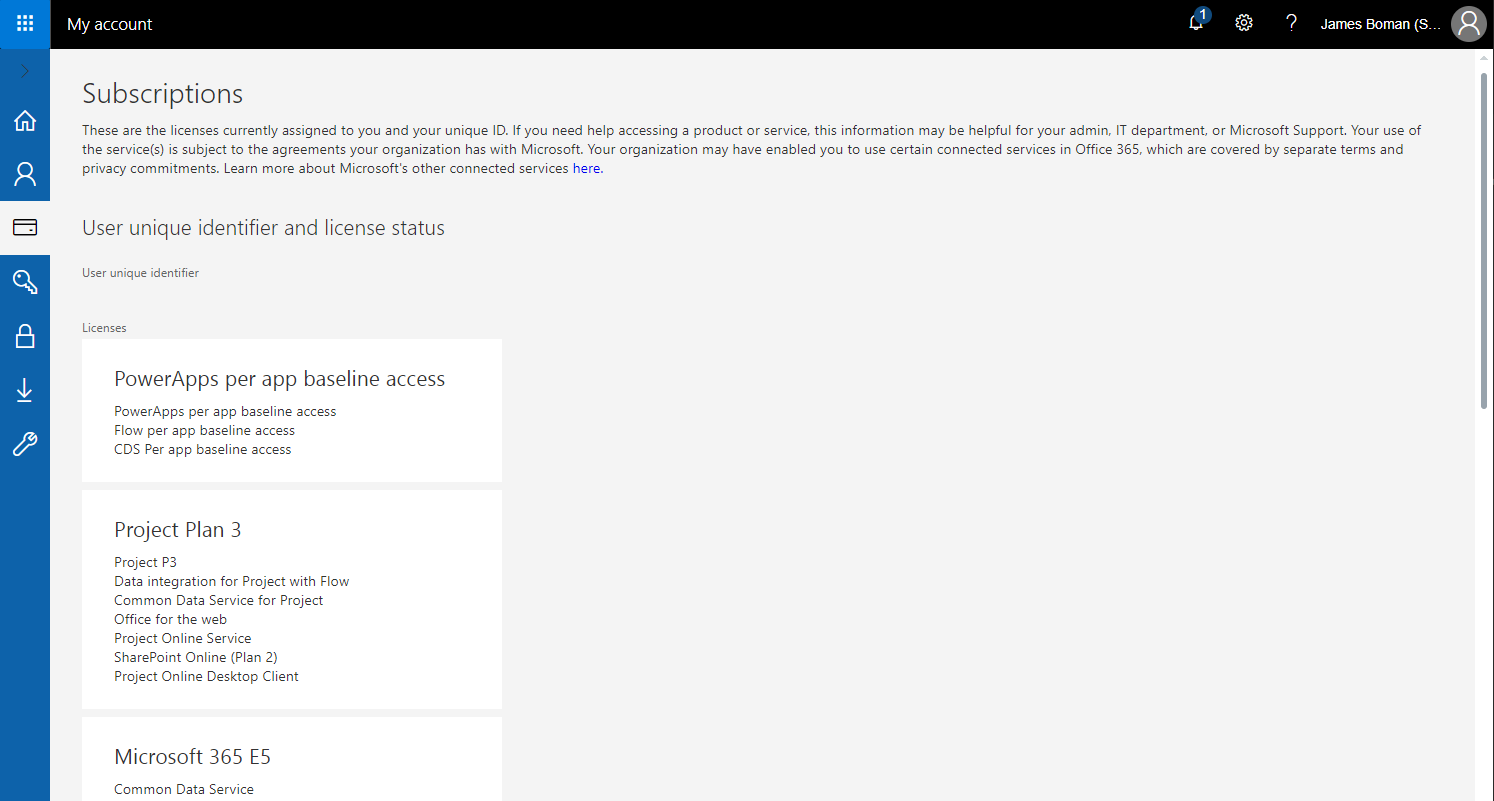
- Log into https://portal.office.com/account/#subscriptions using the credentials provided by the customer. You should be able to see evidence of the licenses applied. In this example we have PowerApps per app and E5 (which also grants Power BI Pro). This satisfies the licensing requirements in Tech Readiness requiring PowerApps, Power BI Pro and Teams.
- Log into Teams Administrative Web Portal, click Apps -> Manage your apps, and ensure the "Upload an app to your org's app catalog" is available:
- Open https://make.powerapps.com and use the environment selector in the top-right to select the Power Platform environment created by the customer during technical readiness.
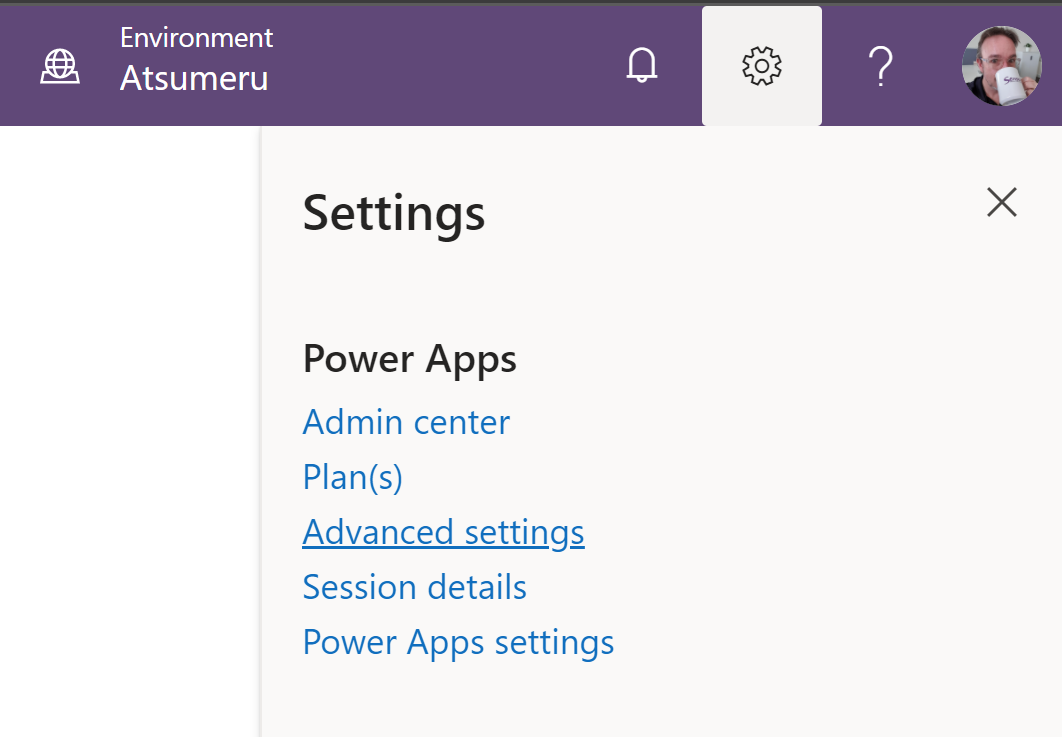
- Click on the ⚙-> Advanced Settings
- Navigate to Settings -> Security -> Users ->
Your User-> Manage Roles to ensure you have admin permissions.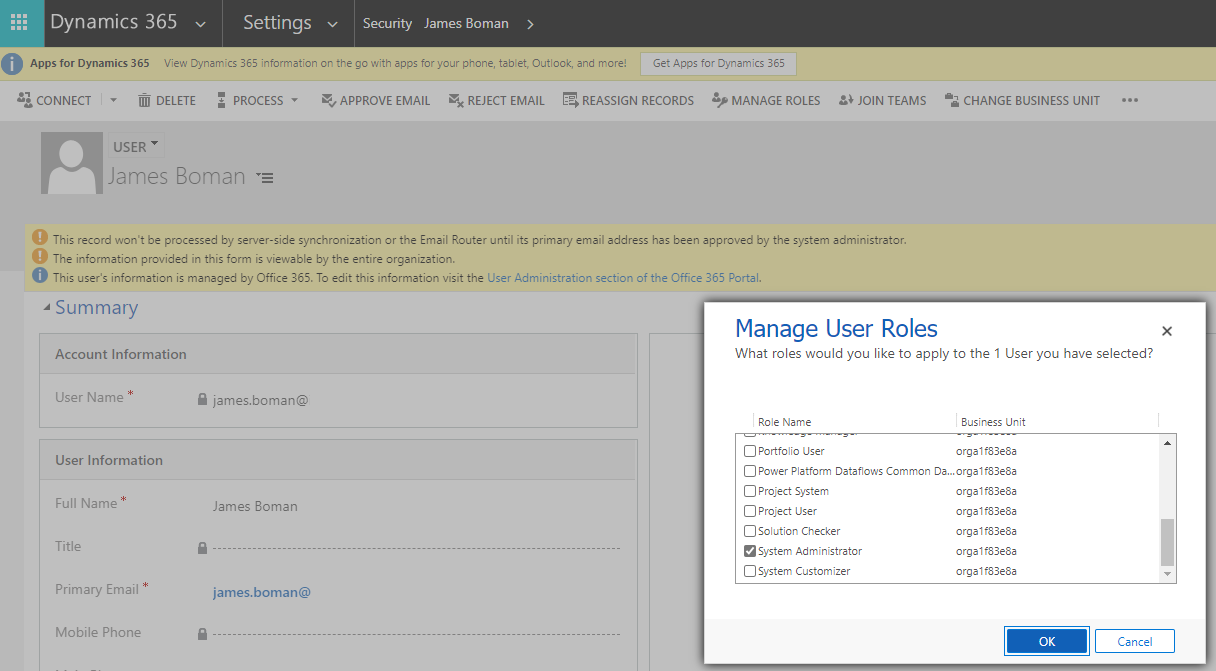
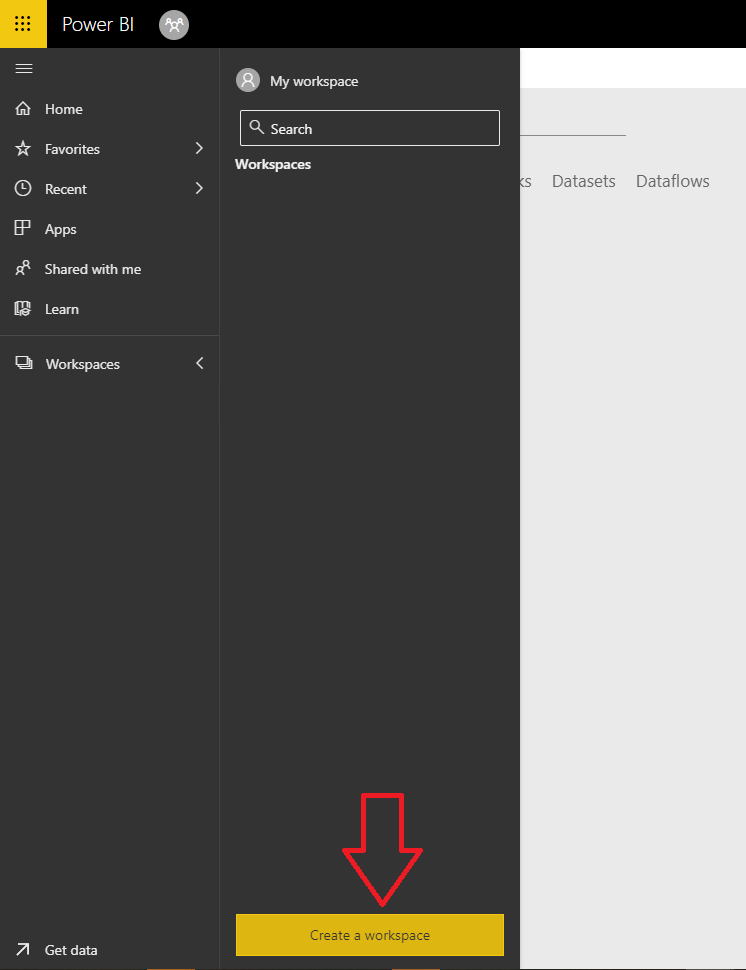
- Log into https://app.powerbi.com and verify you have the option to create a workspace
- Log into Teams Admin Portal and verify you have access to app setup policies
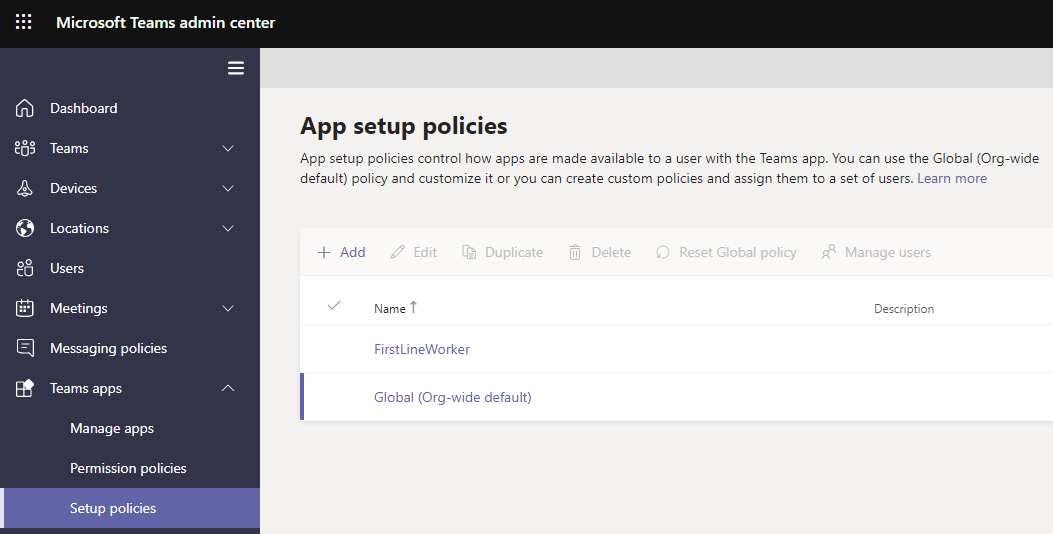 This will be needed to force pin the Sensei IQ app into the Teams Client for targeted end users.
If all those steps check out then you are ready to proceed with deployment.
Prepare for Solution Deployment
The following Solutions will be loaded into the Dynamics environment:
- Sensei Controls v1
- Sensei Project (Kaizen)
- Sensei Project Independent (Atsumeru)
The following activities need to be performed to prepare for Solution deployment:
- Connect to the following Power Automate connectors that exist in the target Power Platform Environment by navigating to https://make.powerapps.com select the target environment in the top-right, then in the left-nav select Dataverse -> Connections. Add "New connection" and Search in top right for each of the connections below to "Create":
- Grant permissions to the Deployment Service Principal
- Open your environment from the Power Platform admin center from https://admin.powerplatform.microsoft.com/environments by selecting the environment desired, then click "Settings" from the toolbar.
- Click on the "Users + permissions" drop-down arrow, then click "Application Users"
- Click "+ New app User", then select "+ Add an App" and the "Sensei IQ Deployment" app.
App ID: 5ea6c3b5-3532-4b65-b312-7cb3d0683b65
- Select the "Business unit" and "Create" the user.
- Select the "Sensei IQ Deployment" user from the list, click "Edit security roles" and add the "System Administator" role to this user.
- Save and Close
Dynamics Solution Deployment
The deployment of the Dynamics Solutions is performed by a Sensei Engineer using our automated tools.
Note
No action is needed from the client during the time that the Sensei Engineer is deploying the Power Apps solutions.
Add Sensei IQ Admin Role
We need to add Sensei IQ Admin Role to both the Deployment and the SenseiIQDeployment Accounts.
Navigate to PowerApps Portal, ensure you are in the correct environment (e.g CRM). Click on Apps then 'Sensei.IQ' application.
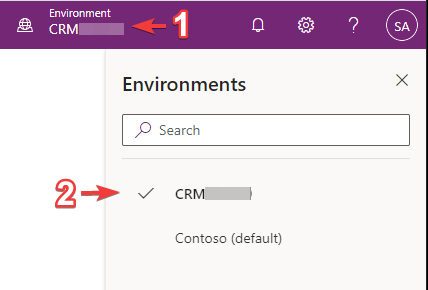

When loaded, select 'Advanced Settings' under the top-right settings (cog icon) menu.

Select 'Security' under the 'System' heading.
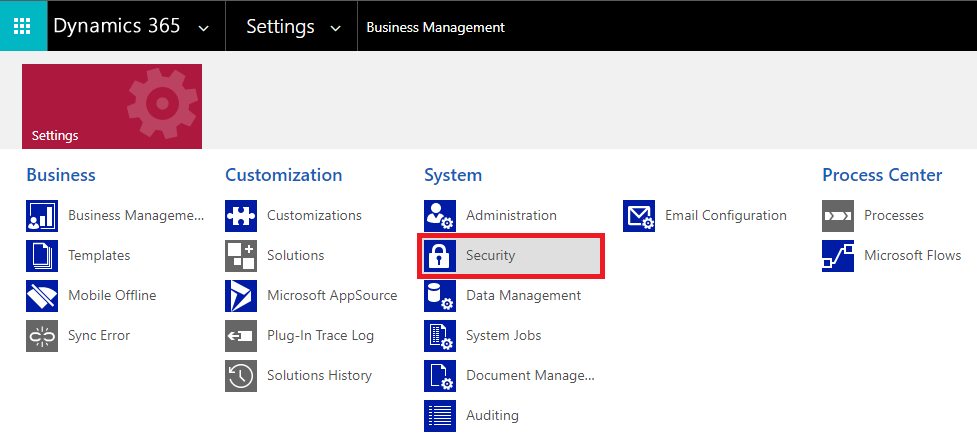
Select 'Users', and locate the Deployment Account.

Under the deployment account user screen, select 'Manage Roles' in the top ribbon.
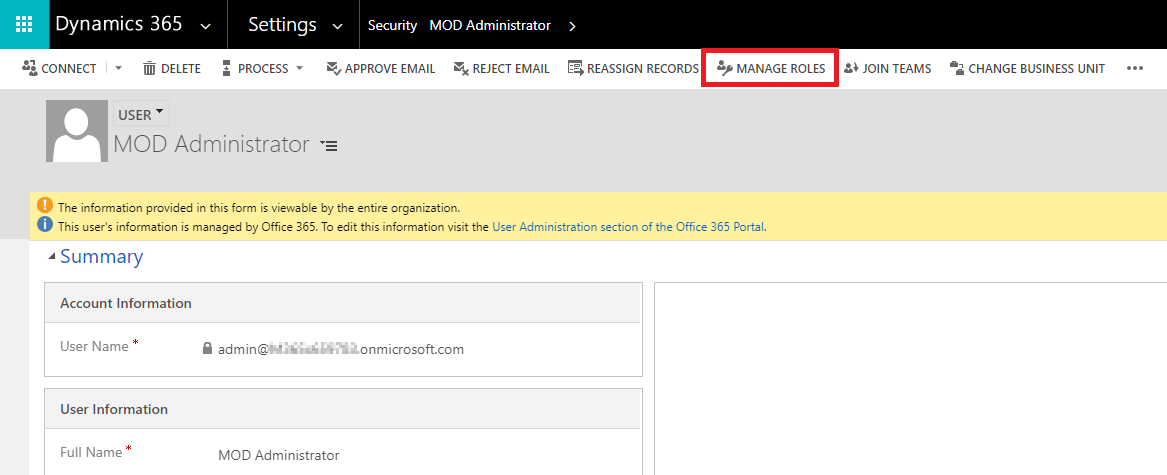
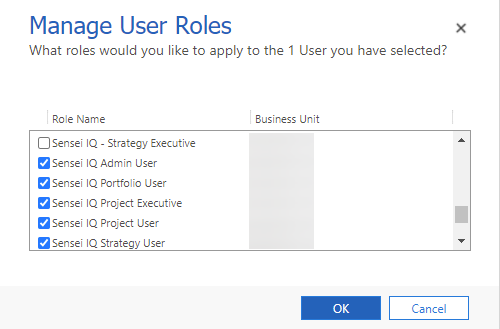
Locate the 'Sensei IQ Admin User' role and enable it for the selected user.
Press 'OK' to save.
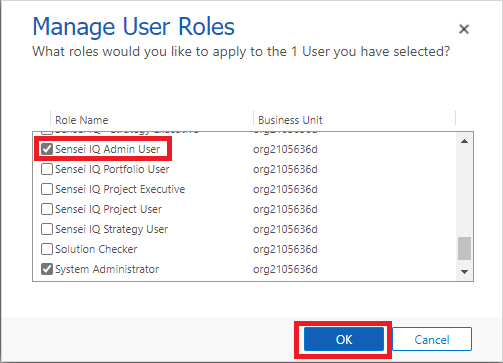
Repeat the above steps for the SenseiIQDeployment Account
Note
The above steps are used to allocate 'Sensei IQ _ User' role to a selected user. As shown below
Power BI Reports
Having demo data can produce more visually appealing reports to look at during review. If desired please follow the following steps. This is an automated process, and if you plan on loading demo data, please do not customize the environment before demo data has been loaded.
The following reports will be deployed:
- Work IQ
- Project IQ
- Portfolio IQ
- Portfolio IQ - Innovation
- Portfolio IQ - Intake
- Strategy IQ
- Resource IQ
- Project Summary Report (Paginated)
Method:
Log into Power BI for the customer environment and create two workspaces
One for the PROD reports where XXXXXXXXX.crmY.dynamics.com represents the org unique name (found in the URL of the environment)
Sensei IQ - XXXXXXXXXOne for the TEST reports used to stage upgrades to the reports before applying them to PROD. This will initially be an exact copy of the reports deployed to the above workspace.
Sensei IQ (TEST) - XXXXXXXXX
Sensei staff member will Download the report PBIT files.
Note
The remaining steps of this section will be performed by a Sensei staff member (Note: we recommend using Power BI Desktop version 2024 August for the most consistent experience).
- For each file perform the following steps.
- Open Template file in Power BI Desktop.
- Specify the "Environment URL" parameter in the following format:
https://XXXXXXXX.crmY.dynamics.com(for the Portfolio IQ Report, leave the Idea Effort Multiplier parameter set to 100) - Sign in if prompted using customer organizational account.
- Specify "Organizational" for privacy settings if prompted.
- Let data load.
- After data load go to File > Options and Settings > Options > Current File > Data Load and enable "Enable Parallel loading of tables".
- Save the file.
- Publish to the chosen workspace in the Power BI Service. When the report has successfully published a confirmation dialog will appear with a direct link to the report that you will need to embed the report in IQ.
Copy the Embed URL (Website or portal) for each report in the Power BI Service and configure each required setting in the Settings > System Configuration > Configuration Settings Area of Sensei IQ: (Note: in the initial setup these will be in the "Inactive Sensei Config Settings" list. It is recommended that you activate these first.)
- PowerBIReport_MyWork_IQA
- PowerBIReport_Insights_IQA (for Project IQ)
- PowerBIReport_PortfolioInsights_IQA
- PowerBIReport_InnovationInsights_IQA
- PowerBIReport_IntakeInsights_IQA
- PowerBIReport_StrategyInsights_IQA
- PowerBIReport_ResourceInsights_IQA
Setting up Scheduled Refresh for Sensei IQ - XXXXXXXXX Workspace
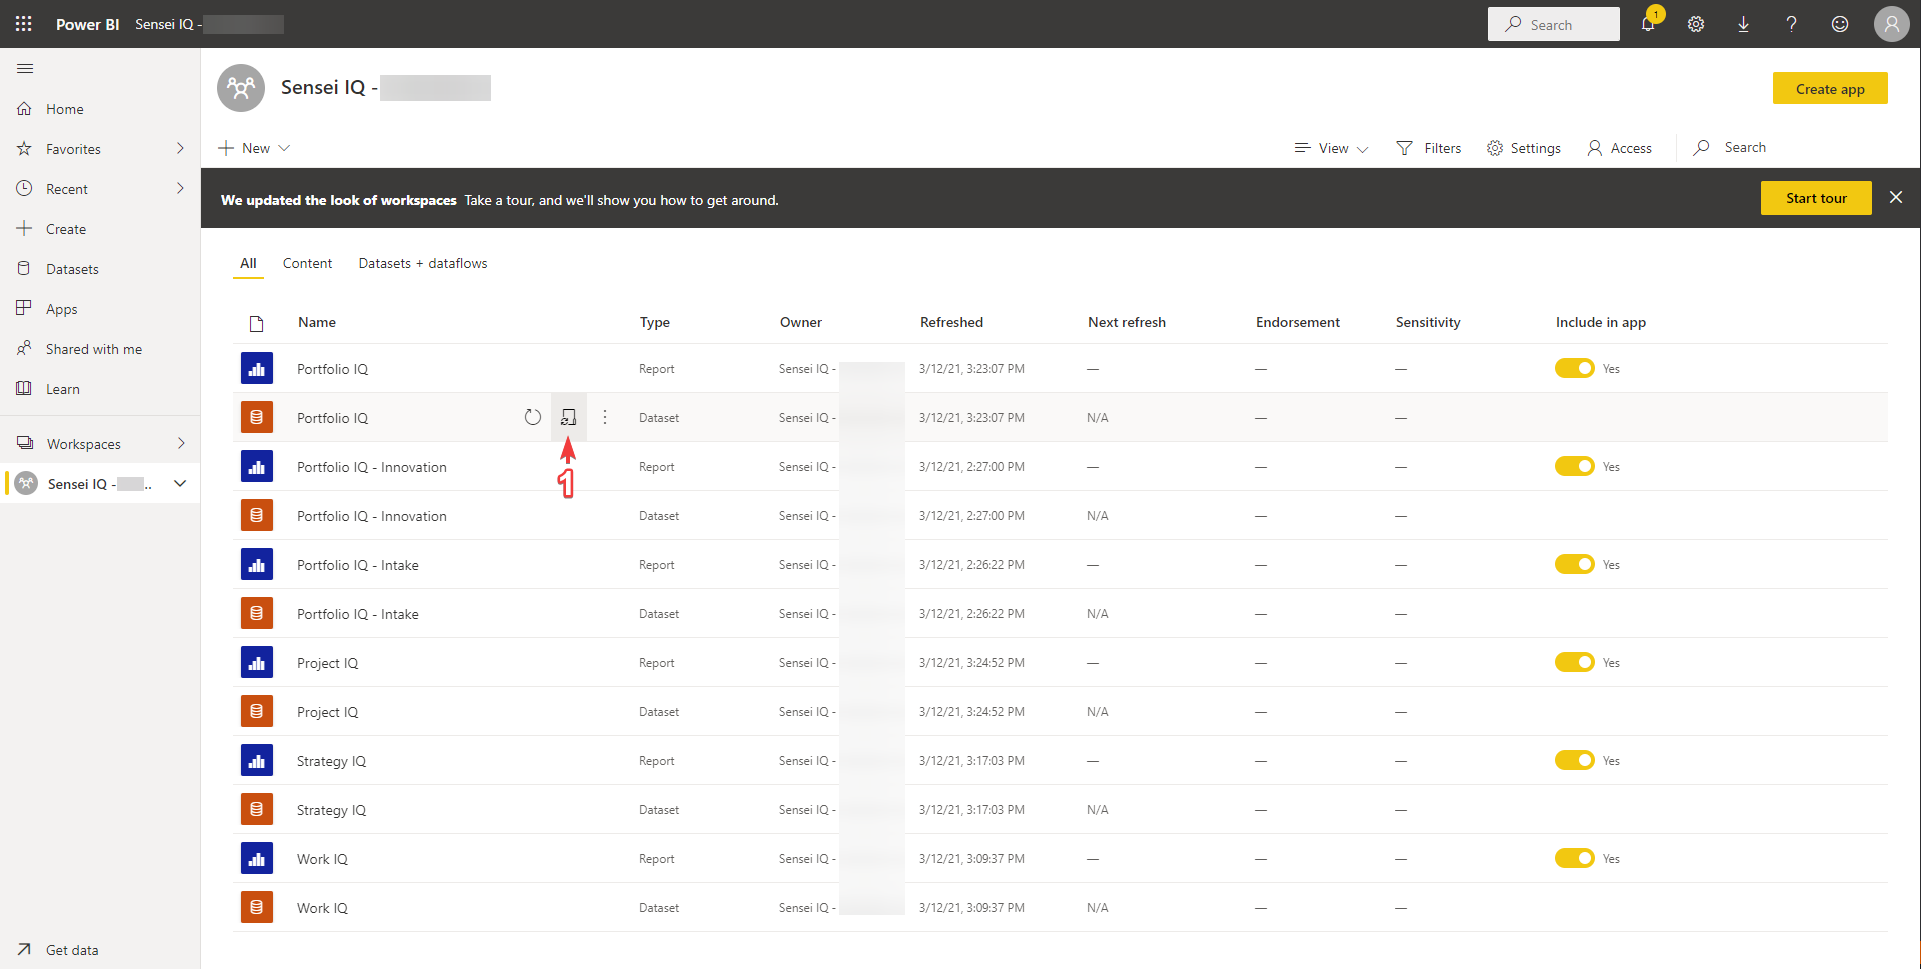
- Navigate to selected Workspace. Then hover over the location shown below, then select Schedule Refresh
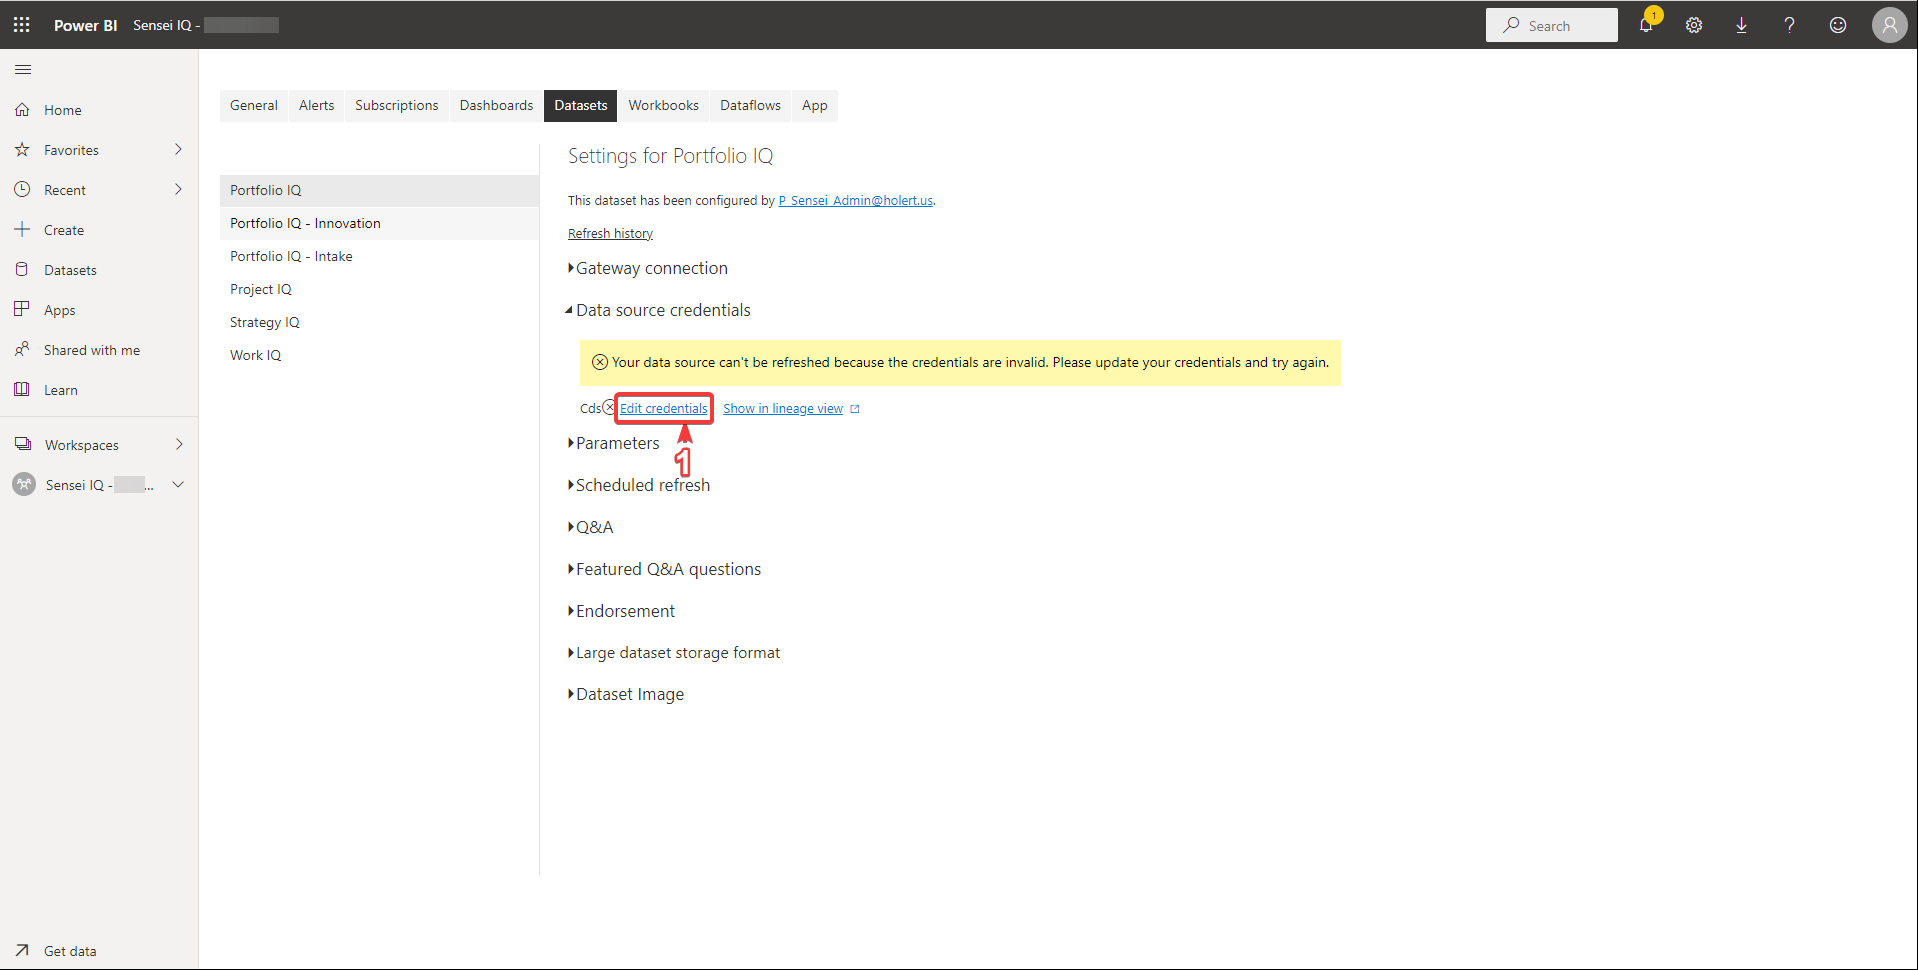
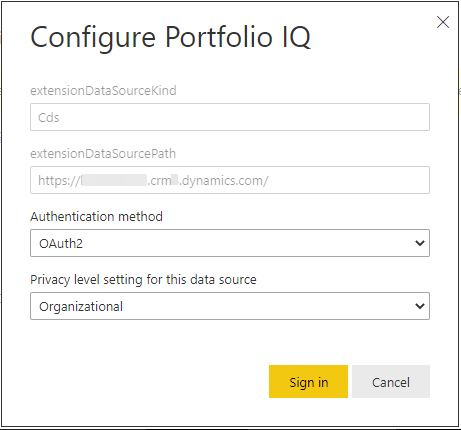
- We need to setup the credentials used for refresh, selecting Organizational as Privacy Level
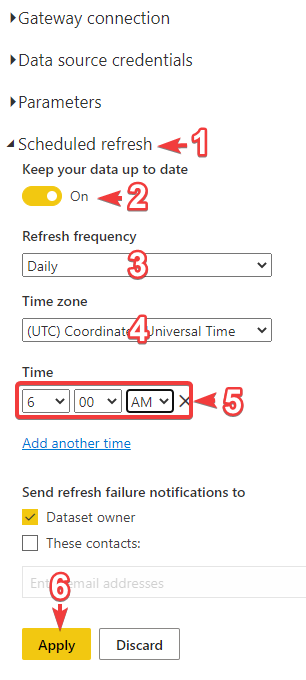
- We configure the Scheduled Refresh.
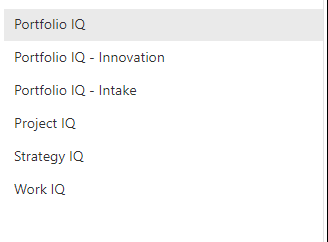
- Repeat step 3 for all Power BI reports by selecting them in left hand coloumn.
- Navigate to selected Workspace. Then hover over the location shown below, then select Schedule Refresh
Share the Reports. Since the security model for Power BI is separate to Sensei IQ, the end-users must be allowed access to the reports. This can be done either by adding all the target users to the Workspace or share each individual report with the target user groups.
Note
If it is desired to update the reports to the latest version AFTER the initial deployment, please find these steps here.
My Work and My Projects Canvas Apps
Method:
- Ensure that a Sensei Deployment Engineer has deployed the 2023 Q2 update (for "My Work") or the 2023 Q3 update (for "My Projects") to the Sensei IQ target environment
- Once the deployment has succeeded, navigate to the corresponding environment via web.powerapps.com
- Once there, you will be prompted with the following message "1 environment variable needs to be updated. See environment variable."
- Click the hyperlink "See environment Variable" and enter in the current environments URL. (Note: Ensure the string has "https://" as a prefix and "/" as a suffix, for example https://orgname.crm.dynamics.com/.
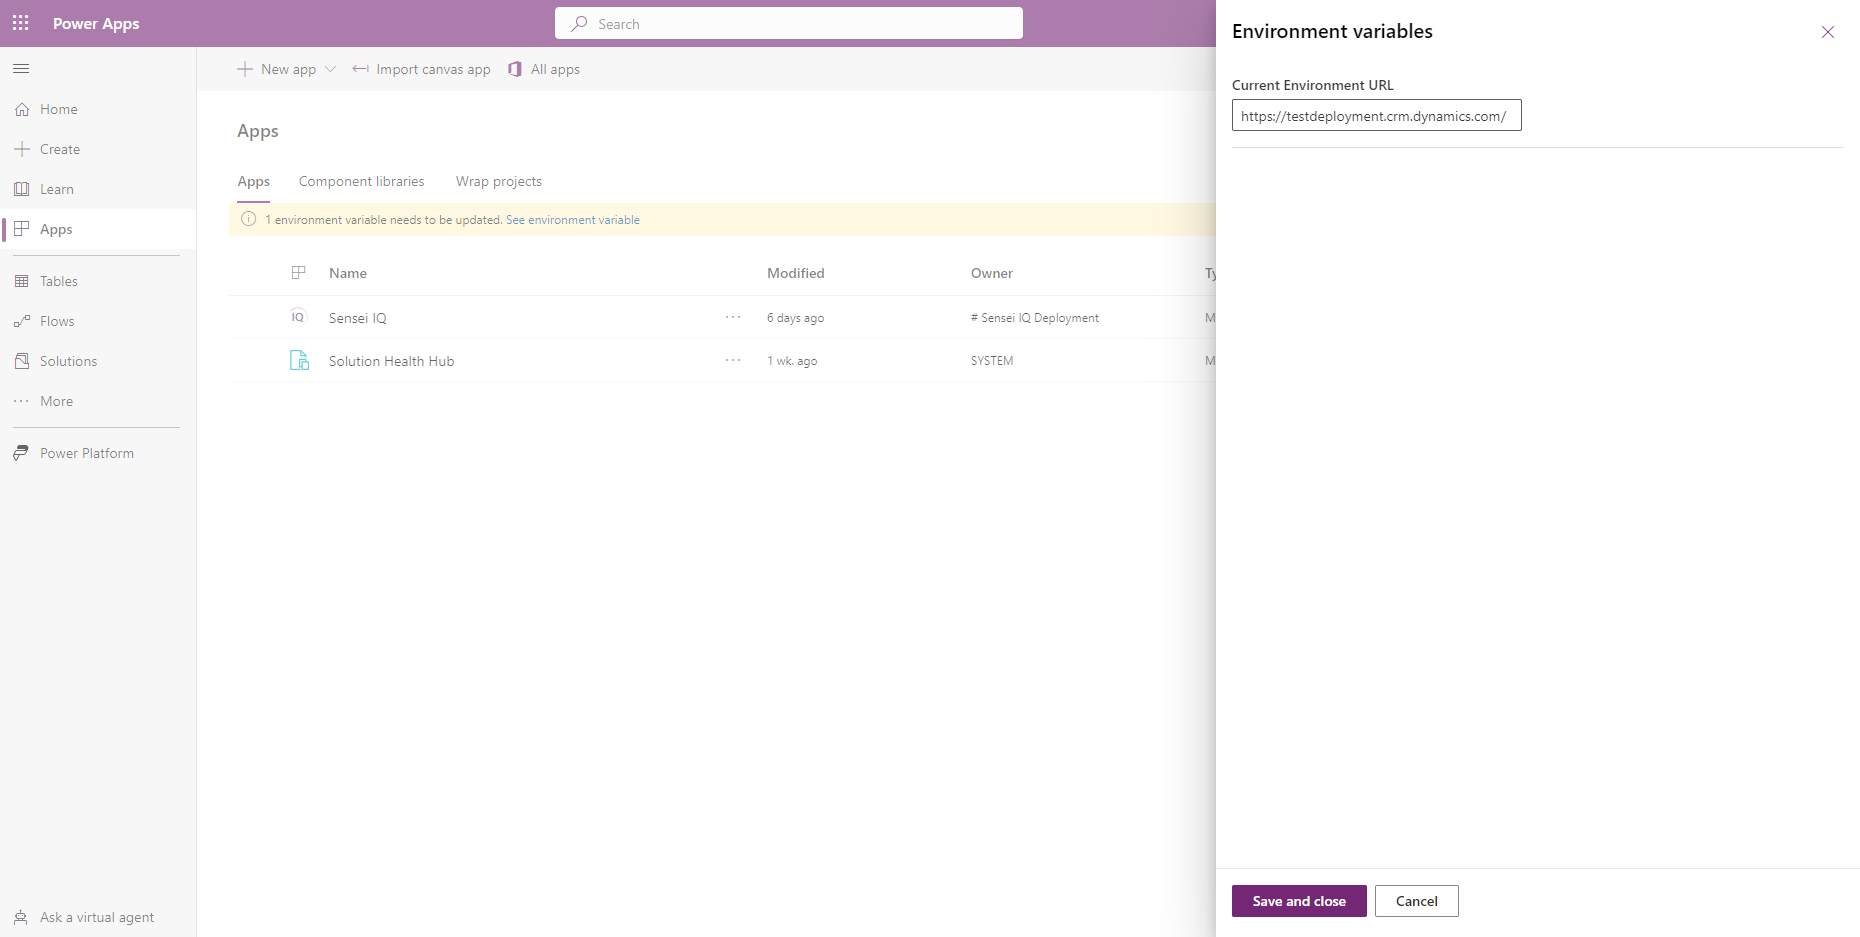
Select 'Save and close'
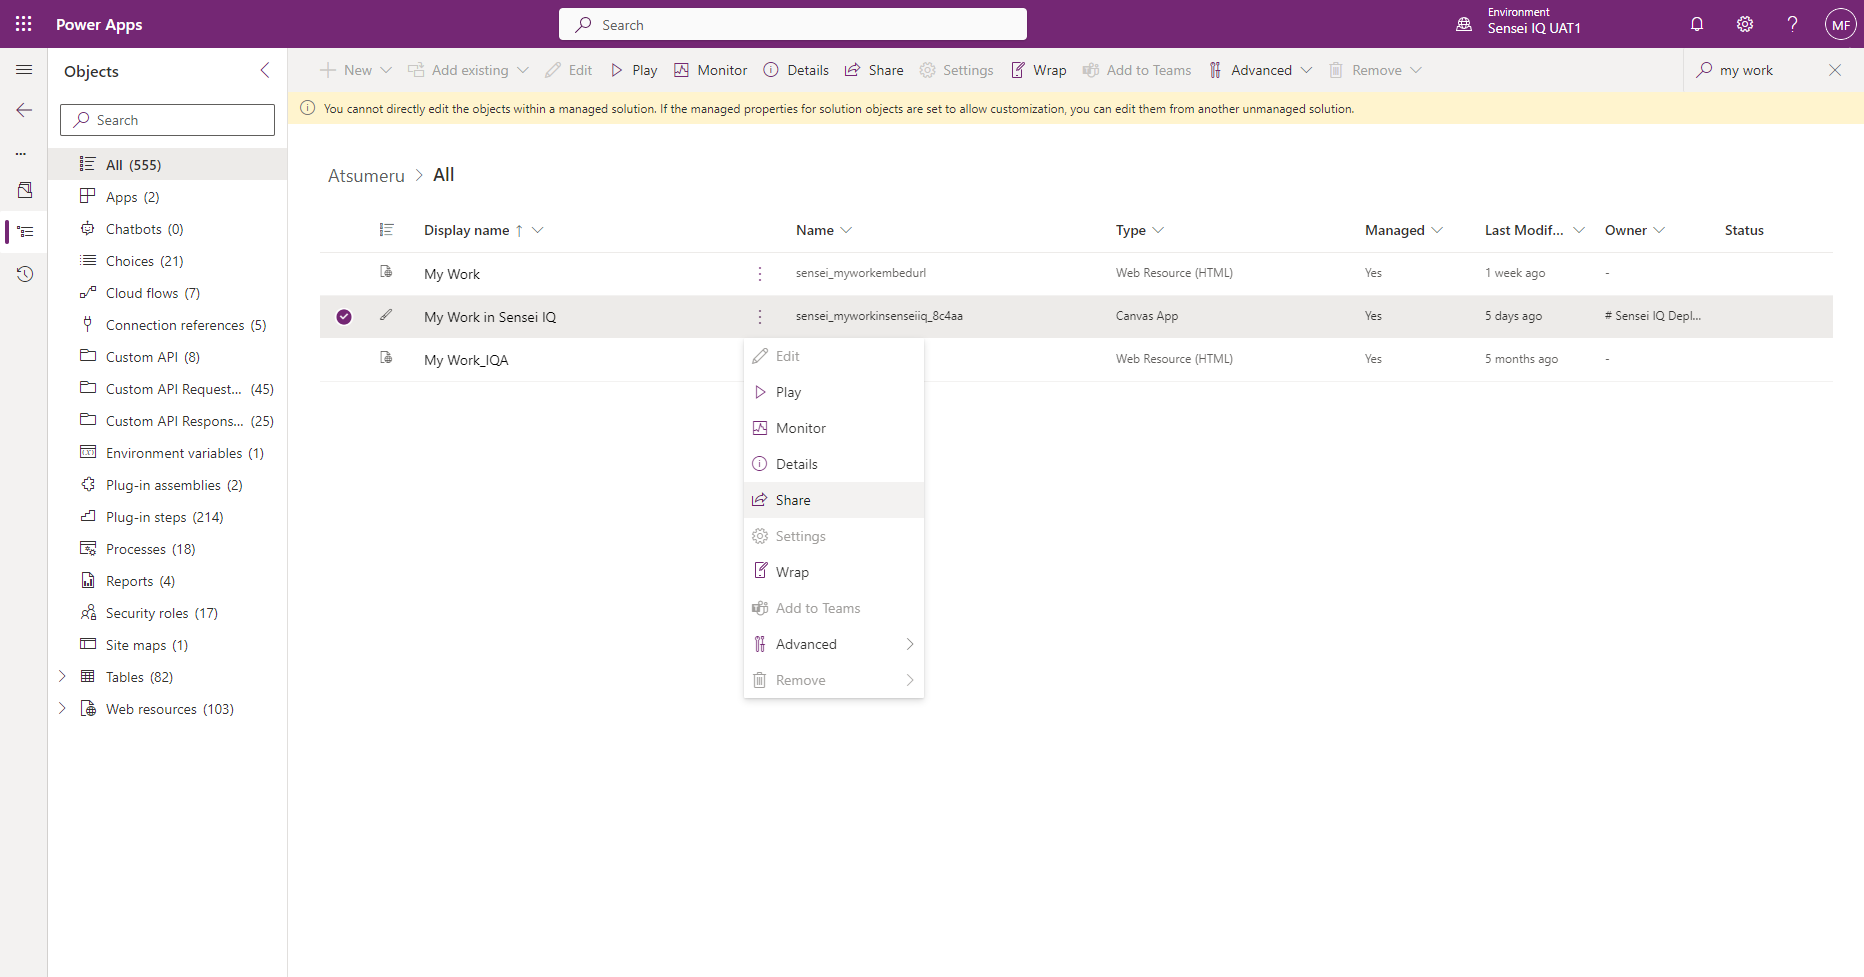
**If this is the first time the 'My Work' or 'My Projects' app is being deployed to this environment, you must ensure that the app gets shared with all basic users. To do this, first ensure that your organization has created a security group for the users of Sensei IQ. Navigate to Atsumeru solution from within the Solution Explorer. Next, find 'My Work in Sensei IQ' or 'My Projects in Sensei IQ' CanvasApp. Select the elipsis, and select Share
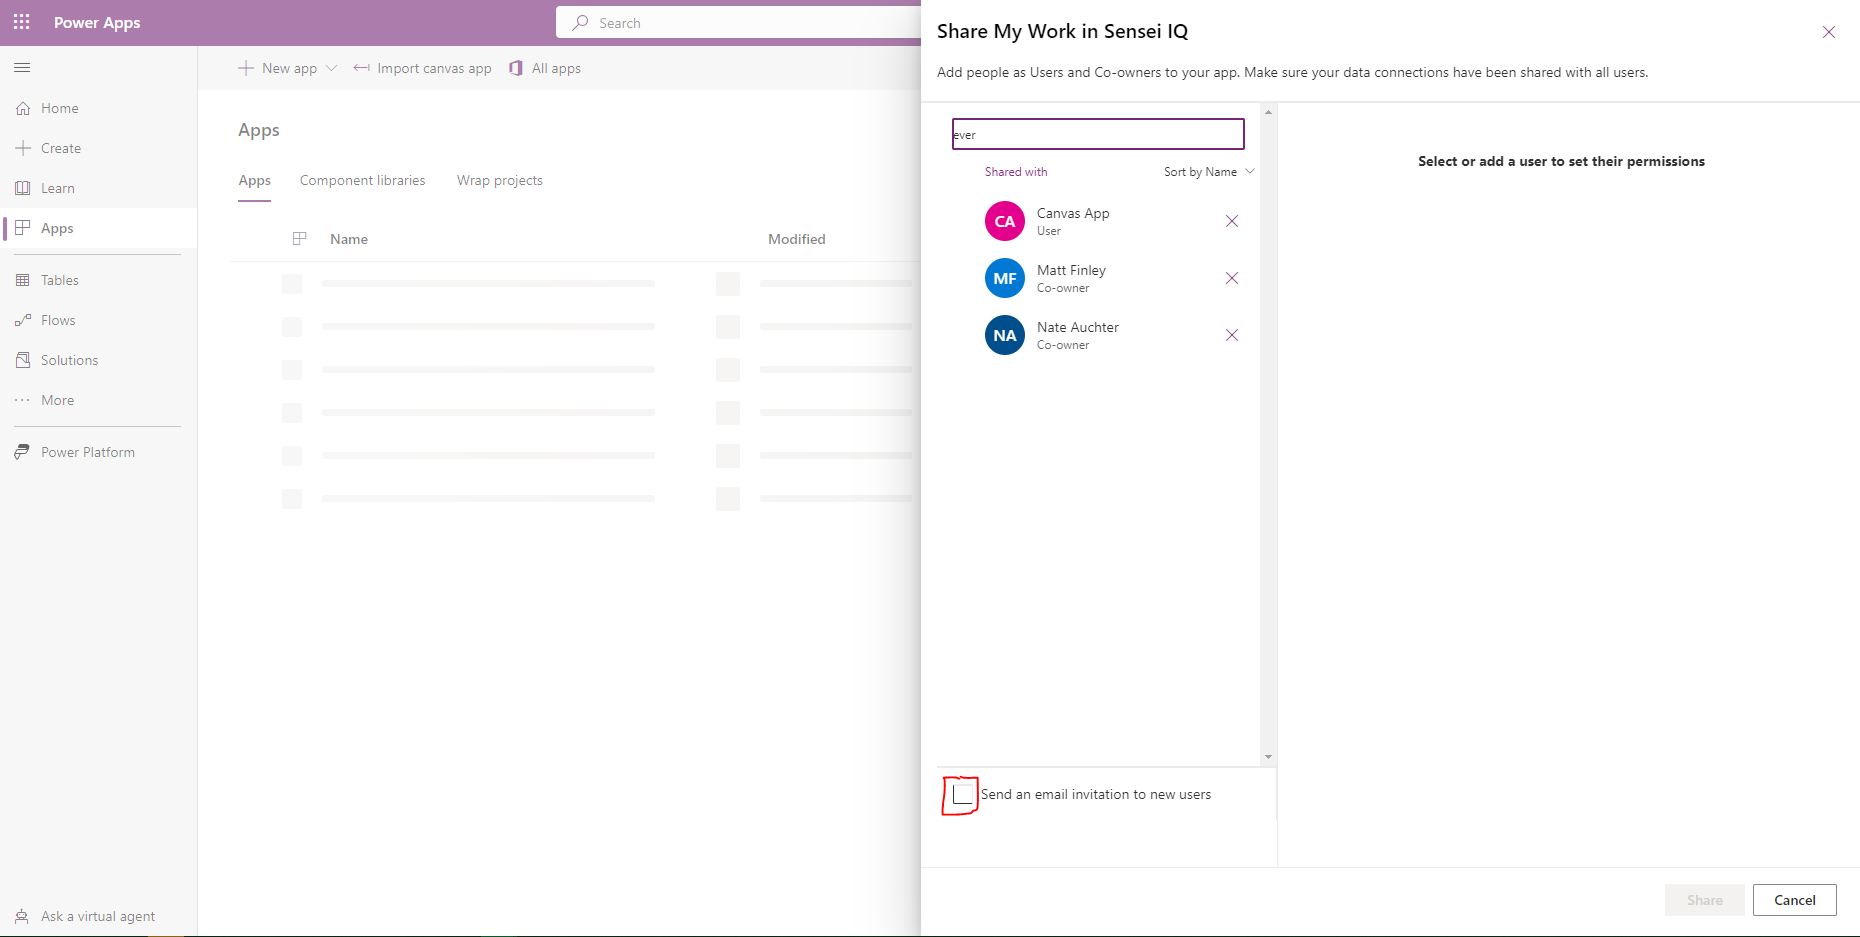
Next, begin typing the name of your security group that contains all Sensei IQ users and select that group.
You may want to uncheck 'Send an email invitation to new users'
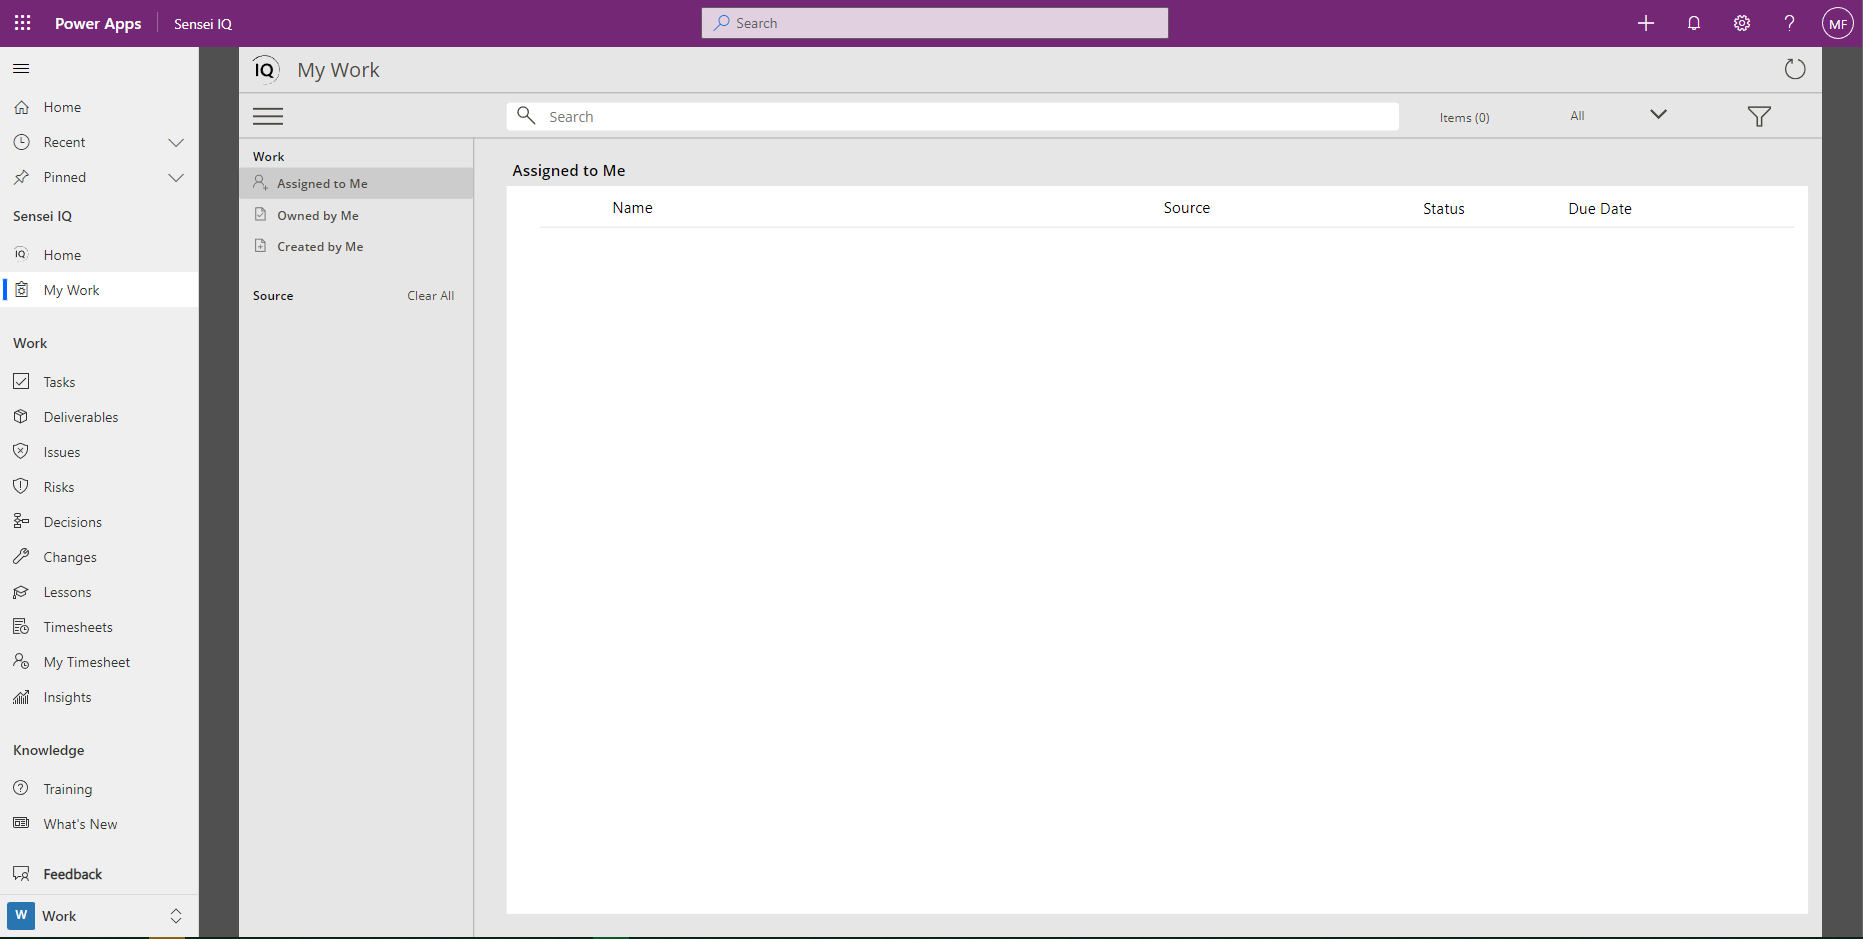
By default, users will now be able to access the CanvasApp in Sensei IQ under the 'My Work' site map component
Teams App
The IQ App will be added to the Teams environment.
Method:
- Downloaded the manifest from https://teams-iq.senseiiq.cloud
- In the Teams Client in the target environment, select Apps -> Manage your apps -> Upload an app to your org's app catalog
- Provide the manifest downloaded in the previous step
- Log into the M365 Teams Admin Portal
- Navigate to Teams Apps -> Setup Policies
- Click "Add" to add a new policy
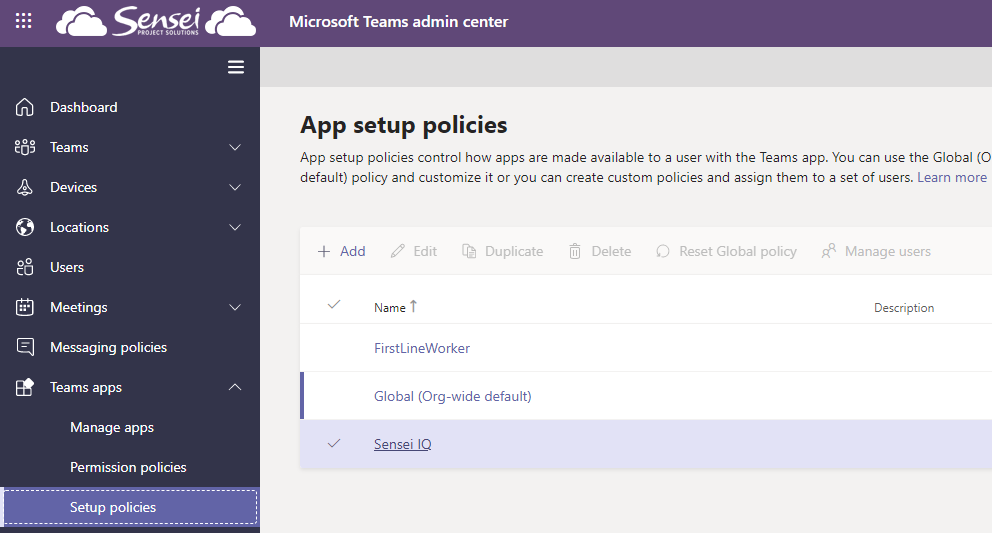
- Add the Sensei IQ App to the list of Pinned Apps, name the policy and save it.
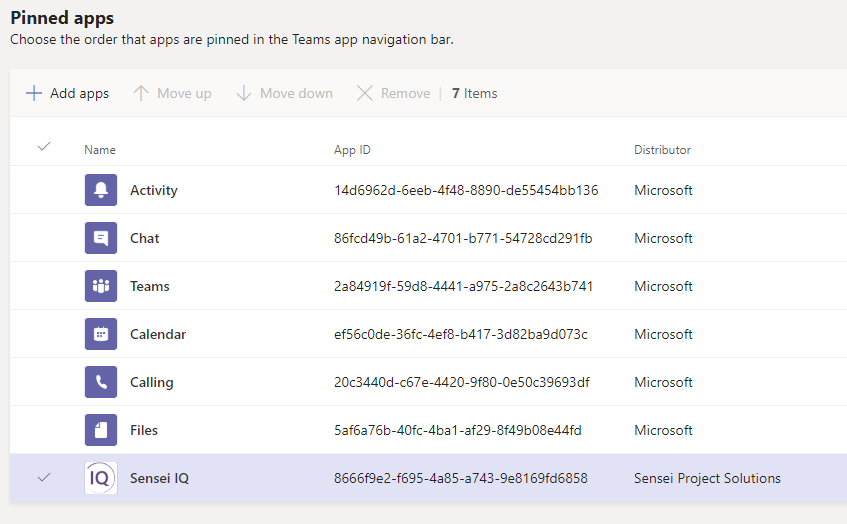
- From the "App setup policies" page, highlight the newly added policy and select Manage Users to add users to the policy who should receive the App pinned into their Microsoft Teams client.
Post-Deployment Tasks
After the solutions components are deployed, Sensei will then perform the following tasks.
Disable Auto Save Functionality
By default, Dynamics 365 Environments are provisioned with an auto save forms feature turned 'on'. When the feature is turned on, whenever a user opens a Form in Dynamics, the form will auto-save every 30 seconds while the user has that Form open. In addition, if the user chooses to navigate away from the Form that they had open, the Form will auto save just prior to navigating away.
Sensei recommends that this setting be Disabled so that the Save and Save and Close buttons have meaning.
Be aware that the setting is global to the Dynamics 365 Environment (so if you turn it off, it will be turned off across all Forms in Power Platform Environment).
The setting can be found in 'System Settings' in the Dynamics Advanced Settings portal, and is present on the 'General' tab.
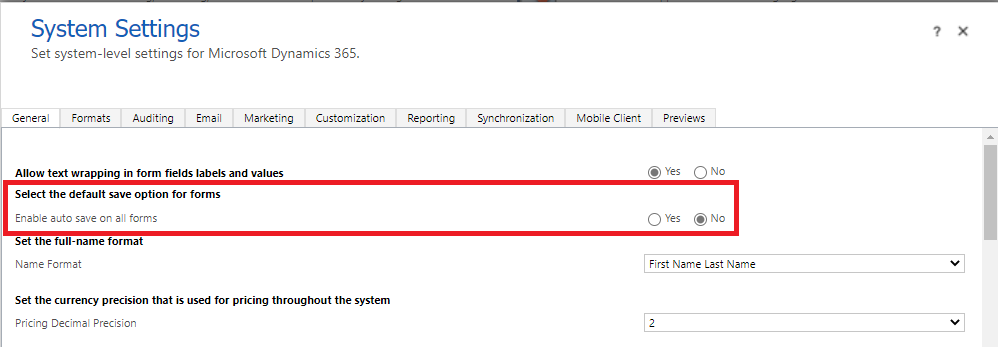
More information on this feature can be found here
Verify that Process Workflows have been enabled
Sometimes during the Solution import activities, Dynamics workflows are successfully created in the environment but for some reason fail to activate. In most circumstances, selecting to manually activate an inactive workflow will resolve the issue. Please note, these "Workflows" are Dynamics based workflows that predominantly operate in response to user action (Project Approval, Project Type Business Process Flows, etc...).
To check on the status of deployed workflows:
- Open https://make.powerapps.com
- Select the correct environment
- Click Solutions
- Click Atsumeru
- Filter on all the Process types in the type column
- Run your eyes over the Status column and verify that all of the Process Status' are set to 'On'
- If you locate any Processes where the status is set to Off, select the ellipsis (...) for that item, then press Turn On
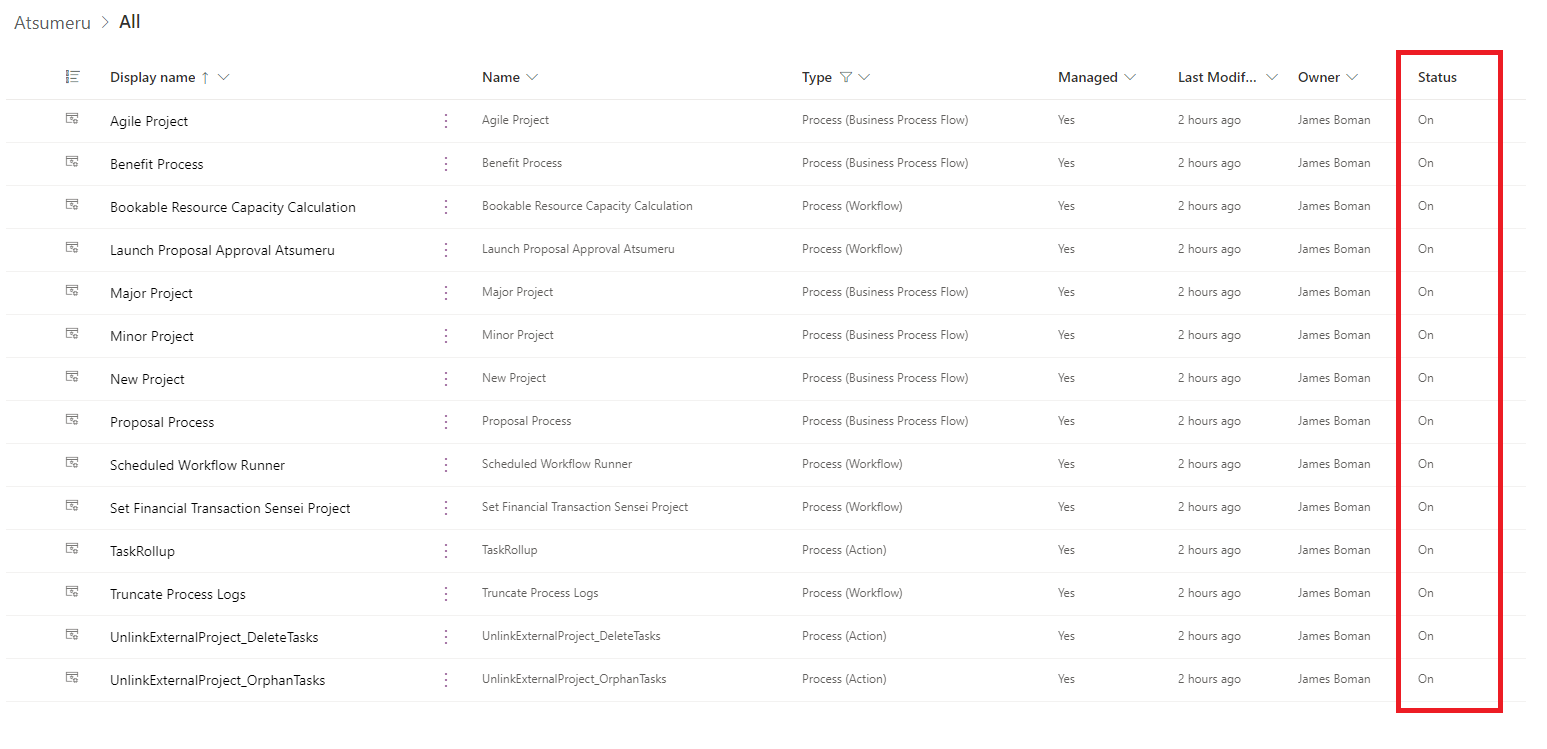
Configure Bulk Record Deletion Jobs for Workflows and System Jobs
Sensei IQ leverages the use of Workflows and Plugins in the environment. This generates logging activity in some Dataverse tables which over time will grow and have the potential slow down the environment. Creating these jobs will ensure that the log files are trimmed from time to time to avoid any quota or performance issues.
- Open https://make.powerapps.com
- From the cog menu, select Advanced Settings
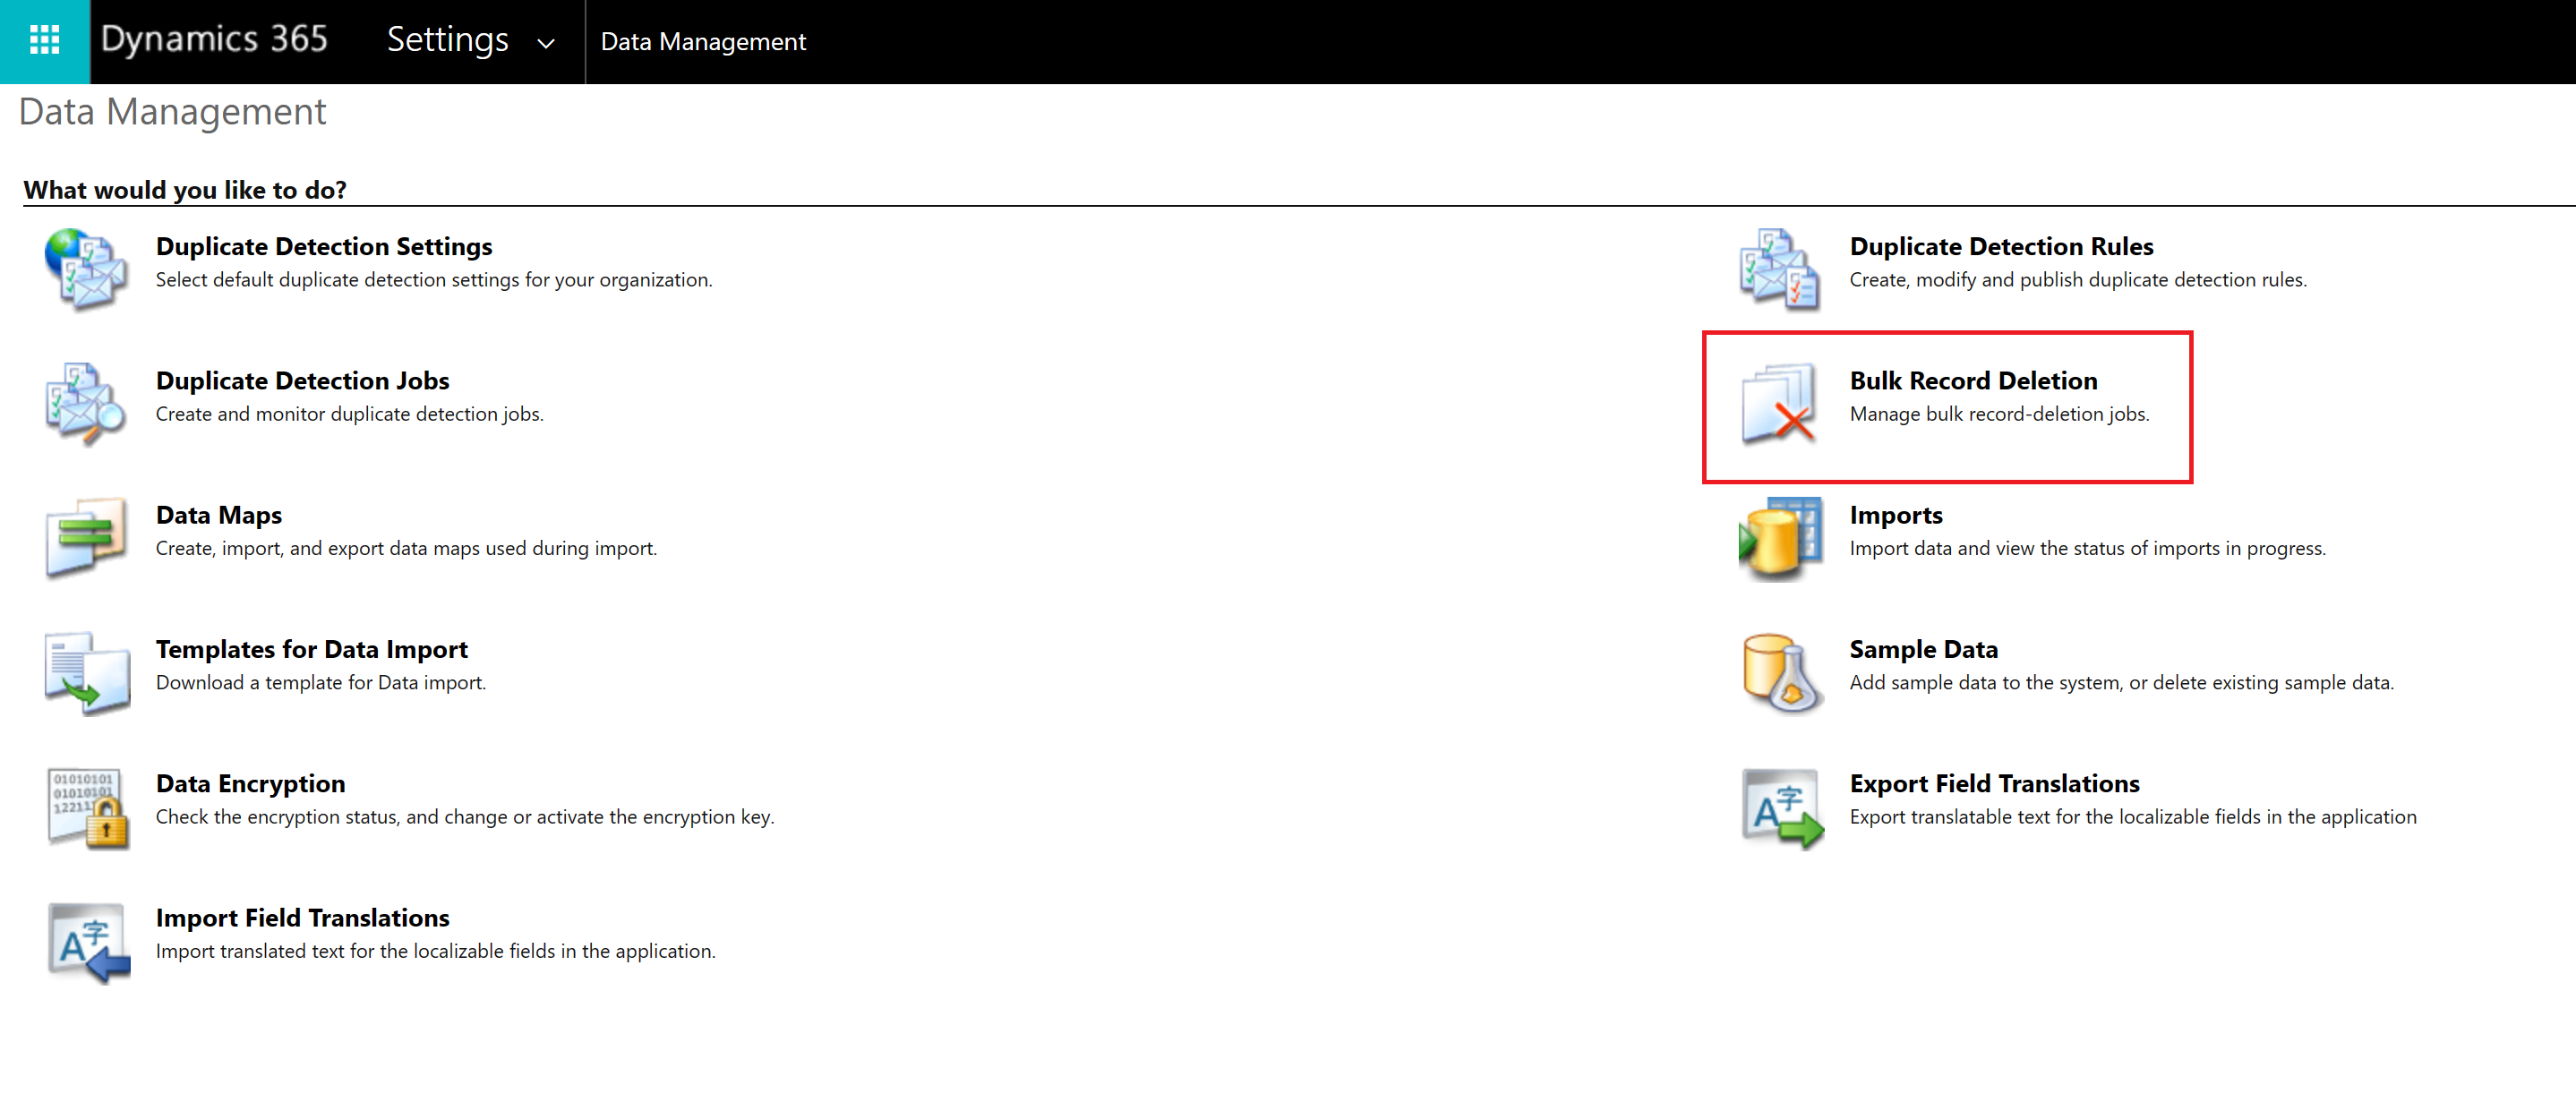
- Select Settings > Data Management
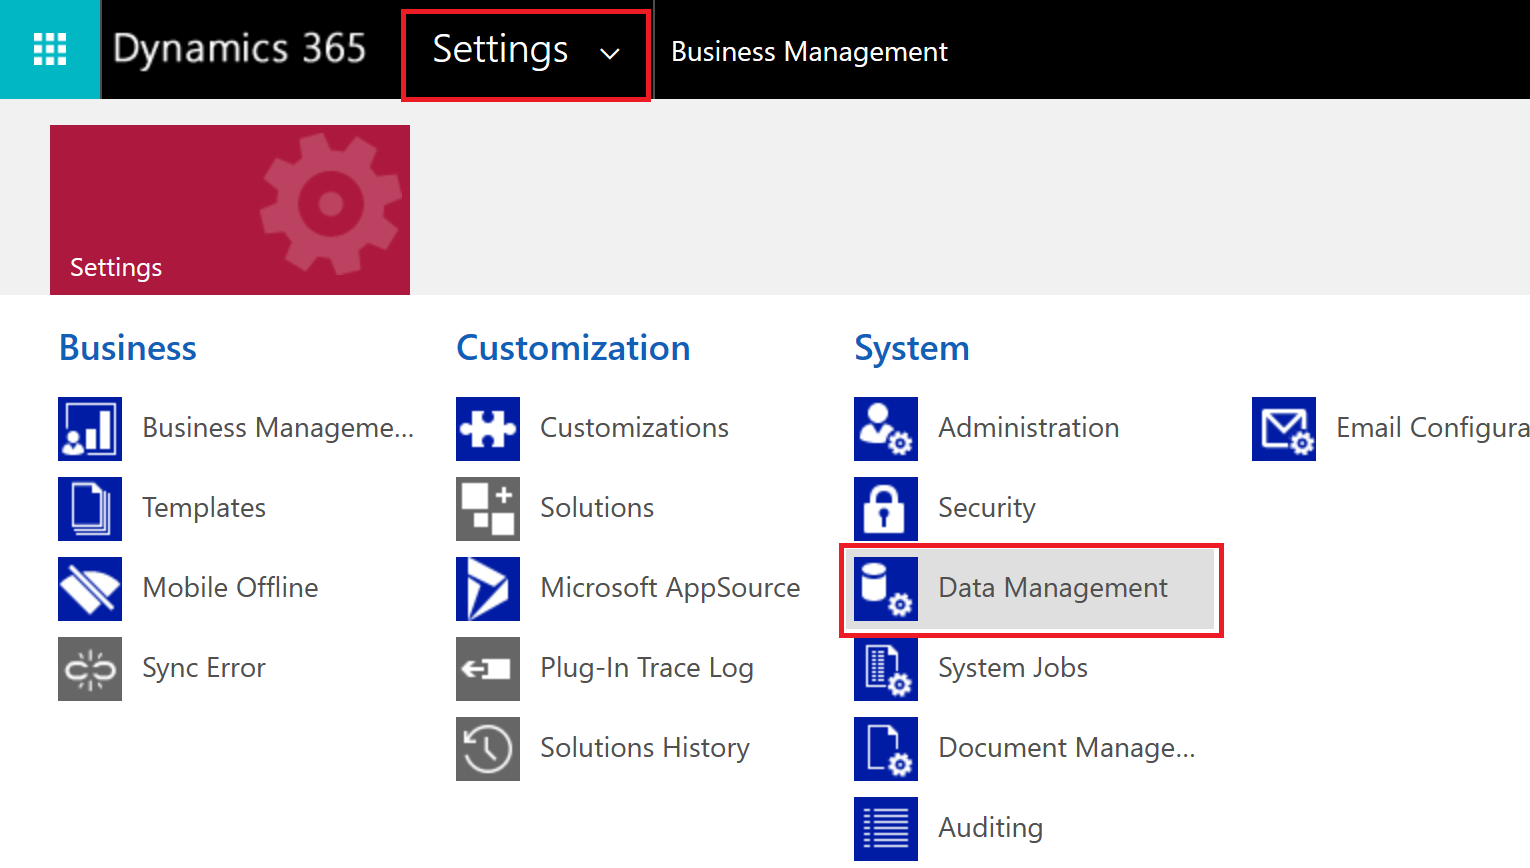
- Select Bulk Record Deletion
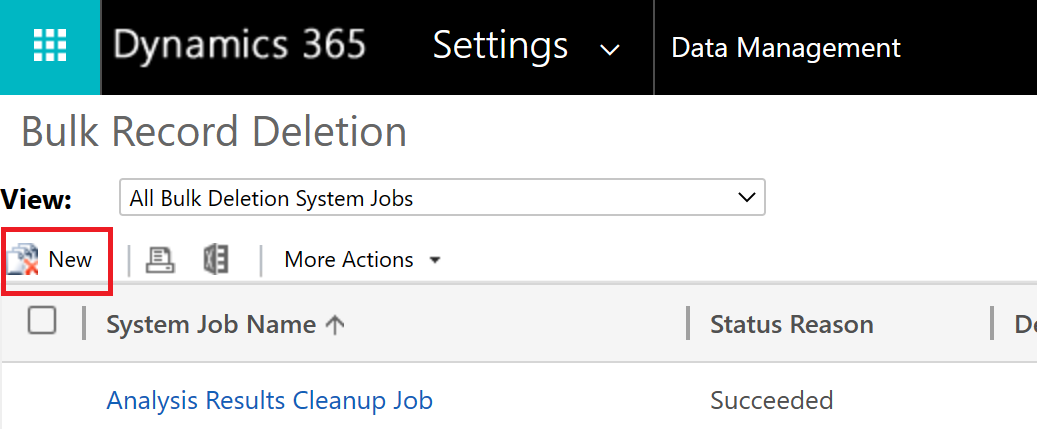
- Select New
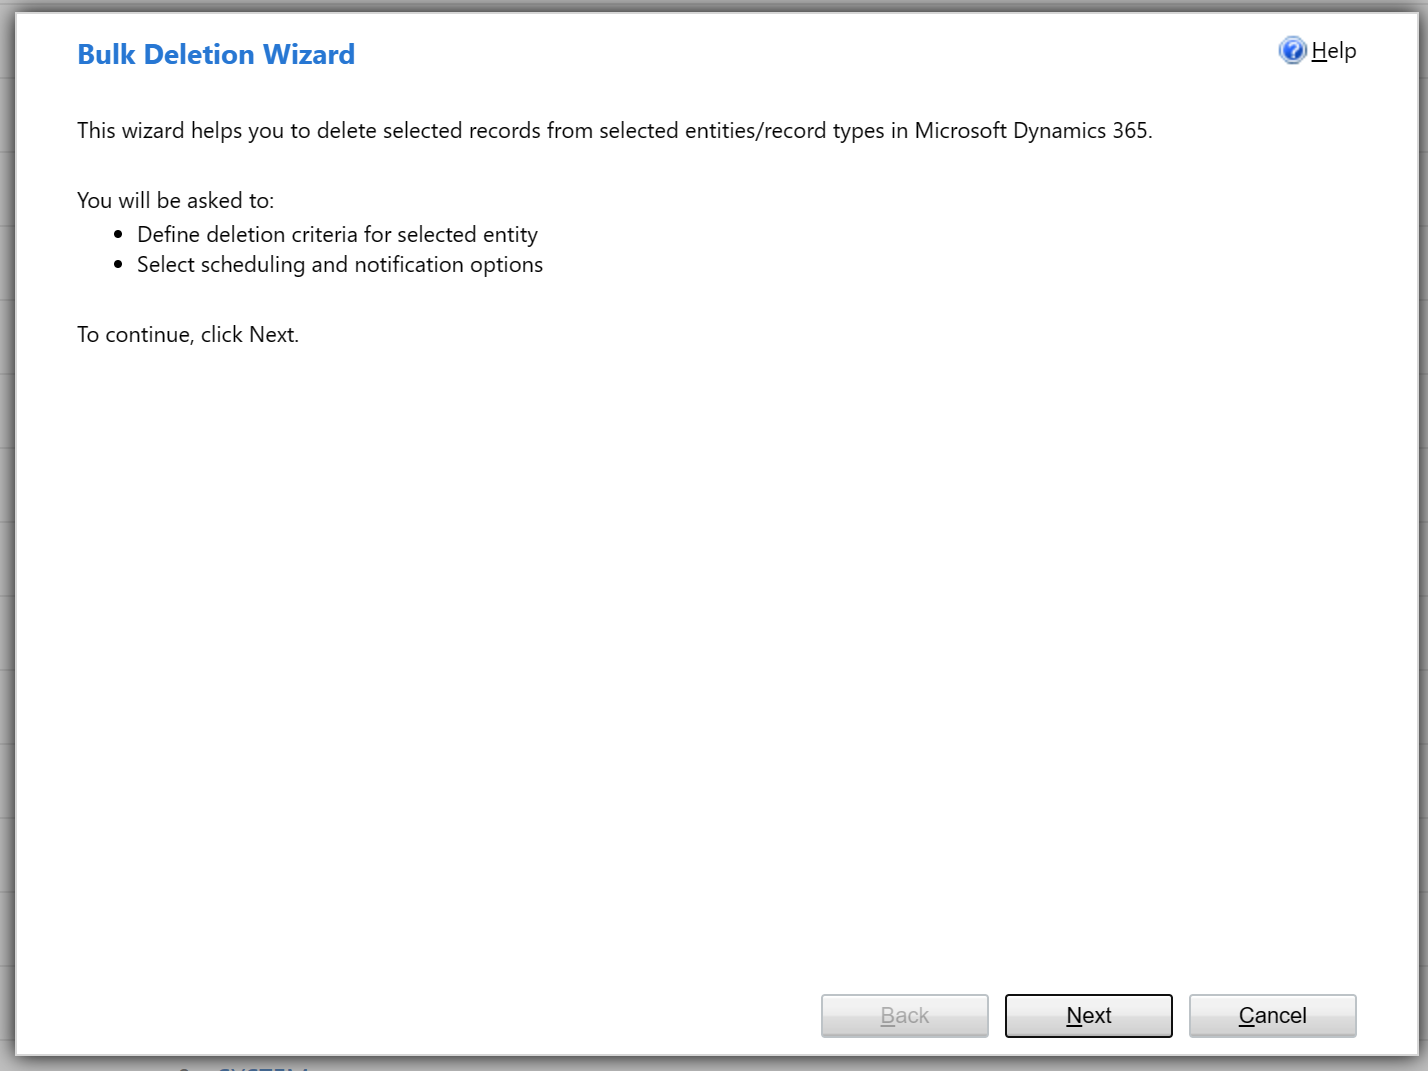
- Click Next
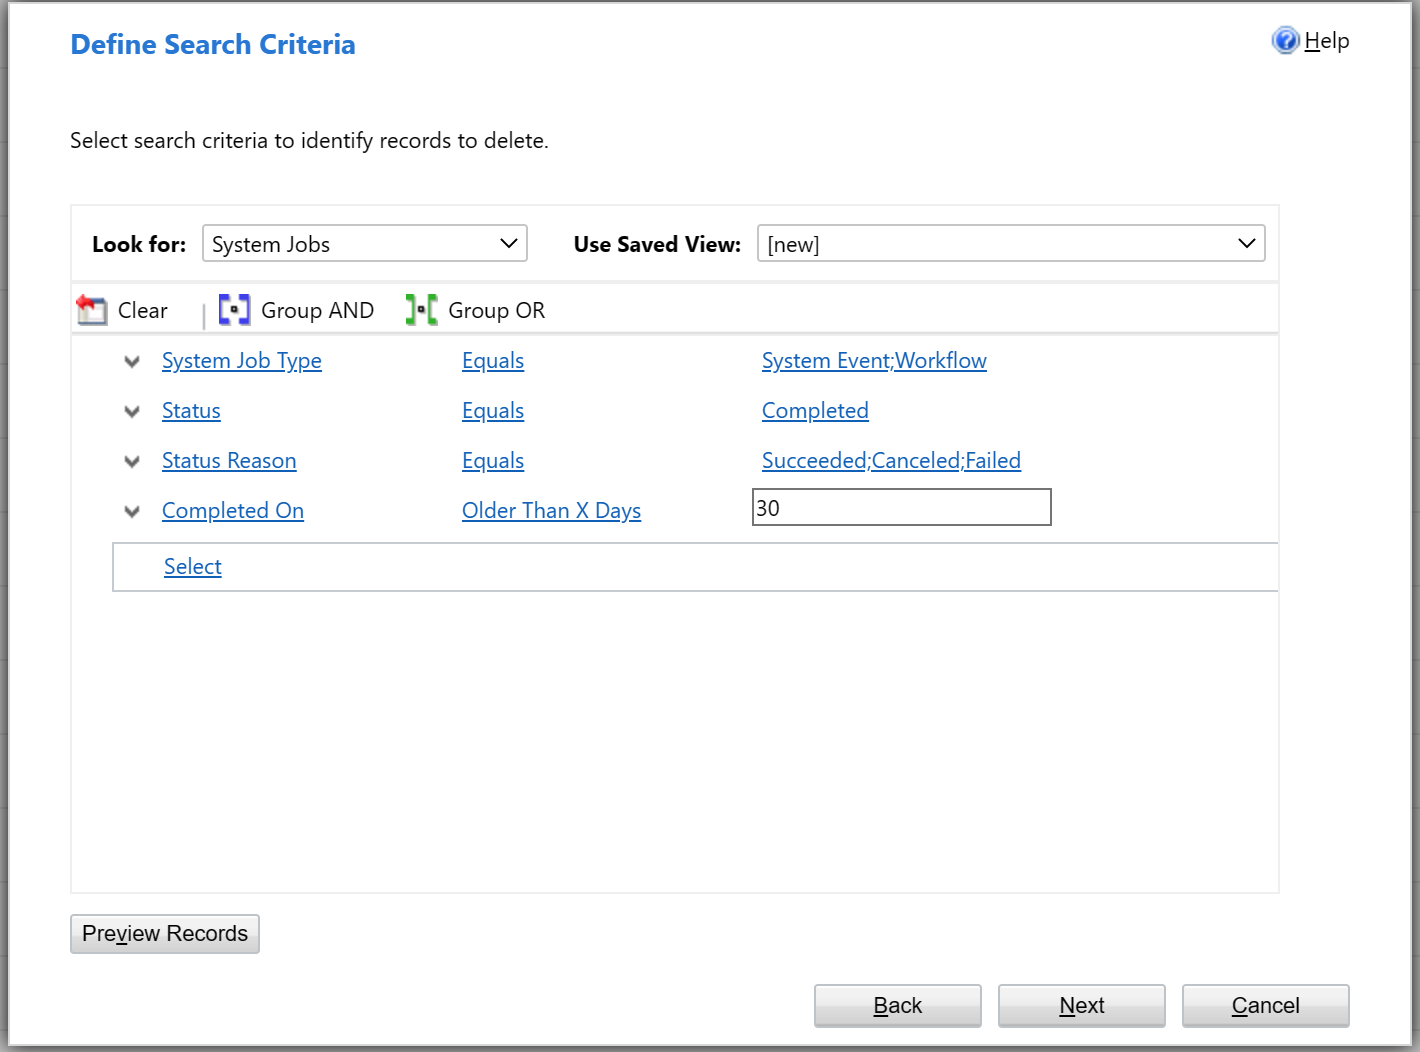
- In the Look for list, select System Jobs.
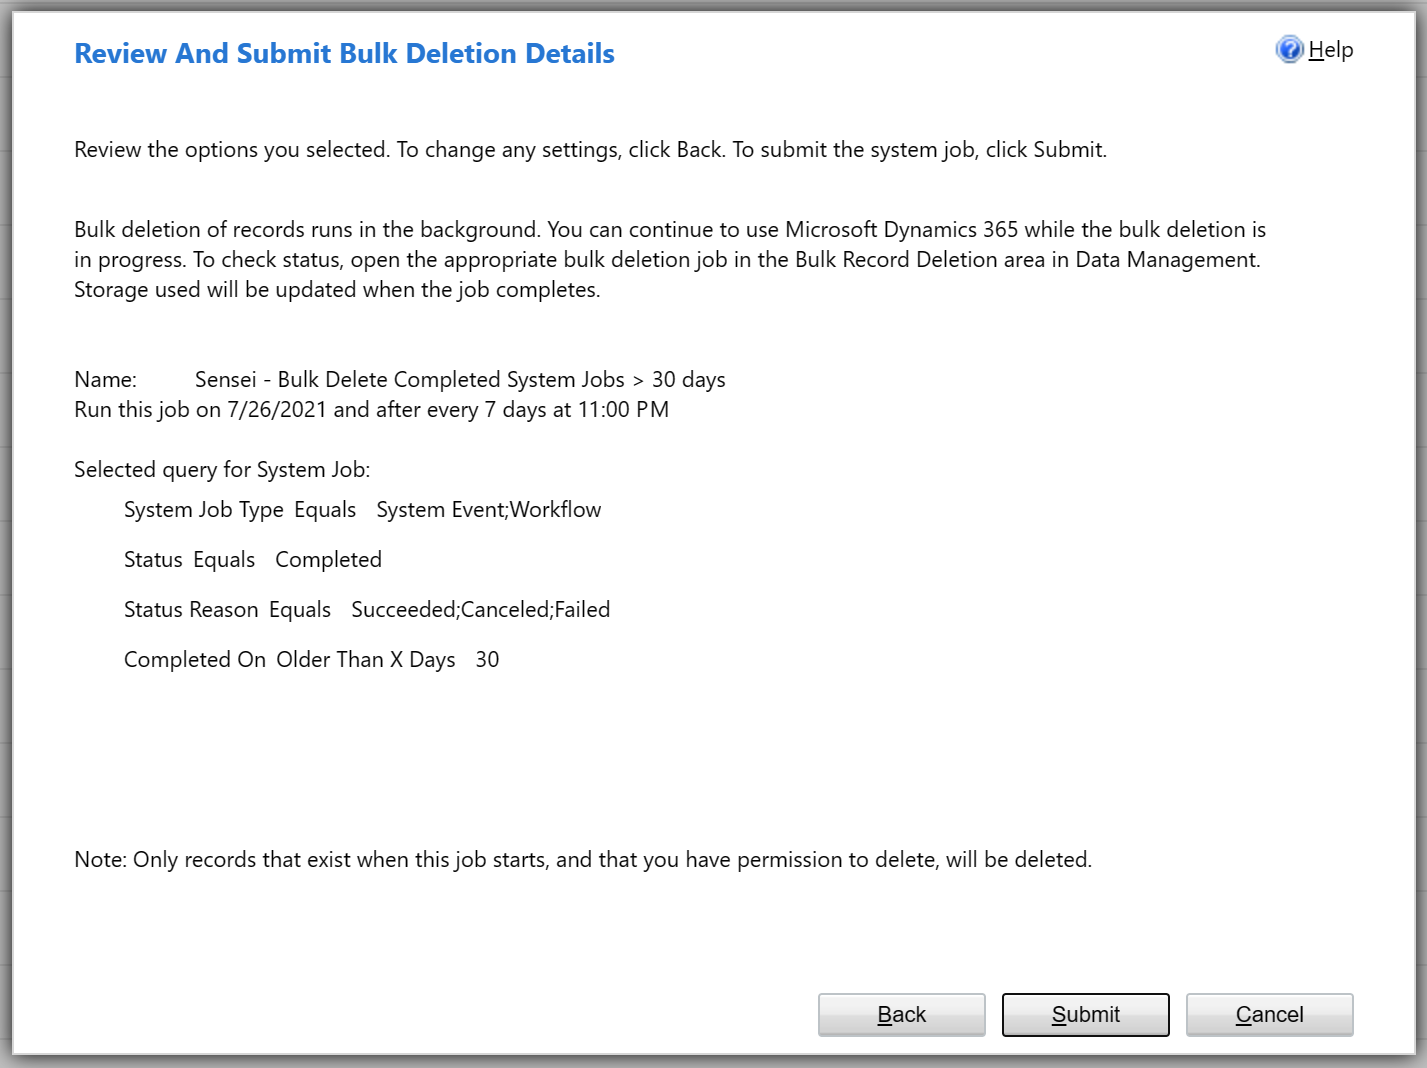
- In the search criteria area, add criteria similar to the following:
- System Job Type – Equals – System Event or Workflow
- Status - Equals - Completed
- Status Reason – Equals – Succeeded or Canceled or Failed
- Completed On - Older than X Days - 30
- Click Next
- In the Name text box, type a name for the bulk deletion job e.g. [Sensei - Bulk Delete Completed System Jobs > 30 days].
- Select a date and time for the job start time; preferably a time when users are not in customer engagement apps.
- Select the Run this job after every check box, and then in the days list, select the frequency you want the job to run. (once a day or every few days for example)
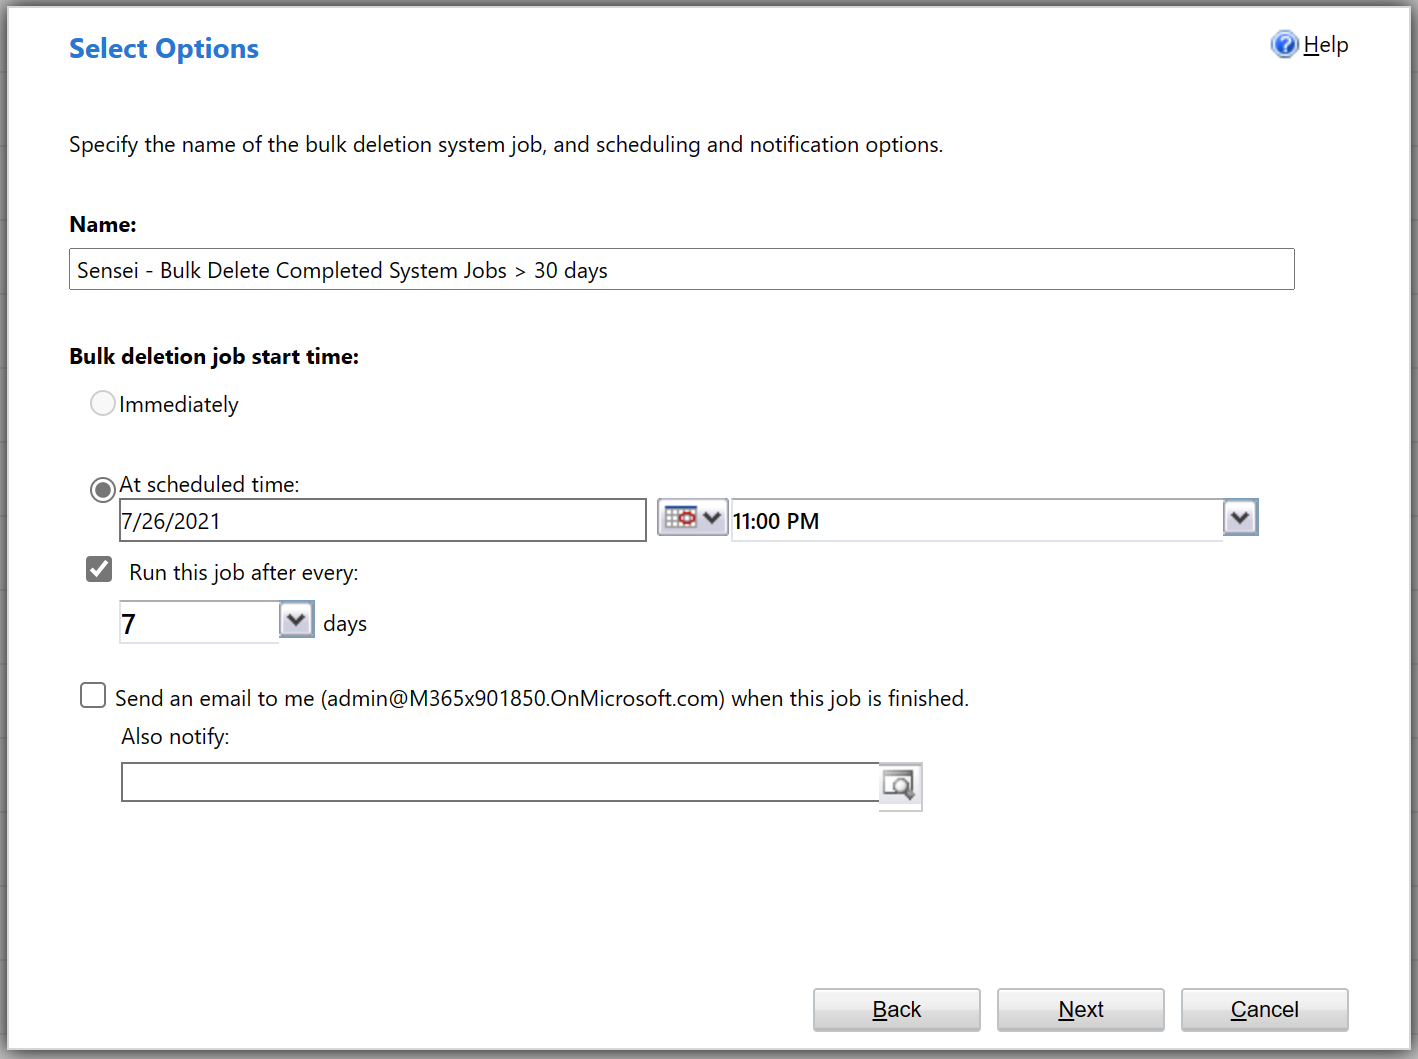
- Optional: If you want a notification e-mail sent, select the Send an email to me (email@domain.com) when this job is finished check box.
- Choose Next, review the bulk deletion job, and then choose Submit to create the recurring job.
Note
The process can take a while depending on how many items are in the table (especially on the first run). It deletes around 100 items every 2 seconds so if you have millions of records this can take a day or two. 10 million for example will take around 2 days to complete and the capacity statistics on the Admin portal of Power Apps also takes around 24 hours to reflect that deletion.
Add individual users into the IQ Security Roles
Navigate to the default environment security center.
Note
You can also manage security roles assigned to users in your environment through the PPAC - Power Platform Admin Center
Legacy Method
- Navigate to https://home.dynamics.com
- Select the Sensei IQ for Project App
- Select ⚙->Advanced Settings
- Select Settings->Security
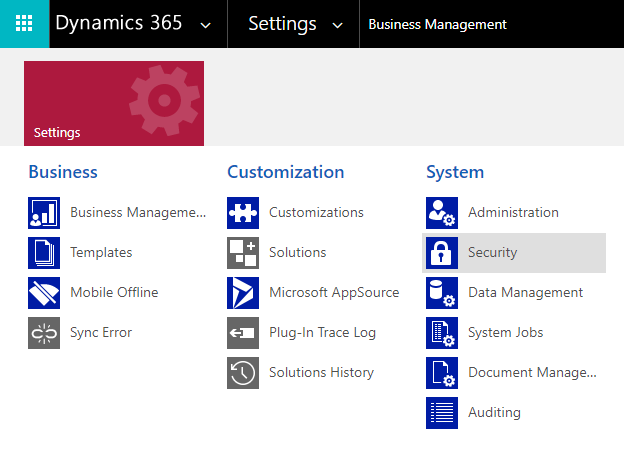
- Select Security->Users
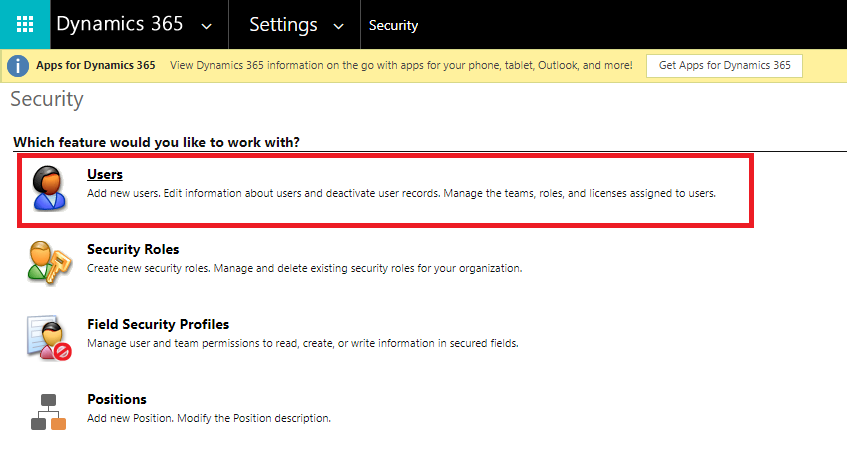
- Select a user to add to IQ
Note
If you do not see the target user in the user list, they may not yet have been added to the Dataverse Environment. Please see the Microsoft Documentation on ensuring users are added to the Dataverse. Additionally there are Power Automate Flow actions that can be used to expedite the addition of users to an environment.
- Click Manage Roles in the toolbar

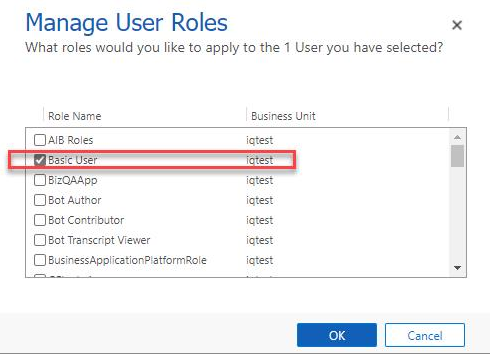
- Add the IQ role(s) relevant to the user. *Note: All Sensei IQ users must have the "Basic User" role assigned.
- Repeat for all relevant users.
Note
Please ensure that all users have been granted the 'Basic User' security role (formerly known as 'Common Data Service User') in addition to which Sensei IQ security roles that they require. This is required for end-users accessing non-default Power Platform environments.
(Optional) Set Date format
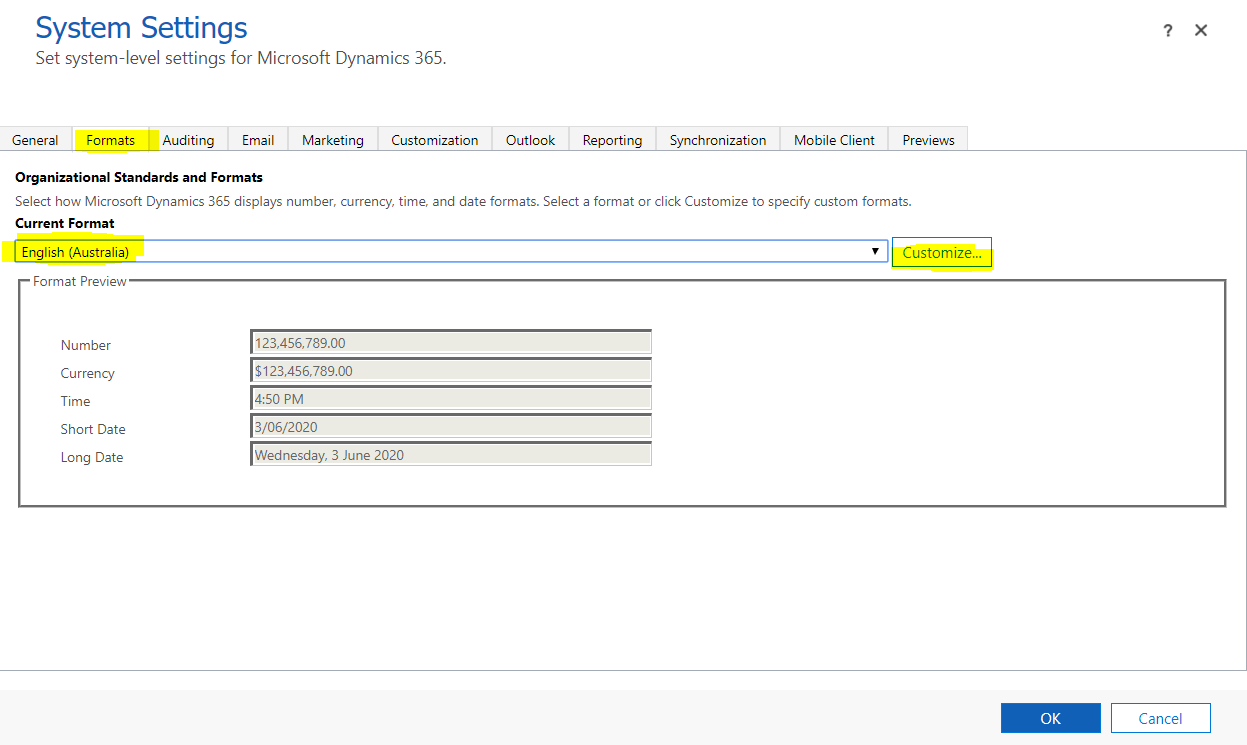
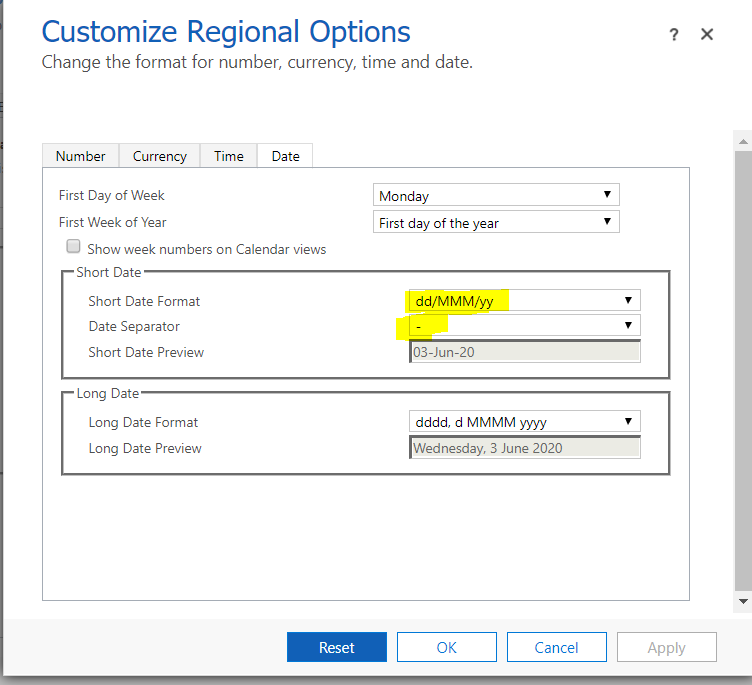
For organizations that wish to have alternate date/number formatting, an administrator can access the settings below.
Advanced Settings > Administration > System Settings
Ensure that the customer has not already customized this. It is an organizational level setting. Also there is a caveat that it does not impact already existing users who must change their own personalization settings in the app. These settings can be found in the classic Dynamics settings area:
(Optional) Configure AAD Sync of Users
It is possible to set up AAD sync of users from a Group into a Dynamics Team. That Team can then be granted Roles that give access to Sensei.IQ (which would therefore allow membership of those roles to be determined by an Microsoft 365 Group).
The steps to set this up are as follows:
- Create an M365 Group or identify an existing M365 Group that you wish to use for synchronization. Identify the Object Id of this Group (this is easily visible from Azure Active Directory)

- From the Dynamics Advanced settings portal, select Settings > Security
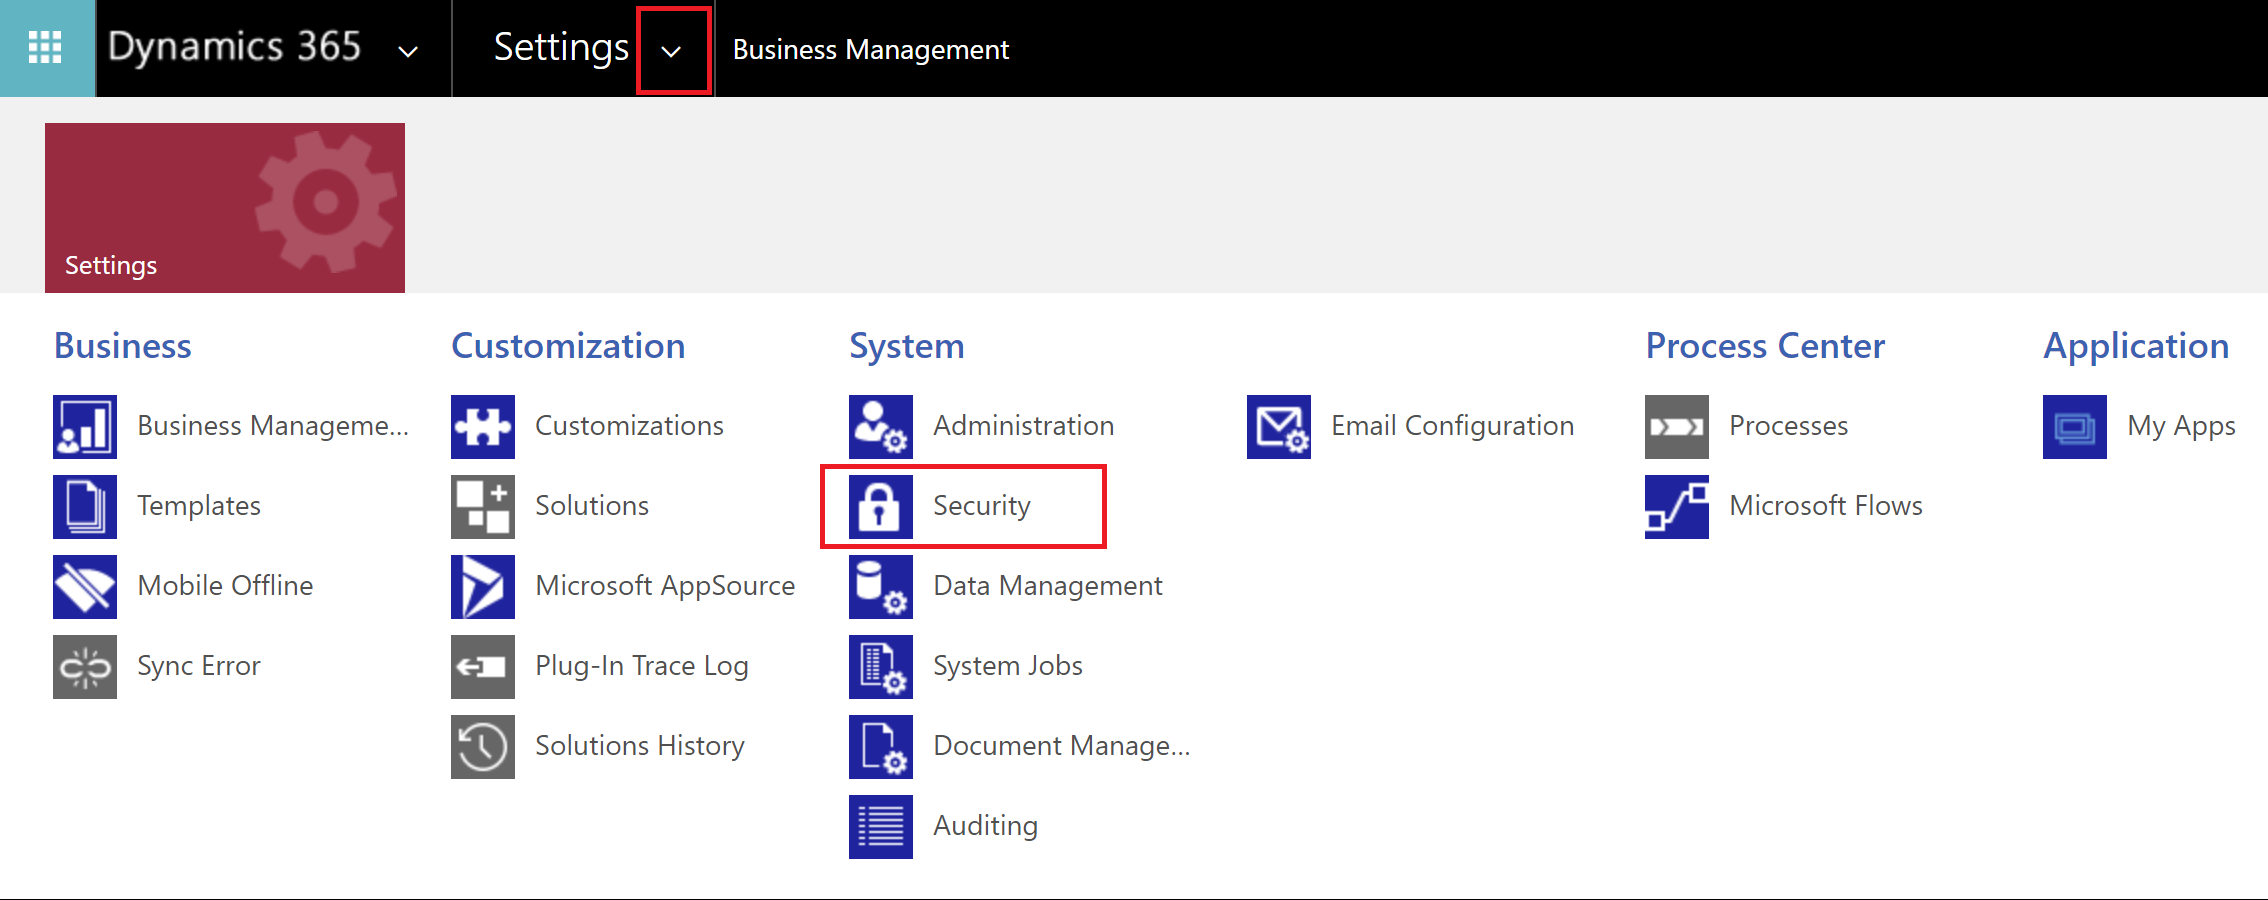
- Select Teams

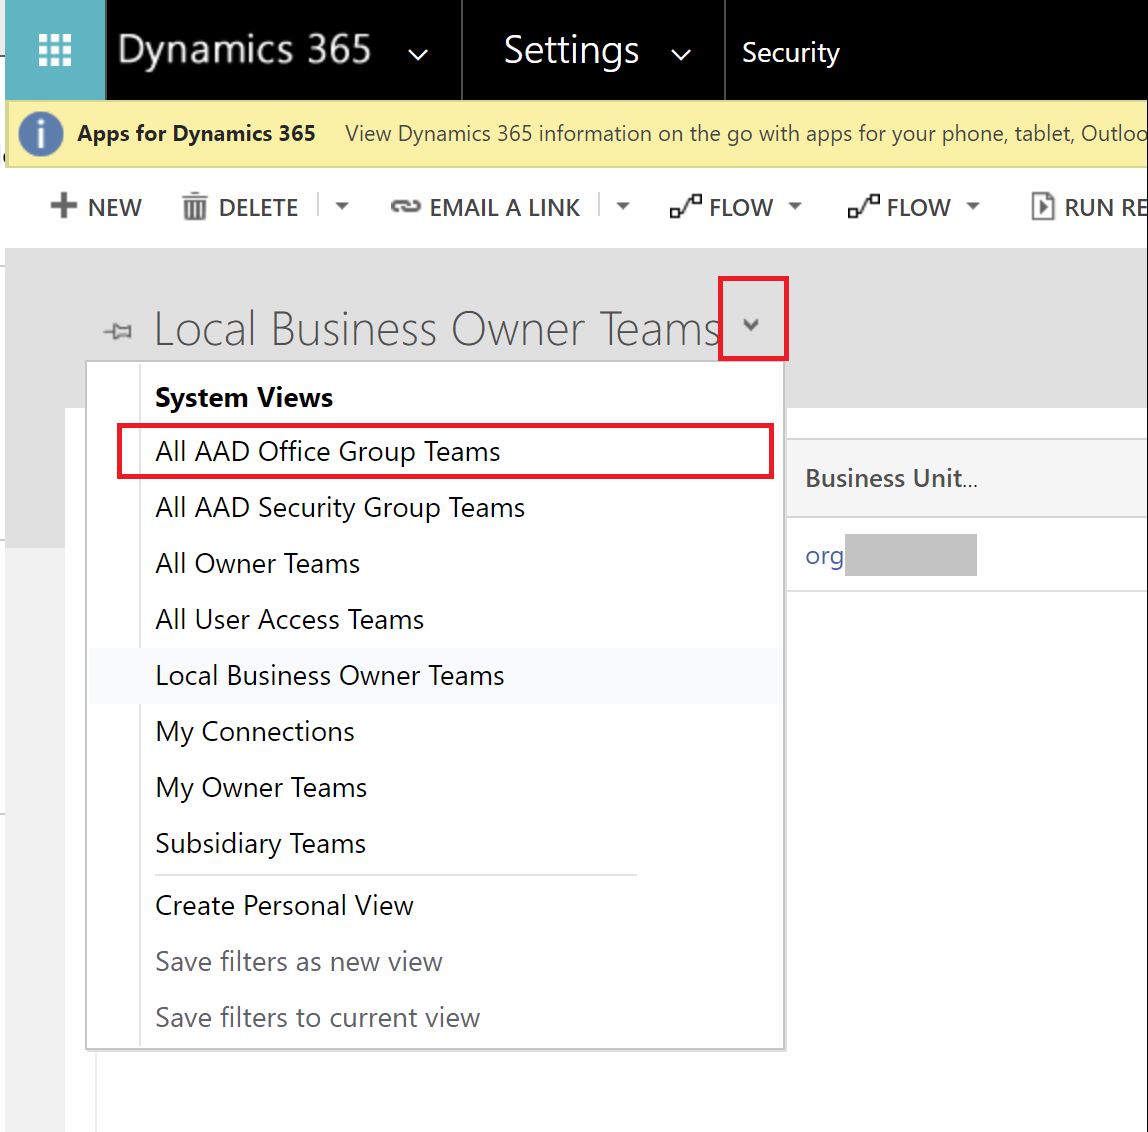
- Select All AAD Office Group Teams
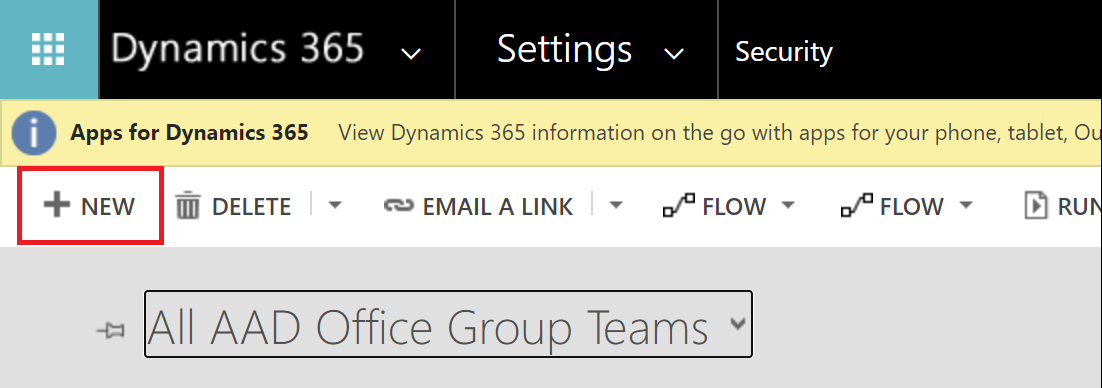
- Select + NEW
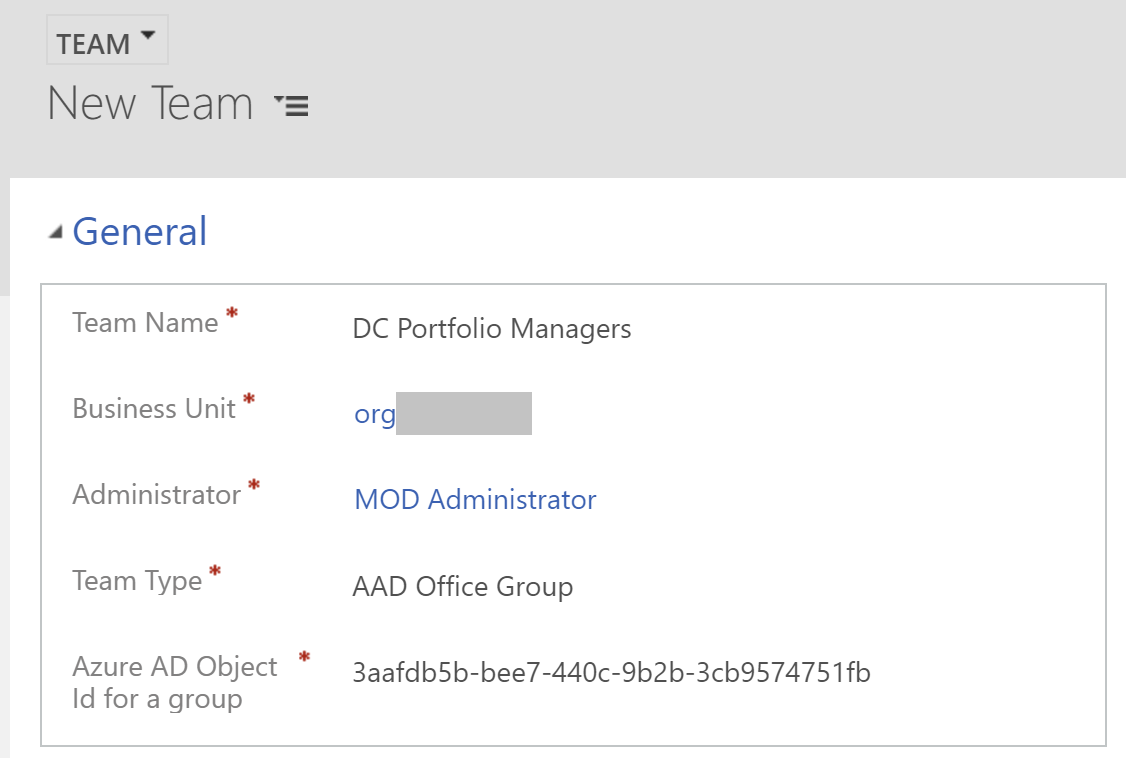
- Enter the Team Name (as you would like it to appear in Dynamics), select an Administrator, select 'AAD Office Group' as the Team Type and enter the Azure AD Object ID that you identified in Step 1, then press Save and Close
- Select your newly created Team
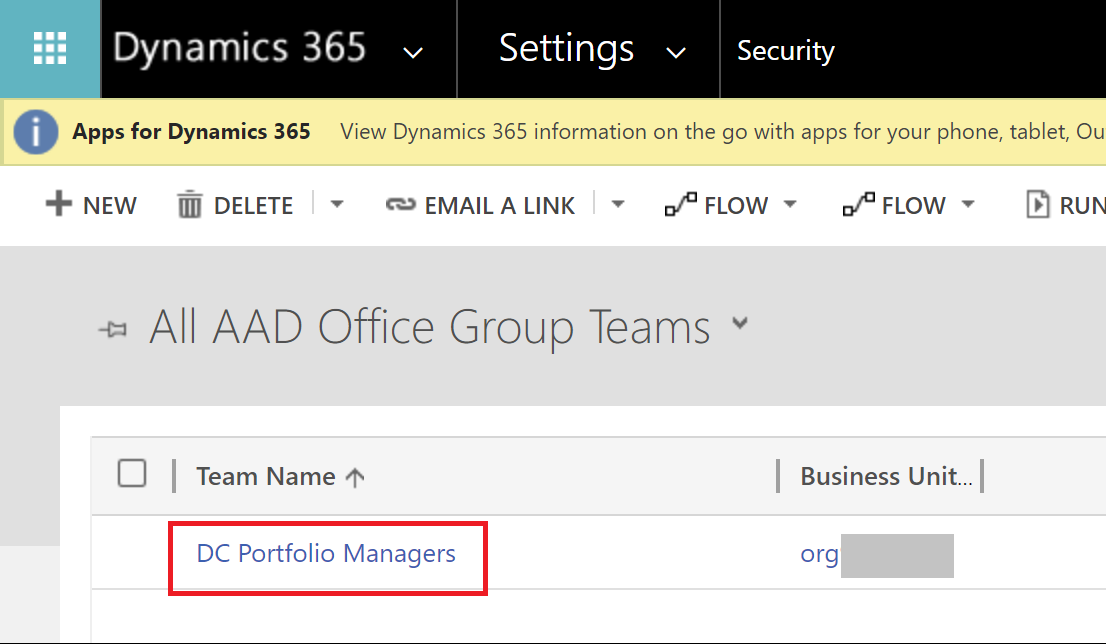
- Select MANAGE ROLES
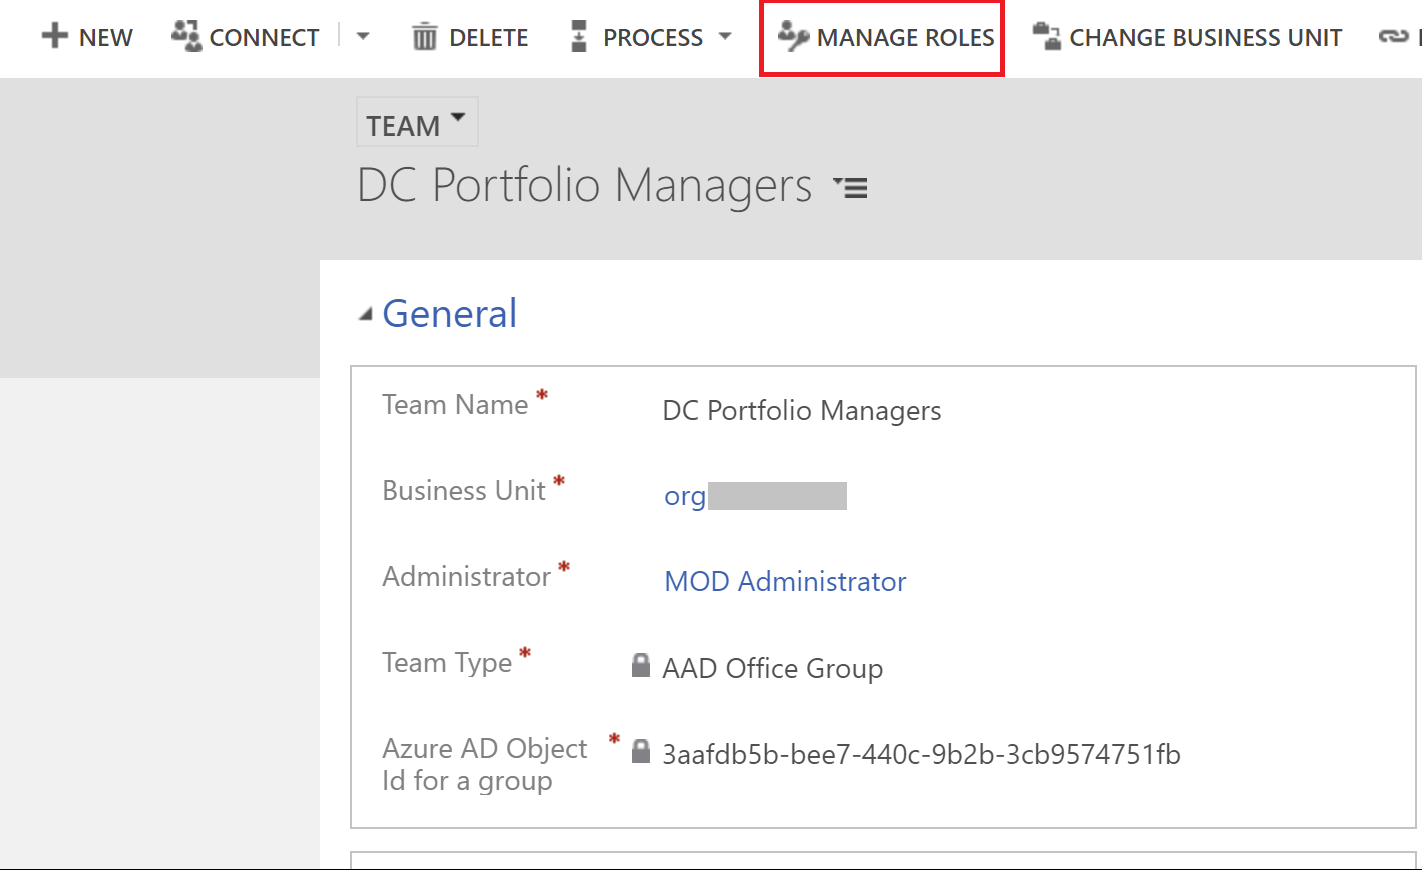
- Select the Role(s) that you would like to automatically grant to members of the identified M365 Group, then press OK.
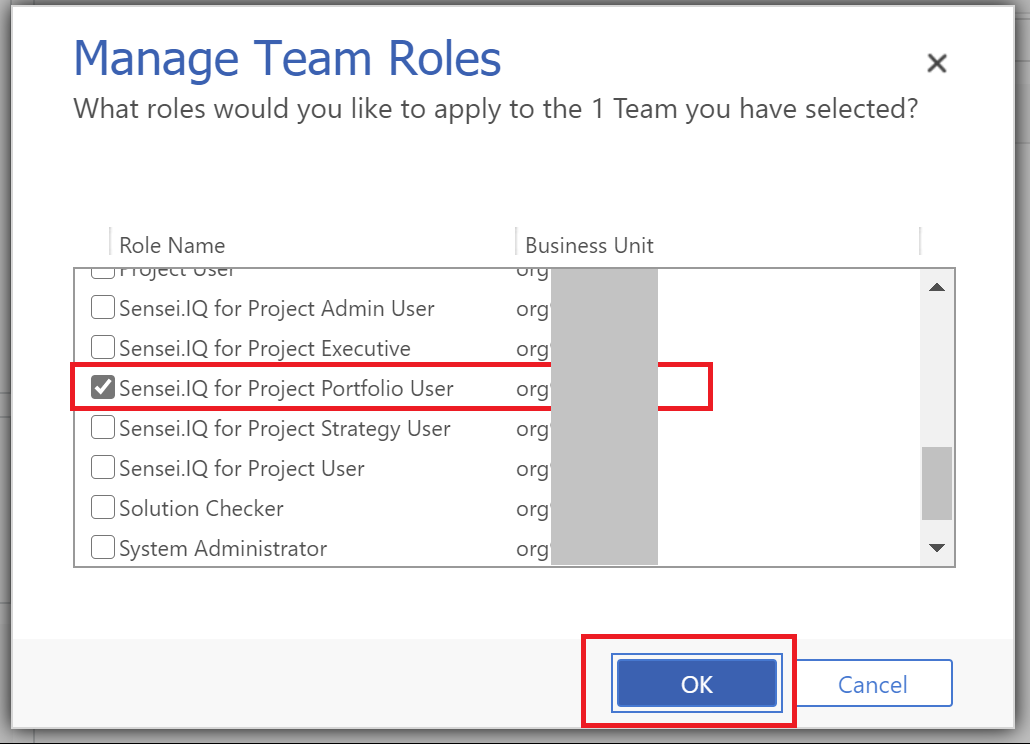
- Note that members of the M365 Group will not appear in the list of Team members in the Dynamics Team until the user next logs in to Dynamics/PowerApps. At that time their Role access will be automatically granted.
- If an existing User is later removed from the M365 Group their Role access will be removed.
(Optional) Enable Flows and update connections
For various reasons it might be necessary to validate Flow connections and update their connections.
- Open https://make.powerapps.com
- Click Solutions
- Select Atsumeru
- Change the filter to Cloud Flow

- Validate the status of each Flow listed. The Status must be
Onin order to enable the associated feature. If a Flow is notOn:- Click on the Flow
- A new window will appear with the Flow details page.
- Click
Editin the toolbar. - Update the connections, or create new connections if necessary when prompted.

- Click
Continue - Click
Save - Validate the Flow Status is
On.
(Optional) Configure Flow Teams Settings for Proposals and Business Cases
In order for the Proposals Approval workflow (Proposal Approval Atsumeru -for Proposals) and Project Approval workflow (Project Approval - for Business Cases) to post status messages to teams, a team and channel must be nominated.
If the client doesn't already have a Team/Channel for this, create one and then locate the two settings in the IQ App -> Settings -> Configuration Settings -> Inactive Settings view:
- Proposal Team (default suggested name: "Project Workflow Approvals")
- Proposal Channel (default suggested name: "General")
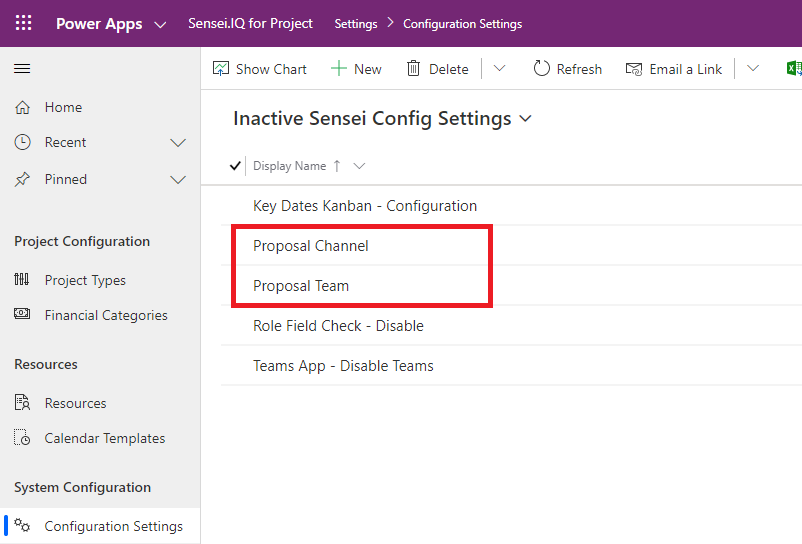
Update and Activate these settings with the name of the team, and the name of the channel the Flow will use to post approvals.
Note
Please be aware the settings name is suffixed with "_IQA" - this is intentional, please leave this in place.
(Optional) Configure Teams Approvals Tab
Within Teams, in the Team and Channel identified above, select to add a new Tab.

From the 'Add a tab' dialog, select Website
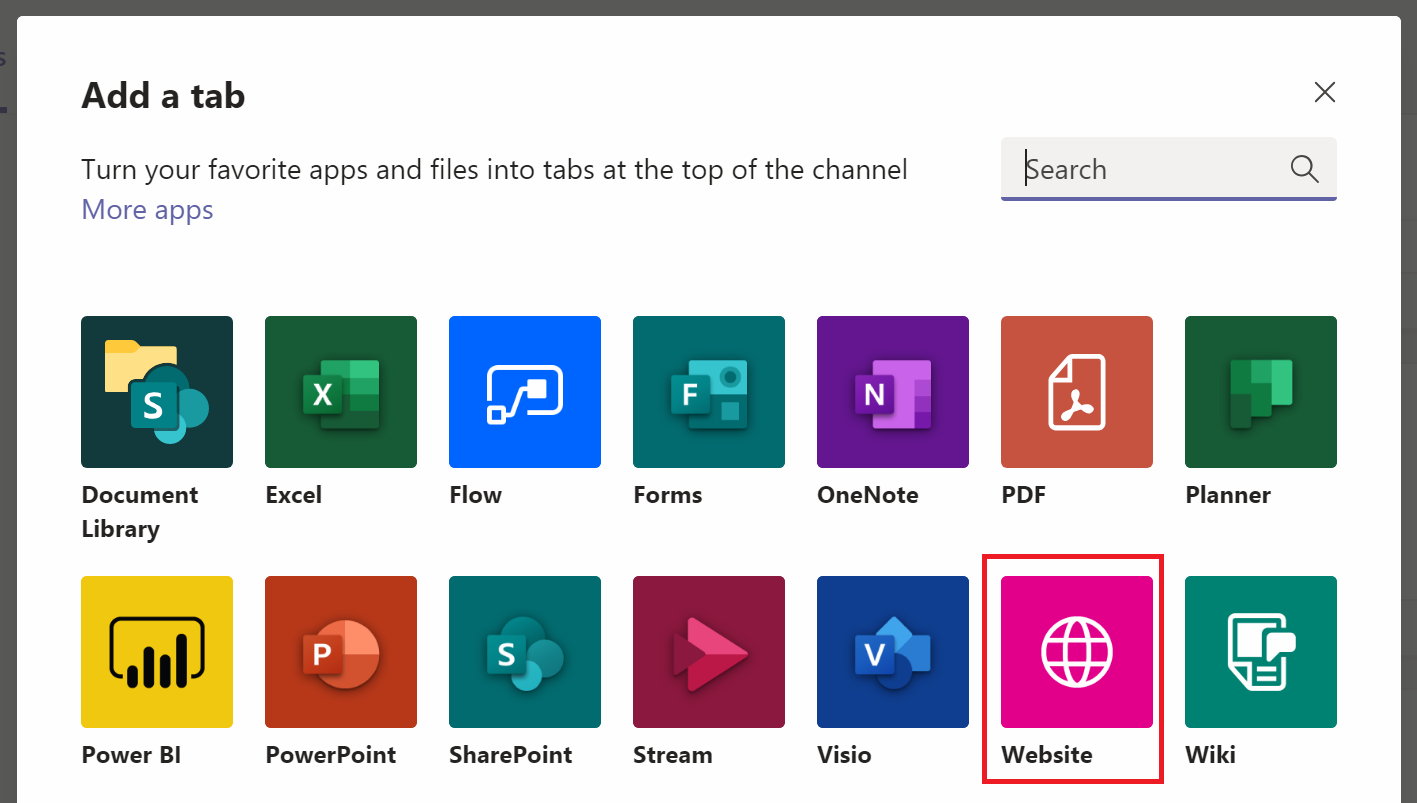
Open a browser (or a new browser tab if you are navigating to Teams over the web) and navigate to https://flow.microsoft.com
Ensure that you are connected to the Environment that will contain the Sensei IQ deployment artefacts. If required, switch to the correct environment.

When connected to the correct Environment, from the left menu select Action items > Approvals.
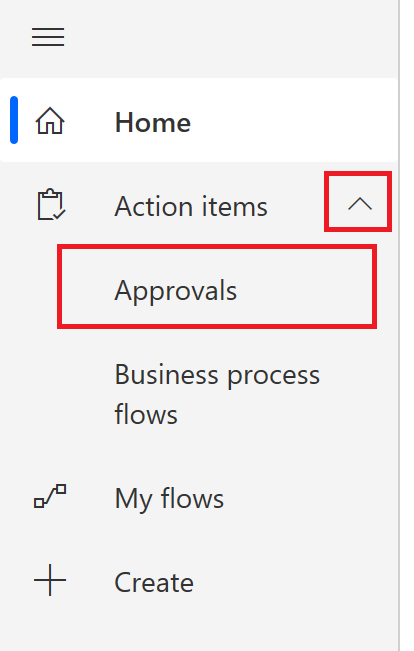
Once the Approvals page loads, select the Url in the address bar and copy it to your clipboard.
Return to the Teams interface, and enter Approvals as the 'Tab name' and paste the Url that you just copied to your clipboard. Uncheck 'Post to the channel about this tab', then press Save.
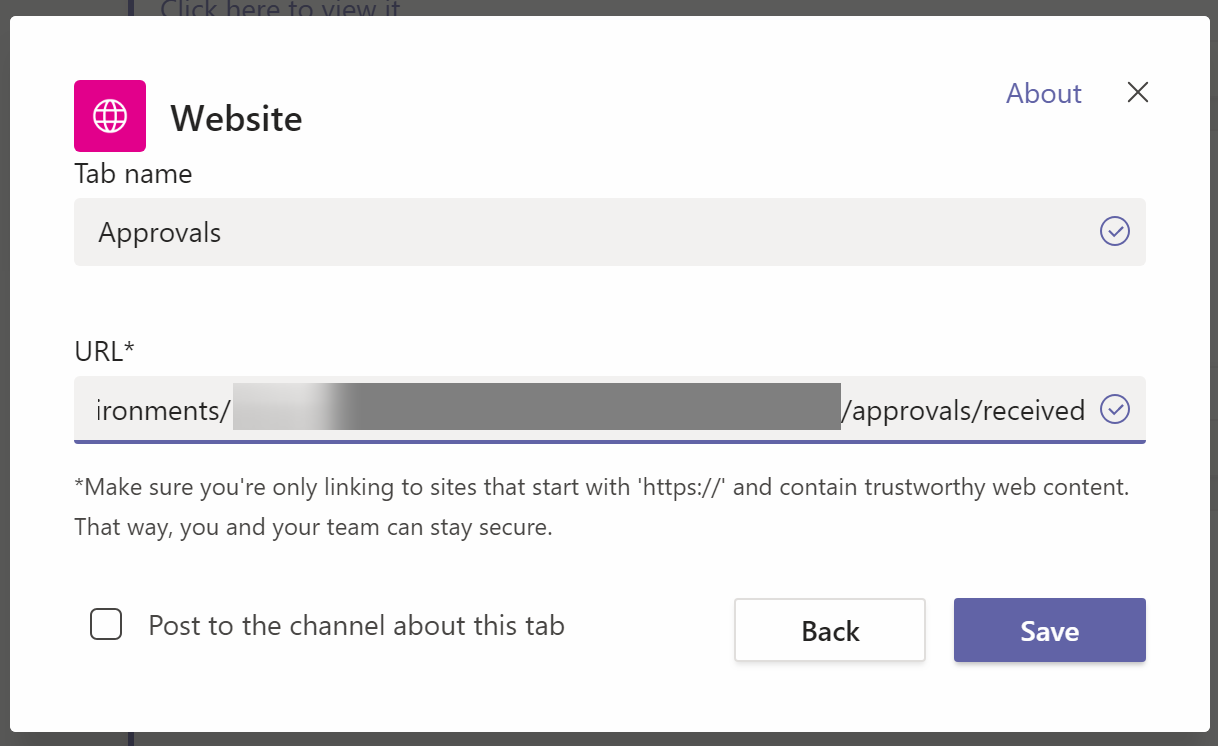
The Flow Approvals page will now display as a Tab within your Teams Channel.
Note: The Approvals tab will not render correctly when viewing Teams in a browser - it will only work within the Teams Desktop Client.
(Optional) Configure Timesheet Notifications
Three Power Automate Flows are provided along with the IQ solution in a disabled state; the following table details their purpose.
| Flow Name | Recipient | When | Description |
|---|---|---|---|
| Unsubmitted Timesheet Reminder | Timesheet user | When configured to run (e.g. Monday 9am) | Sends an email to all users required to complete a timesheet in the last period who have not done so. |
| Timesheet Submit For Approval Notification | Timesheet manager | On submission | Notifies the timesheet manager that a timesheet is awaiting approval. |
| Timesheet Rejection Notification | Timesheet user | On rejection | Notifies the timesheet user that a timesheet manager has rejected a submitted timesheet. |
To enable these Flows, please follow the following steps:
Visit https://flow.microsoft.com.
Navigate to Solutions, and find the Atsumeru Solution.
Filter the solution contents to show 'Cloud Flows'
Click the ellipsis (...) next to the Flow of interest, and select 'Turn On'.
The notification email body may be modified as necessary.
Additional Configuration steps for 'Unsubmitted Timesheet Reminder' Flow
Edit the Flow named 'Unsubmitted Timesheet Reminder'.
Select the first step at the top of the process named 'Recurrence'.
Select Edit on the step contents and select 'Show advanced options'.
Configure the Flow to run on the first day of the timesheet period cycle at a suitable time, e.g. 9:00am.
Set the recurrence interval to match the length of a timesheet period, e.g. 1 week.
Configure the Period Length variable to match the number of days in a period (including weekends).
Configure the Optional Delay In Days variable only if the reminder is desired to be sent on a day other than the first day of a period.
(Optional) Enable Dataverse Search
Dataverse search enables the search bar at the top of each model-driven app within an environment to search enabled tables (entities) that are included within that particular model-driven app. The search results are then filtered according to the records that the current user has permission to see (according to their security role/s)
System Administrator can enable it by following Enable Dataverse Search provided by Microsoft.
Note
Dataverse search requires an index which will consume dataverse storage.
Note
Sensei has enabled search on suggested tables (entities), if there is a customization layer made on top of a given table (entity) you may have to enable Dataverse search for the customized tables (entities) for that customized Solution by following Select tables for Dataverse search provided by Microsoft.
Dataverse Capacity Management
Since Sensei IQ requires a Dataverse PowerPlatform Environment - this will consume at least 1GB of Dataverse Quota. This section details how to monitor and resolve Dataverse quota problems.
In April 2019 Microsoft introduced a new capacity-based model for tracking power platform storage and database usage. In this new storage model, environment creation rights are governed by the amount of available database capacity instead of being based on user license entitlement.
Within this new capacity model, the following points are important to understand:
Important
- A new environment may not be created without a minimum of 1gb database capacity available.
- Some administrative actions for environments are disabled while the organization is in capacity deficit.
- Capacity deficit will need to be resolved at time of license renewal.
Check capacity usage
Organization capacity usage can be observed in the Power Platform Admin Center > Resources > Capacity.
You should be presented with a breakdown of capacity usage similar to the following image:
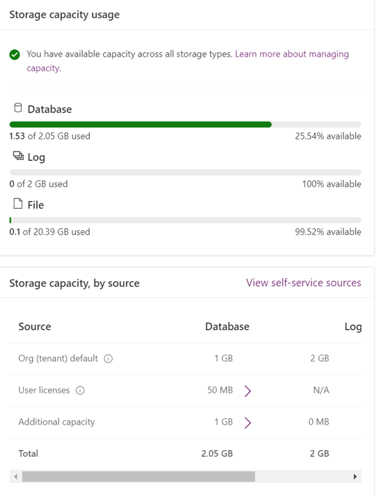
If your capacity portal does not appear this way, your organization may be operating under the legacy storage model. Run through the process found at the following link to confirm:
Legacy storage capacity - Power Platform | Microsoft Docs
Please notify your Sensei contact if this is the case, as there may be deployment implications.
Addressing a capacity deficit
Many of Sensei's products are recommended to be deployed to a new environment. If the available capacity is less than the 1gb required for new environment creation, one or multiple of the following options will need to be investigated.
1. Delete unused / unnecessary environments
If any existing environments can be deemed unnecessary or unused, you may wish to delete them. This will immediately return at least 1gb of database capacity per deletion excluding size of environment content.
2. Free up storage space
Please visit the following page for a list of common procedures that may be followed to reclaim storage from existing environments and solutions.
Free up storage space - Power Platform | Microsoft Docs
3. User licensing
Capacity may be sourced via the purchase of user licenses. See the Power Apps and Power Automate Licensing Guide for purchasing information.
Note
Per app plans currently do not provide any additional capacity as detailed in the licensing guide.
This is expected to change, however no ETA is known at this stage.
Per user licensing provides 400mb database capacity per license as expected.
4. Purchase a capacity add-on
Capacity add-ons may be sourced via purchase of add-on capacity in 1gb increments.
See the Power Apps and Power Automate Licensing Guide for purchasing information.
More information on these add-ons can be found here: Capacity add-ons - Power Platform | Microsoft Docs
(Optional) Enable Audit Logging
The Microsoft Power Platform Dataverse provides an optional audit logging facility when necessary.
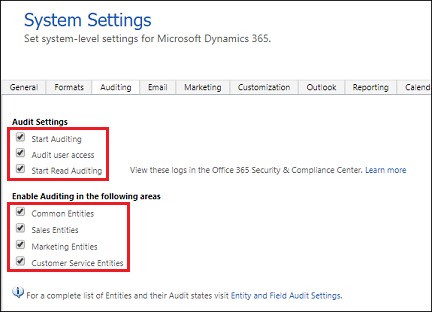
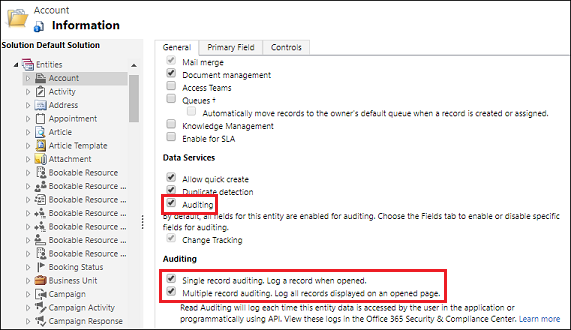
Enabling Audit logging is a 2 step process:
- Enable Global Audit settings in Settings (gear icon) > Advanced settings > Settings > Auditing > Global Audit Settings.
- Enable auditing on the entities where you wish to track activity.
Note
Audit logging consumes additional dataverse quota.
(Optional) Demo Data
Sensei IQ Demo Data Loading
If demo data is required but not yet loaded, please request demo data from your Sensei Engagement Lead.


