Reporting
This section provides additional detail on report functionality within Sensei IQ.
Steps to Update Power BI Reports to the Latest Versions
Sensei IQ is deployed with a set of Power BI reports to provide insights into the data contained within the app. After the initial deployment of the solution and associated report files, these files are no longer updated, as many of our clients opt to customize the reports to deliver insights into the customized version of the solution and model-driven app. Periodically, Sensei delivers updates to these Power BI files and in order to receive these updates, our clients or consultants can follow the steps below to publish the new files, and opt to either overwrite the existing version or publish as a new file.
Note
If opting to overwrite as the update method, any customizations to the report will be lost. If customizations have been made to the reports our recommendation would be to publish the report using a new file name so that your organization can review and compare the versions and choose which file you would like to embed in Sensei IQ.
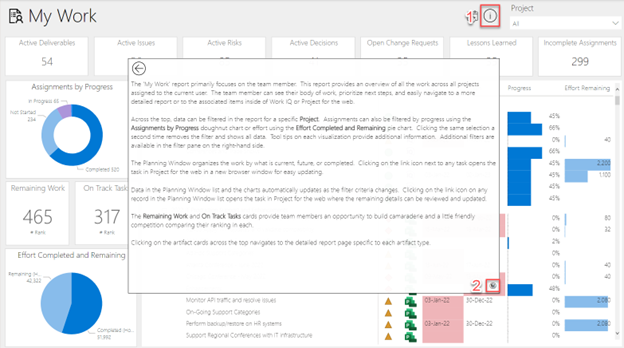
- Access the Sensei IQ Power BI versions page by clicking on the “secret” button inside of the ‘Info Pane’ on the first page of any of the Reports that are deployed to your Sensei IQ app.
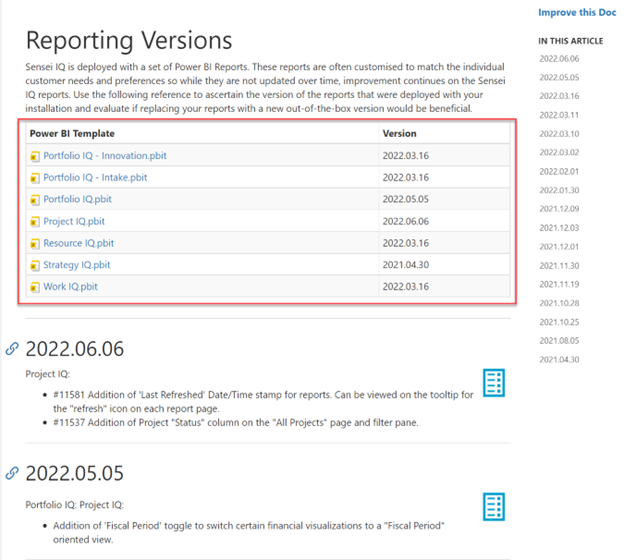
- From the Sensei IQ Report Template Versions page, select and download the file(s) you wish to install. Version notes are available below the table of report templates. You can use the quick links to jump to a specific version on the right.
- For each downloaded template file (.pbit) complete the following steps:
- Open the file in Power BI Desktop.
- Provide the Sensei IQ URL for your IQ Deployment in the parameter for “IQ URL” in the format: https://IQENVIRONMENTNAME.crm#.dynamics.com (for the Portfolio IQ Report, leave the Idea Effort Multiplier parameter set to 100)
- Sign in if prompted using credentials that have access to the data source (Dataverse)
- Specify "Organizational" for privacy settings if prompted.
- Click “OK” and wait for the data to load to the report.
- Once the data has loaded, feel free to browse the report and view the changes specified by the versions page in the new template.
- OPTIONAL: from the File menu > Options and Settings > Options > Current File > Data Load tab, click to “Enable parallel loading of tables”. This will allow refreshes to occur in less time as the data will be loaded to the tables in a parallel manner instead of waiting for each table load to finish before loading the next table’s data.
- Click “Publish” from the Home ribbon > Share section.

- Choose the workspace for your Sensei IQ reports.
- If a file with the same name already exists in the workspace, you will be notified that you will be overwriting the existing version. In this case, you will NOT need to update the Sensei IQ Configuration Setting for the report with a new embed link.
Note
If you do not want to overwrite the existing version, save the pbix file with a new filename first and republish to the workspace.
- If you choose to save and publish the file with a different name, you’ll need to update the Sensei IQ report configuration setting with a new embed link (see below).
Steps to configure a Sensei IQ Report Configuration setting with a new embed link:
- Review the table below to understand which setting to Update:
Power BI Report Configuration Settings
| Report | Setting |
|---|---|
| Work IQ | PowerBIReport_MyWork_IQA |
| Project IQ | PowerBIReport_Insights_IQA |
| Portfolio IQ | PowerBIReport_PortfolioInsights_IQA |
| Portfolio IQ – Innovation | PowerBIReport_InnovationInsights_IQA |
| Portfolio IQ – Intake | PowerBIReport_IntakeInsights_IQA |
| Strategy IQ | PowerBIReport_StrategyInsights_IQA |
| Resource IQ | PowerBIReport_ResourceInsights_IQA |
- Open the that requires an update in the Power BI Workspace for Sensei IQ.
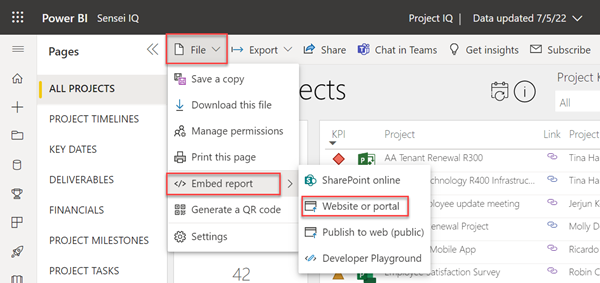
- Click the “File menu > Embed Report > Website or portal” option.
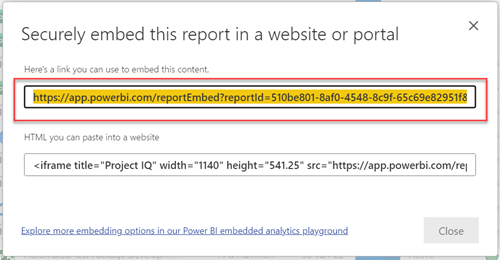
- Copy the embed link from the top box in the dialog that will appear.
- Navigate to Sensei IQ > Settings area > Configuration Settings.
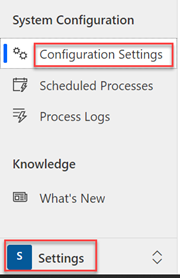
- Open the setting specified in the table above for the report that you wish to update. In the example below, we’re updating the Project IQ Report, so we’re using the PowerBIReport_Insights_IQA setting.
- Paste the copied embed link into the “Value” input box.
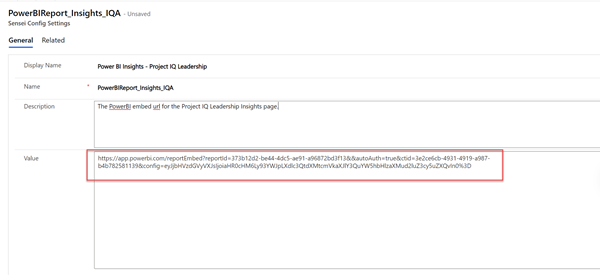
- Click “Save and close”.
Reporting on Sensei_Tasks and Sensei_Assignments in Sensei IQ Reports
When a user sets the 'Effort' on a Sensei_task (This is a task using the standard sensei scheduling tool inside Sensei IQ), the value entered for effort will be split evenly in the reports between all resources assigned to the task.
As an example, a Project Manager sets the effort on a Sensei_task in their task list at 100 hours and the Project Manager then assigns 4 users to the task. Each resource would be “allocated” 25 hours of the effort for this task in the reports. Assignment units have no bearing on this division of effort. As the task is progressed, it is assumed that it is progressed evenly across all assignments. So if the same task mentioned above is progressed to 50%, then each resource "assignment" in the IQ reports will have 12.5 hours of effort completed, and 12.5 hours of effort remaining.
Synthesizing Timephased assignment data from IQ Schedule Assignments
In providing core scheduling capability, Sensei IQ schedule does not store the assignment or task-level values in a time phased way. This means that we do not have access to the per-day values for work that we might find in Project Online or other Project management tools.
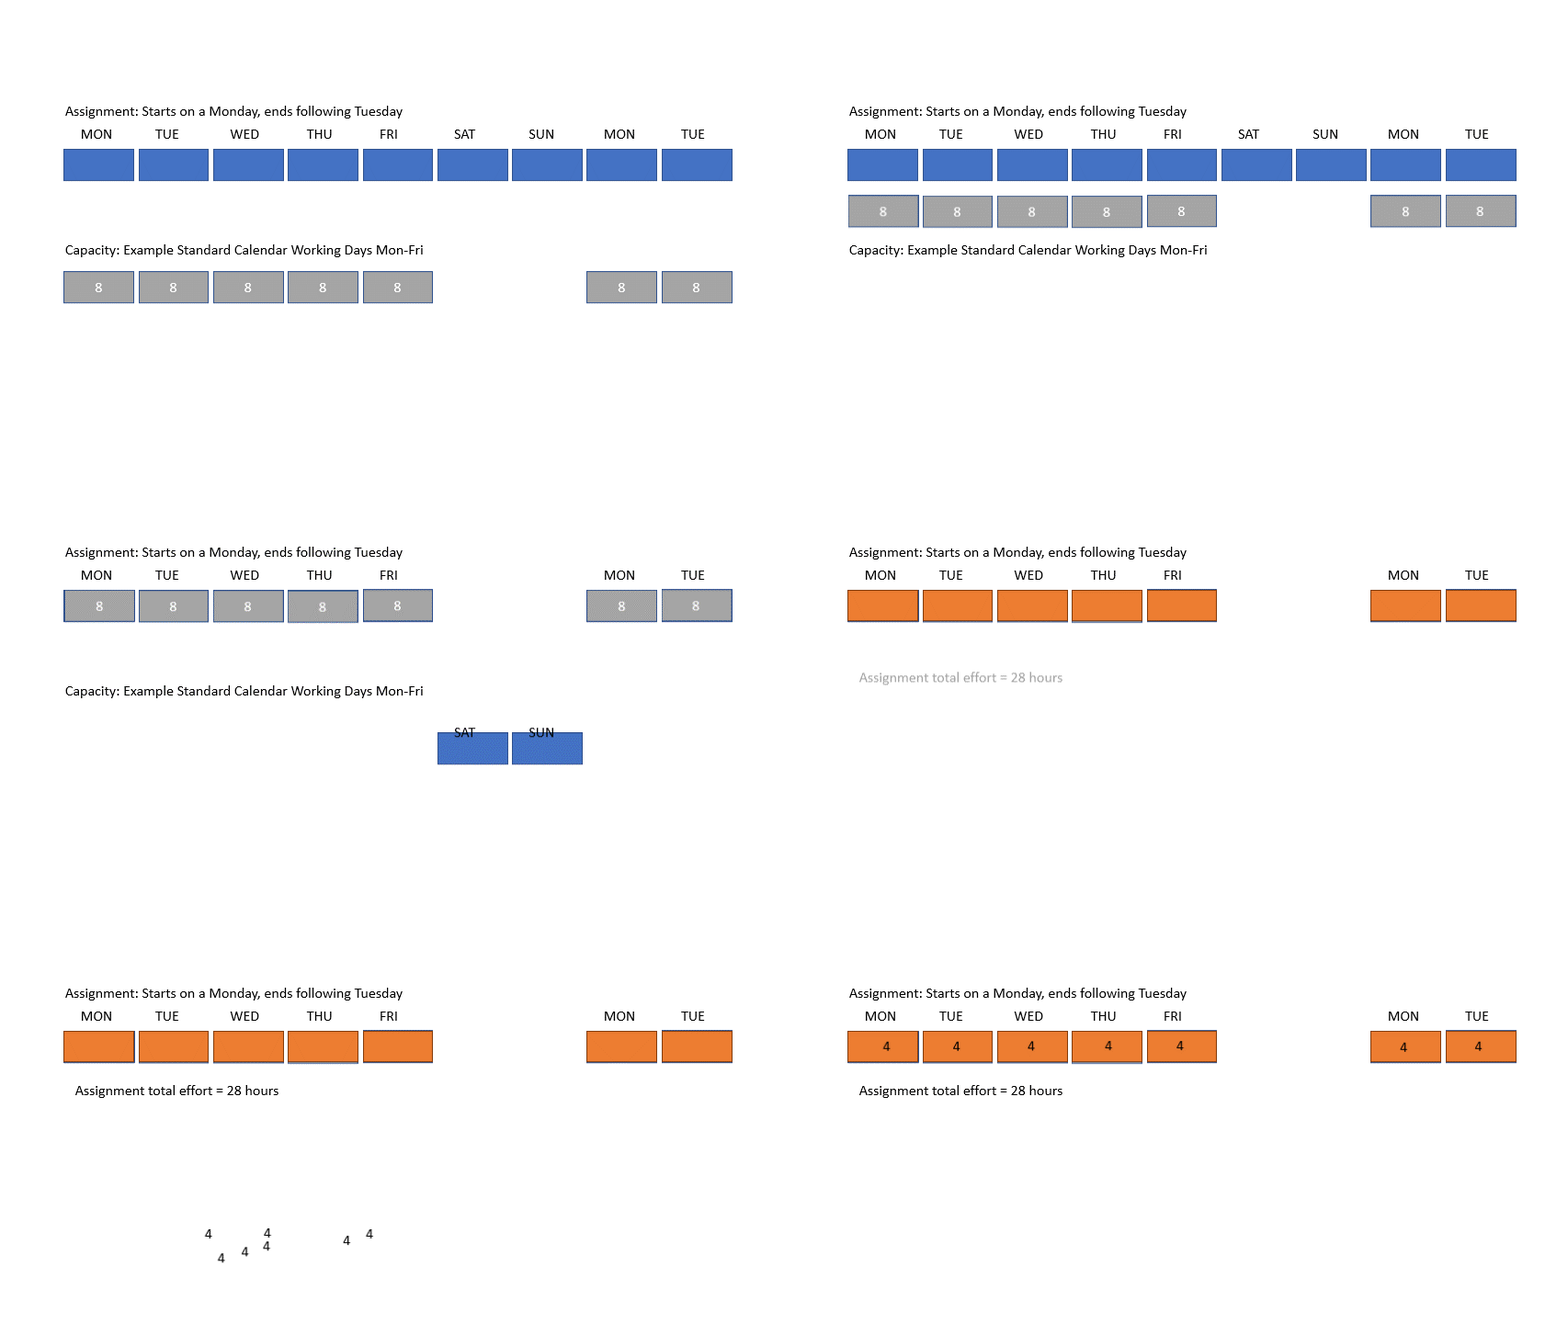
In order to synthesize this data from the assignment data that we do have access to in Dataverse, a method was utilized in which a row is created for each day for an assignment using the start date and finish date. These rows are then filtered by the rows in the resource capacity table, ensuring that rows for days on which the resource is not working are not included. Finally, the number of rows (working days) for each assignment is calculated by counting the remaining rows for each assignment, and then the total effort for the assignment is divided by this number giving us the daily effort for each assignment. An example of this process is depicted in the animation below.
Please note, this method assumes that the effort is spread evenly over all working days for the assignment and results in a flat (uncontoured) assignment, as the true daily values are unavailable for reporting.
Also of note is that because generic resources do not have associated capacity, there will not be an opportunity to synthesize the timephased resource assignments for this resource type.
External Execution Tool Assignment Effort
There is a limitation when using External Execution tool Task Sync where if tasks in an external execution tool that are assigned to multiple resources have varying values for work (effort) assigned to each resource, these specific values are not synced into Sensei IQ. For example, if a task from Project Online (external execution tool) has three resources assigned to it, with a total work value of 100 hours, is split unevenly in the following manner: 50 hours for resource 1, 25 hours for resource 2 and 25 hours for resource 3, these assignments are imported into Sensei IQ with an EVEN split on the task, and the reporting for the Sensei IQ "assignments" will indicate 33.33 hours for each resource. This is due to the nature of the IQ Schedule control, and the fact that the work/effort data is not stored at an assignment level or in a timephased manner.
Because of this limitation, Sensei recommends that when choosing to sync tasks from an external system the Managers of those schedules should follow the suggestions below:
- Only assign one resource to each task on the external schedule.
- If assigning one resource to each task is not possible, assume/allow for an EVEN split of the assignment work (effort) on the task.
If following the above recommendations is not possible, your users should understand that there will be some degree of data ambiguity at an assignment level in your Sensei IQ reports.
If your organization feels that this is unacceptable, you may choose to work with your Sensei Engagement Lead to customize your reporting to obtain data directly from the source execution tool system using Professional Services hours.
Creating a pre-filtered Status Report embedded in Teams
As of Q3 2024, Sensei is recommending the following method to create a pre-filtered "Status" report in Microsoft teams for a specific project, program or portfolio. This allows a Project Manager or Project Team to view a version of the desired report page in their Teams Channel Tab without having to click to drill through in the standard embedded report. To add this to a specific Team Channel follow the steps below:
- You will need the "Share" link from the Power BI service that includes "your changes". To get this follow the steps below:
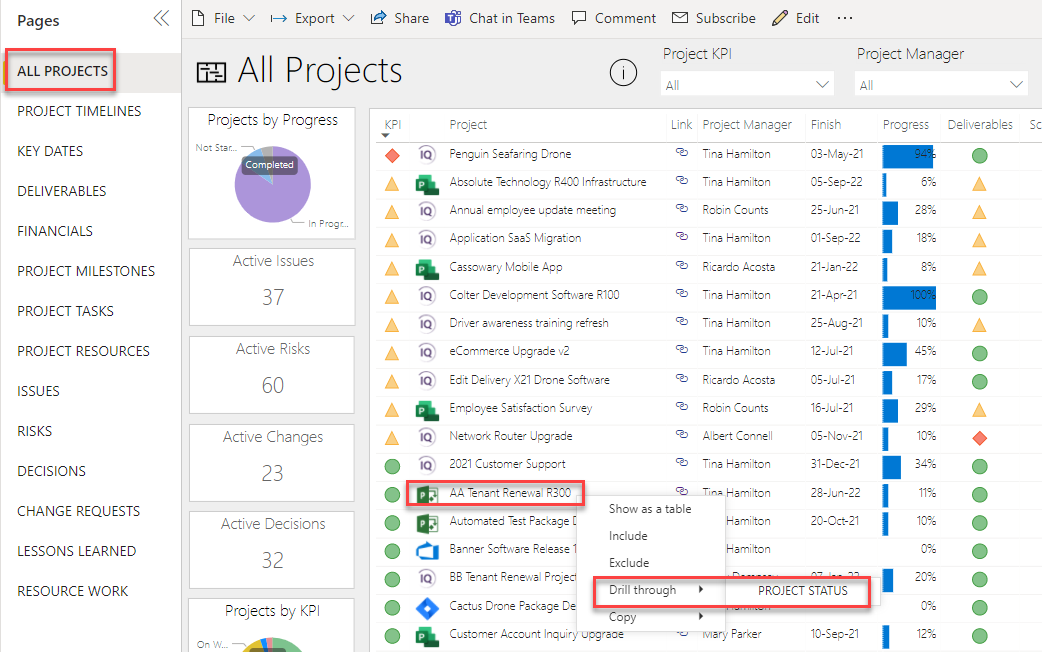
a. Navigate to the Power BI Workspace that contains the report page you wish to feature in Teams. In the example below, we'll use the "Project Status" report page for the "AA Tenant Renewal R300" project.
b. From the Project IQ Insights report > All Projects page, we right click the "AA Tenant Renewal R300" project and click “Drill through > PROJECT STATUS”.
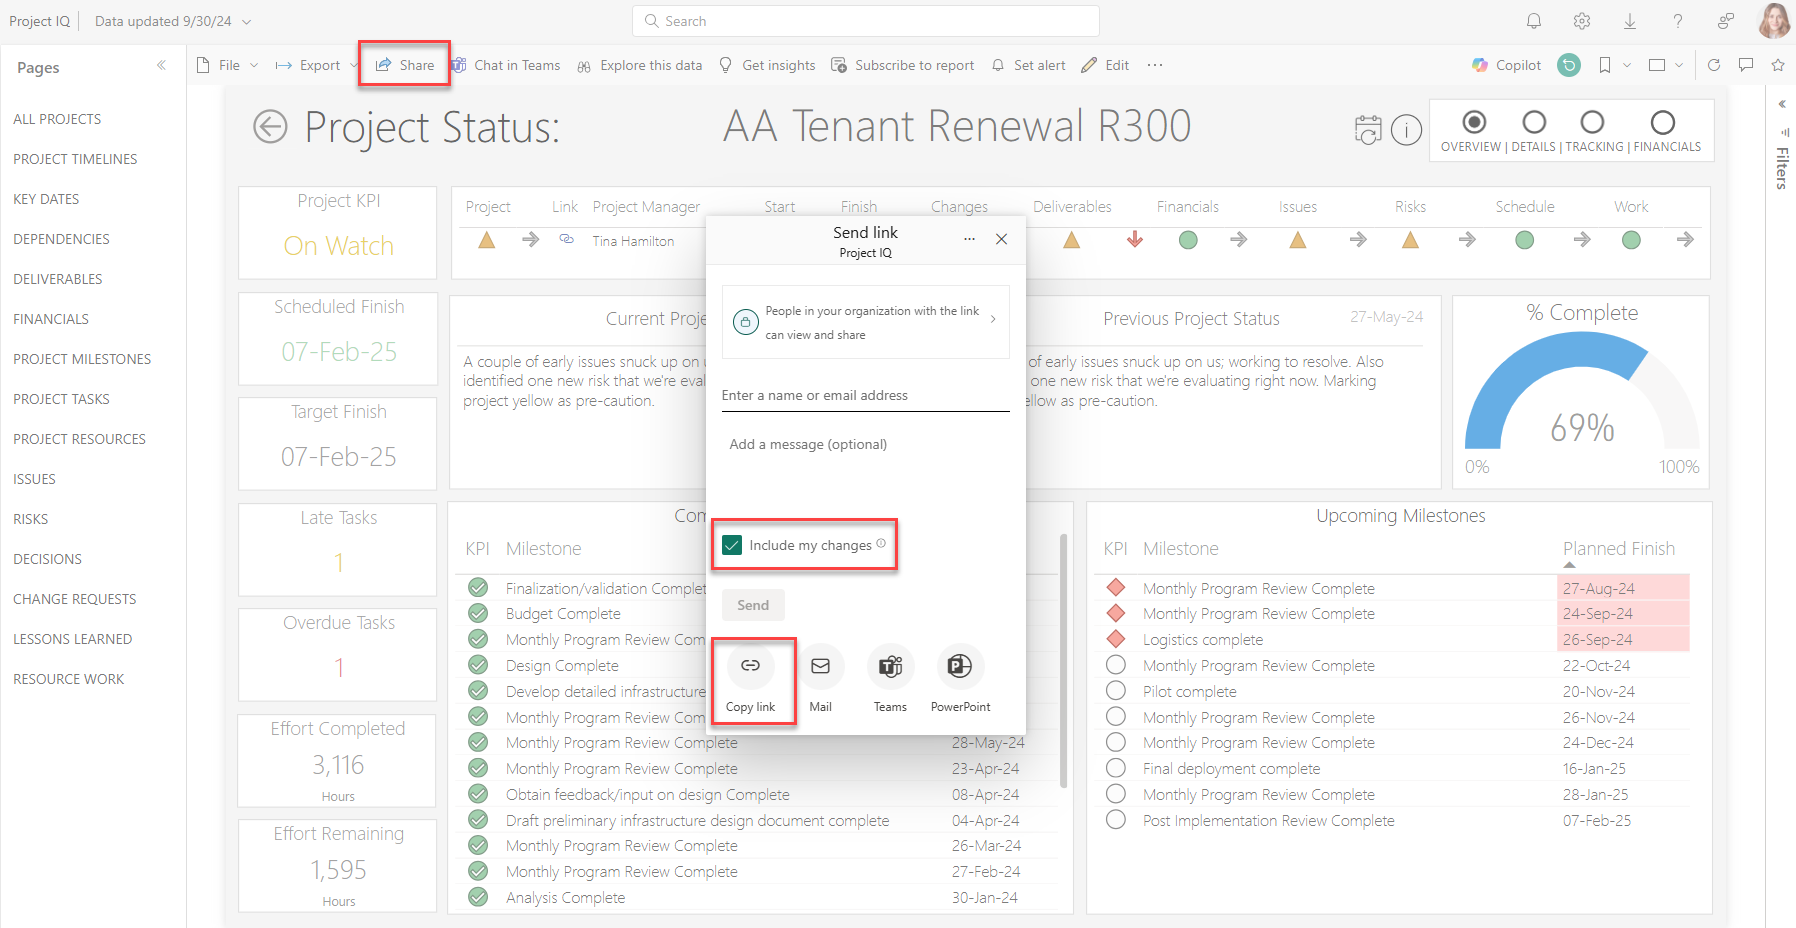
c. Make any desired changes to the current view of the report, as this will be the default view provided to the team. Then click "Share" from the Power BI toolbar. On the "Send link" dialog, ensure that "Include my changes" is checked, then click "Copy link", and save that to notepad or OneNote.
- You're now ready to configure your Teams Channel tab.
a. Navigate to Teams, and to the channel that represents your project.
b. Click the ‘+’ symbol on the tabs to create a new tab and select "Power BI". Click "Save" to save the tab to configure (Optionally deselect “Post to the channel about this tab”).

c. Rename the tab “Status Report” and paste in the link you copied from the Power BI service.
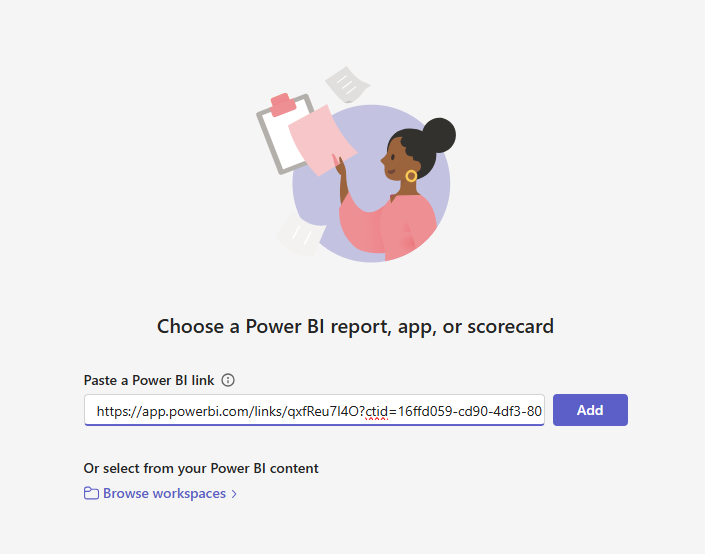
d. Test the new tab by clicking on it to see the pre-filtered report.
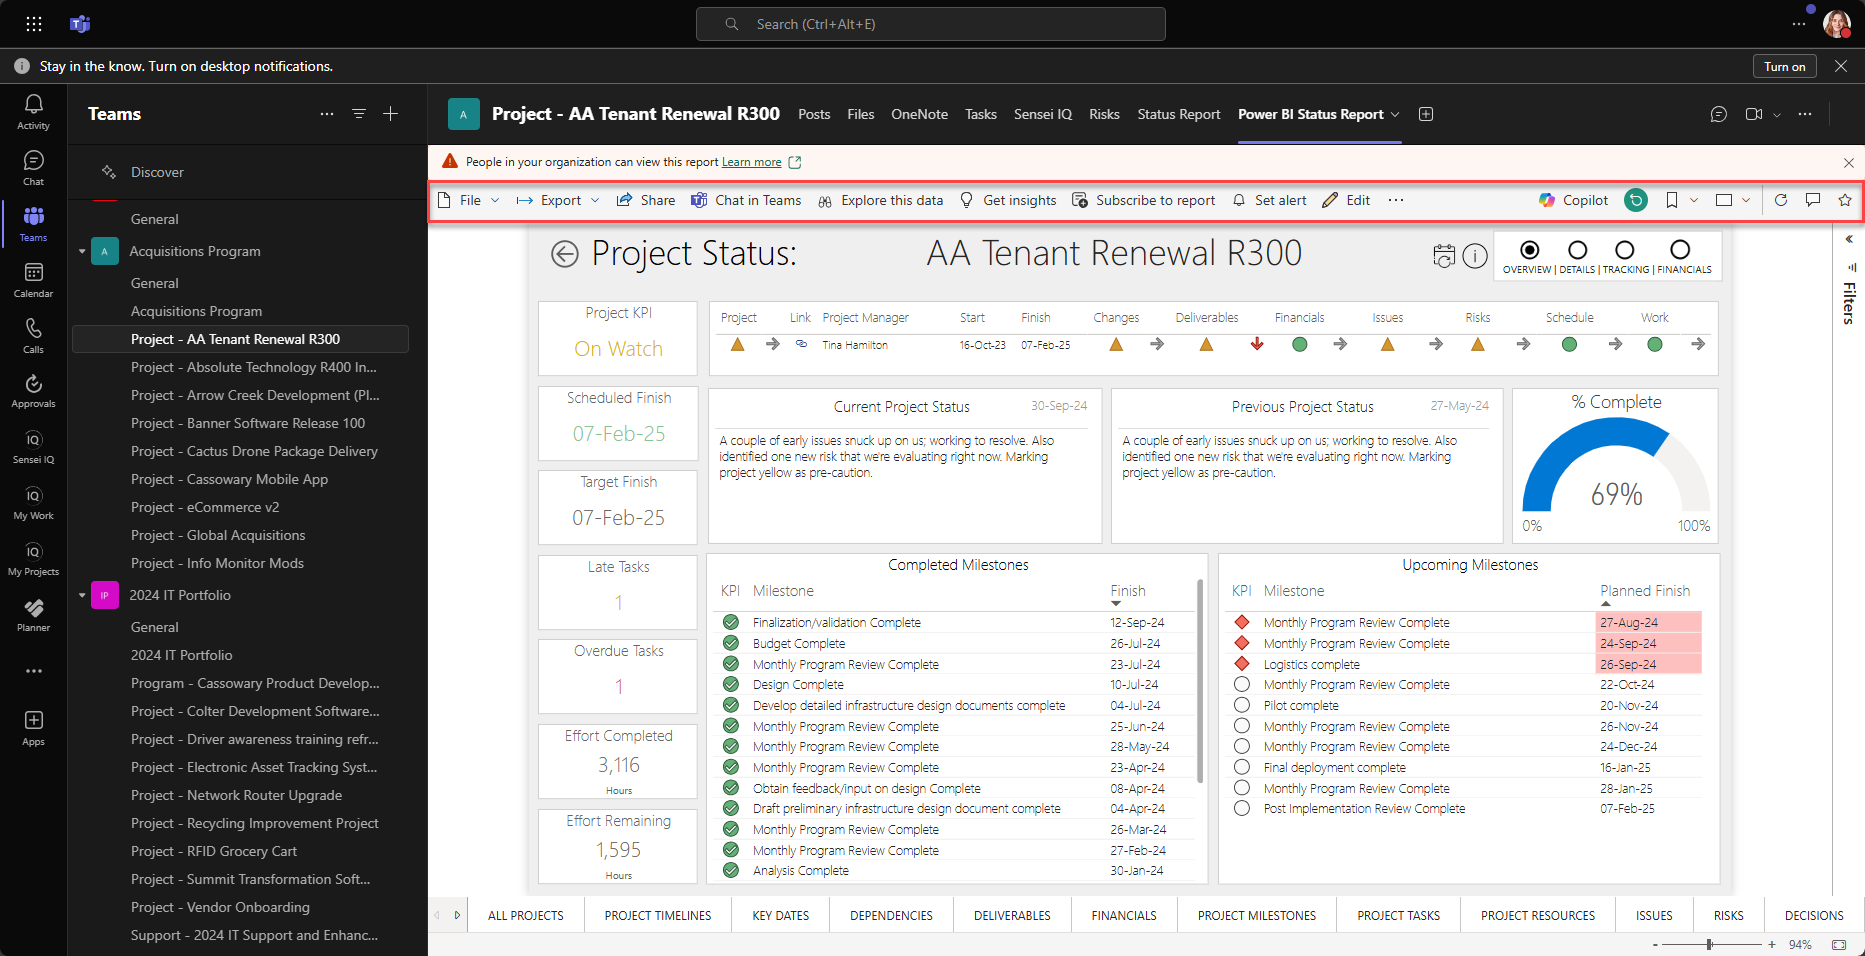
We like this method for embedding the Project Status Report, as the controls for Power BI are still visible in the frame, and you can use helpful features like bookmarks, comments, and other visibility controls.
Note
The above process can also be used to create pre-filtered Portfolio and Program status reports by using the Portfolio and Program status reports from the Portfolio IQ Insights report.
Adding/Embedding new or custom Power BI reports in Sensei IQ
The standard Power BI reports embedded in Sensei IQ are configured in a unique way, where the embed link is read from a configuration setting and an iframe is used to display the Power BI Report. Microsoft has now updated Power Apps to allow for embedding reports and dashboards from Power BI workspaces in a simpler way. Please refer to the documentation here for steps on how to do this: https://docs.microsoft.com/en-us/powerapps/maker/model-driven-apps/create-edit-powerbi-embedded-page
Creating a Custom Planner Premium (P4TW) DataReader Security Role
To facilitate the retrieval of data from a Planner Premium (Project for the web) Dataverse Database, an account must have permissions to read the data from the Planner Premium tables. Some organizations choose to simply provide the account that is accessing the data (credentials running the data flow) with the “System Administrator” role in the Power Apps environment (typically the default environment in a tenant). However, following the principle of least privilege, you may choose to create a custom security role in the Planner Premium environment that provides read permissions to the Planner Premium tables and no others.
Steps to create a custom security role for Planner Premium DataReader
- Access the Power Apps admin portal at https://admin.powerapps.com
- Once in the portal, select the environment where the changes must be applied
- Click “Settings”
- Expand the “Users + permissions” grouping and click “Security Roles”
- Click “New Role”.
- Give the role a name, we suggest “Planner Premium DataReader”.
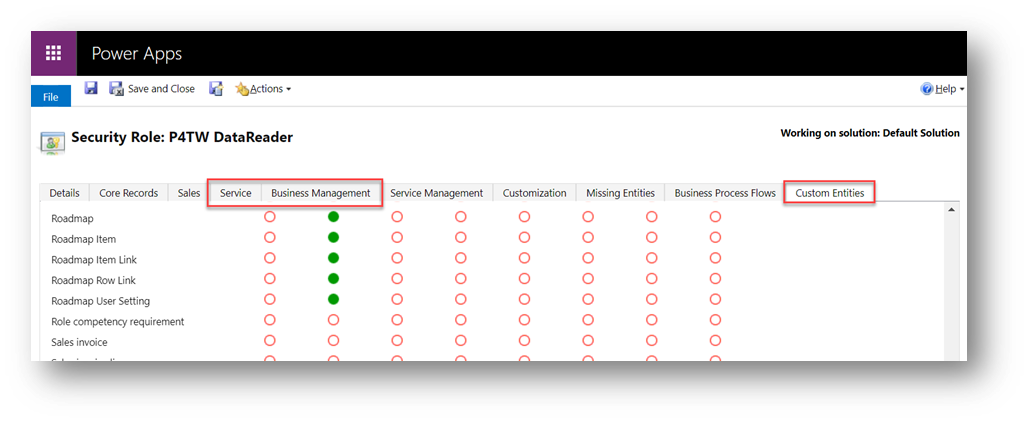
- On the Tables tab provide “read” access to the following tables at an organizational level.
- “Service” tab
- Bookable Resource
- User
- Plan (msdyn_project)
- Project Task
- Project Team Member
- Resource Assignment
- “Service” tab
An example of what this looks like is below (note, you can add permissions to any other table at this point that you may require data from in the future).
- Click “Save and close” to save the new security role.
Apply the New Custom Role to the Account Running the Planner Premium to Sensei IQ Dataflow(s)
Once the role has been created, it must be applied to the account whose credentials are used for the authentication for the data flow from Planner Premium to Sensei IQ. The data flows for Planner Premium as an execution tool currently queries for data from the Project, Resource Assignment, and Project Task tables, however as mentioned above, if you plan on customizing this in the future, please ensure you've granted read permissions to any tables your organization may require.
To apply the role:
- Apply the new role to the user account that is running the data flows to Sensei IQ. This can be done a number of ways, navigate to the environment “Advanced Settings” using the “Settings” cog.
- Click the “Settings” menu, then “Security”.
- Click “Users”.
- Find the user whose credentials will be used for the dataflow to Sensei IQ. Select the circle next to the user name, then click “Manage Roles”.
- Find the "Planner Premium DataReader” role and check circle for it, then click “OK”.
Note
If you have created a new user account for NO OTHER purpose in your Planner Premium Power Apps environment, you should not require any other roles. However, if the user is used for other purposes, please ensure that the appropriate roles required are left on the user.
Run the Dataflow to ensure that data is accessible for retrieval into Sensei IQ
Now the dataflow can be either refreshed (if it was already configured), or it can be configured using the credentials for the account specified.