Customization
When to customize?
When considering customization, think about the business benefit of a customization versus the cost.
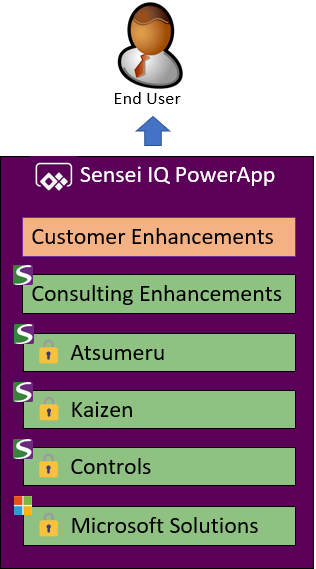
| Benefit | Cost |
|---|---|
| Adapt to Client’s business processes | Blocks future updates to that area |
| More direct business value | Additional maintenance cost |
| Enhanced end-user experiences | Additional complexity / update risk |
Some customizations have higher costs than others
| Example | Cost of ownership |
|---|---|
| Reporting Customization | Low |
| Additional form fields | Low |
| New entities/data structure changes | Medium |
| Changes to OOTB JavaScript / DOM | High |
How to customize?
One of the key reasons to choose Sensei IQ and the Power Platform is to facilitate customization of the product to suit your requirements. With Sensei IQ you can customize it yourself or engage us to help you.
Do it yourself

Power Apps is an open and accessible platform for citizen developers and experienced developers to perform customizations themselves. We advise that all client customizations are performed in a Development (DEV) environment in a dedicated layer and then deployed to the Production (PROD) environment as a managed layer. This allows good separation and change control processes to take place.

Engage Sensei Consulting

To provide the highest level of expertise and support, Sensei Consulting can also provide customization services for Sensei IQ and our Client Care service can ensure that your deployment remains supported and up to date.
It is recommended that Sensei Consulting led customizations to Sensei IQ are stored in a layer above the base product and in the case where there are multiple environments (DEV, TEST, PROD) that unmanaged layers are used in DEV by Sensei and deployed into PROD as Managed. Client maintained layers can also be present to provide a quicker way to make changes without having to engage Sensei every time.

Warning
Each environment must only contain one unmanaged layer used for development.
Customisation Reference
Sensei provides the IQ solution as a set of layers over the existing Project and Power Platform components. The additional components that are provided as part of the solution have the Customizable flag enabled (where possible) to allow almost any provided Dynamics component to be tailored to meet the business requirements. Where the item is not directly customisable (Security Roles, PCF Components, and the Teams App) we have taken steps to ensure that these have configuration options available to control their behaviour.
The solution layering concept is a common technique used throughout the Power Platform, and reviewing this general introduction to Solutions from Microsoft is recommended before getting started, with a more advanced discussion of best practices for Solution Lifecycle Management available here.
In the case of Sensei IQ, the solution layering can be visualised as:
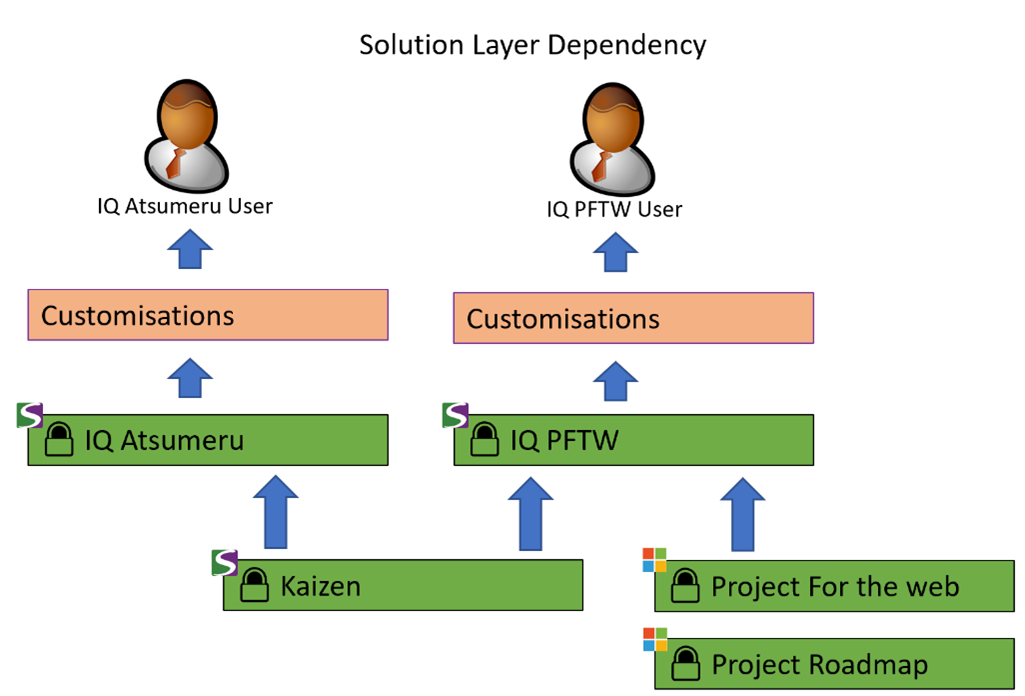
The Solution Layers are (from the bottom up):
- (PFTW Edition Only) Microsoft Project Roadmap. Roadmap functionality is part of the Project Plan 3 and Project Plan 5 licenses. The Roadmap solution provides base level functionality for many project related functions and was historically released first.
- (PFTW Edition Only) Project for the Web. This layer provided by Microsoft contains the back-end Dynamics components required for the Project for the Web functionality.
- Sensei IQ. This layer contains the Sensei IQ Tables and functions that are not specific to Project for the Web, and common to all Sensei IQ solutions.
- IQ Atsumeru. Specific functionality for the Sensei IQ execution tool independent solution.
- (PFTW Edition Only) Sensei IQ PFTW. This layer includes Tables, relationships and functions that provide integration with Microsoft Project for the Web.
- Customisations. This layer can be added by the customer, or by Sensei on the Customer's behalf. It is either the "Default Solution" or a solution that is managed in a customer owned DEVOPS process.
Sensei applies solutions in layers to provide functionality to the end user and customer specific customisations can then be applied on top to cater for specific customer needs.
Limitations
Important
Some elements in the Dataverse do not seem to handle Solution Layering. Please see below a list of the elements we have encountered which we recommend not to modify from our IQ Solutions.
Security Roles
Because Security Roles do not seem handle solution layering (and any changes made to them would be overwritten on the next update), all of the security roles shipped with Sensei IQ are shipped as uncustomisable. If you require custom security roles, you can add new security roles in your environment.
Control Configuration at the Table level
Dataverse provides a capability (via the Classic interface) to modify the default Control used for each Table. This configuration change does not handle Solution Layering and any change made to this setting will either be deleted automatically whenever the base Solution updates, or will cause the base Solution update to fail completely if the control configuration is housed in another managed Solution layer.
Sensei strictly recommend not modifying the Control settings at the Table level for any of the Tables that are shipped with Sensei IQ.
(Note: Modifying the control for a subgrid at the Form level does not have this limitation as the layering is handled correctly by the Form).
More details here
SharePoint Group Sites
It is a common requirement to want to add elements or customise the SharePoint Site that is created in conjunction to the Microsoft (M365) Group. The approach to facilitating this is Using Site Designs to Manage Project Life Cycles.
Using techniques such as Hubs Sites, Site Designs, Site Scripts and connected Power Automate Flows allow for an almost infinite level of site customisation capabilities.
SSRS Reports for Dynamics
Dynamics and Model Driven Power Apps have the facility to render SQL Server Reporting Services (SSRS) reports. To create and customise them requires a very specific tool-chain.
To get started with using SQL Server Reporting Services (SSRS) report with model-driven PowerApps, you need to run some specific software. You will need to use FetchXML to write queries against Dataverse tables. You will need to install the following software in this order.
- Install Visual Studio Enterprise 2019
- Include the 'Data storage and processing' workload under 'Other Toolsets'
- Install Visual Studio Extensions
- Web Live Preview (Preview)
- Microsoft Reporting Services Projects
- Microsoft Analysis Services Projects
- Install the v9.0 Dynamics 365 Report Authoring Extension
You can then use Visual Studio 2019 to author reports.
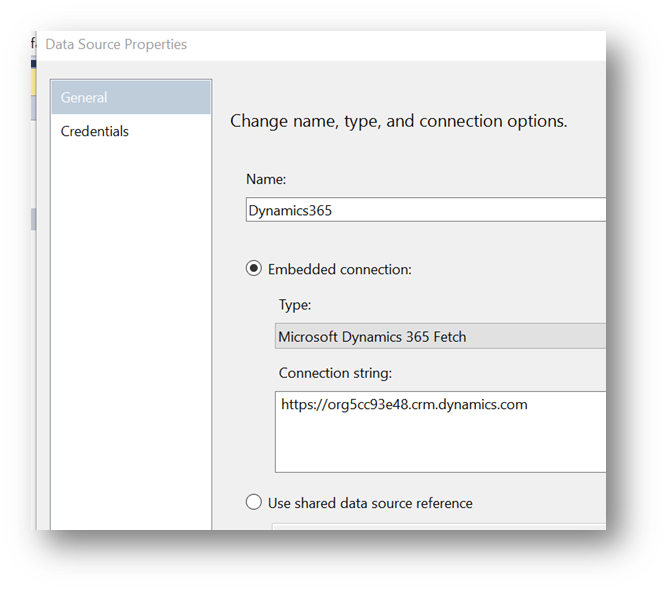
To add a datasource, you use an embedded connection and choose “Microsoft Dynamics 365 Fetch” as your type. For the Connection String, type in your Dynamics 365 root URL.
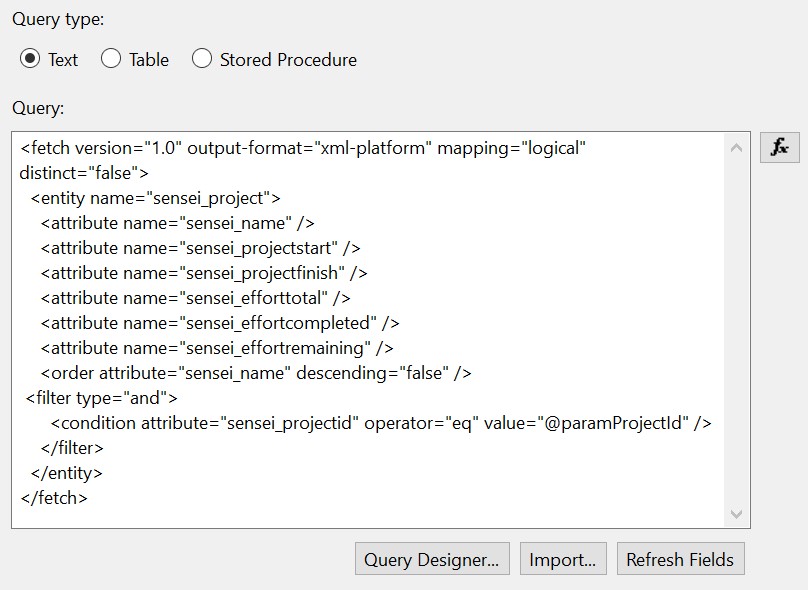
Add a dataset and use FetchXML as your query text. Note, you can use FetchXML Builder from the XRM Toolkit to help you build FetchXML queries.
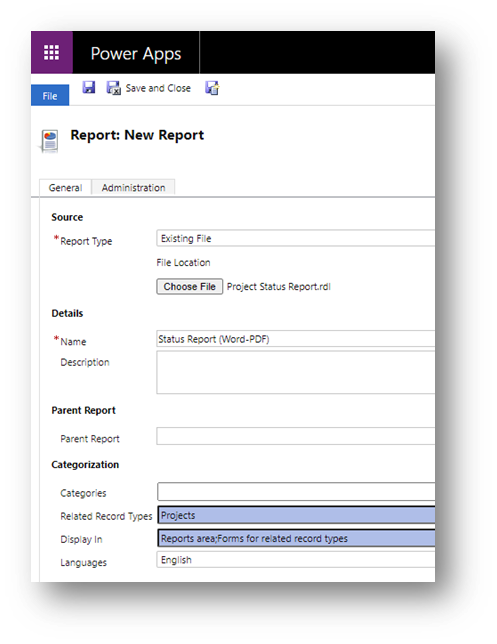
Save the .rdl file and then to Power Apps and navigate to your solution. You can then upload your report and choose the related table (such as Projects for a Project Status Report). To overwrite an existing report, go into Edit mode for the report and then select Choose File and upload your .rdl to overwrite.
Adding a Column
TODO:
- Add Column to Table
- Add Column to Form
Adding a Project Type (EPT)
TODO: Adding an EPT and setting tab visibility
Adding a Workflow
Custom Workflows can be added to Sensei.IQ, but there are some important steps required to make them function as expected within IQ.
Create a new Business Process Flow (BPF)
- Navigate from the cog menu in PowerApps to Advanced Settings
- From the Dynamics 365 Settings menu, select Solutions
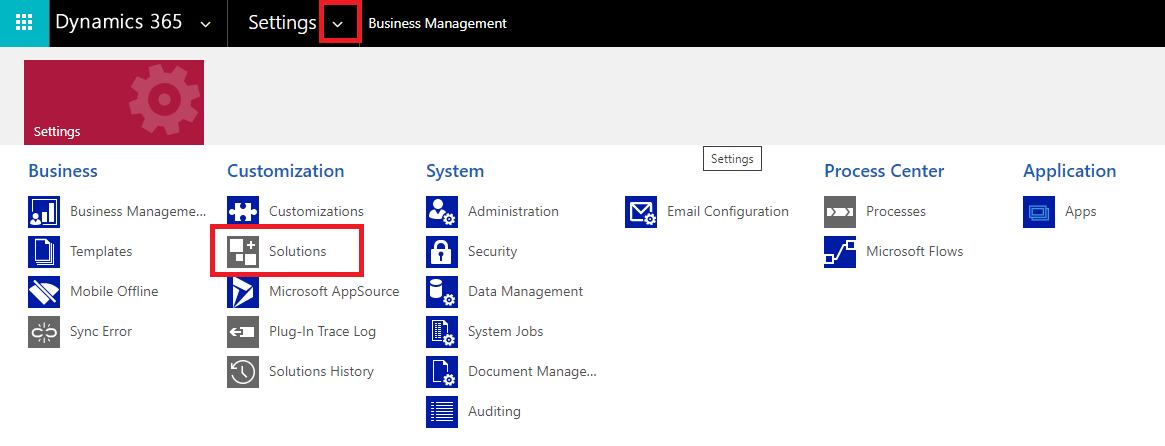
- Select the Sensei_IQ_Enhancements unmanaged Solution that contains the Enhancements for IQ in your environment.

- Select the New button and then select Process

- Enter a name for your Process, then ensure the following options are selected:
| Column | Value |
|---|---|
| Process name: | {Name of your BPF} |
| Category: | Business Process Flow |
| Table: | Project |
| Business Process Type: | Run process as a business flow (Classic) |
| Name: | {Should be automatically entered for you when you enter the Process name. Adjust if required.} |
Once you have entered the details, press OK.
- Now that your BPF has been created, populate it as per your requirements. Once you are happy, Save and Activate your BPF.

- Back within the IQ Enhancements Solution in the Dynamics 365 Advanced Settings area, select to either edit an existing enhancement Security Role, or select to add a new one.
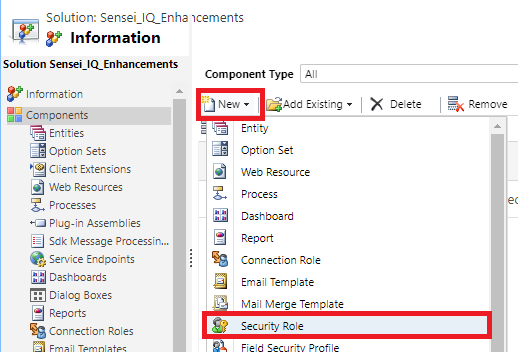
- If adding a new Role, provide a relevant Name and then select the Business Process Flows tab.

- Locate and select the Name of your Business Process Flow. The UI should update to provide security permissions to the role across the permission set.

- Select Save and Close.
- Next, Navigate to the Sensei.IQ for Project app. (Note: You will need the Sensei.IQ for Admin User role to perform these actions)
- Select the Settings area of the app
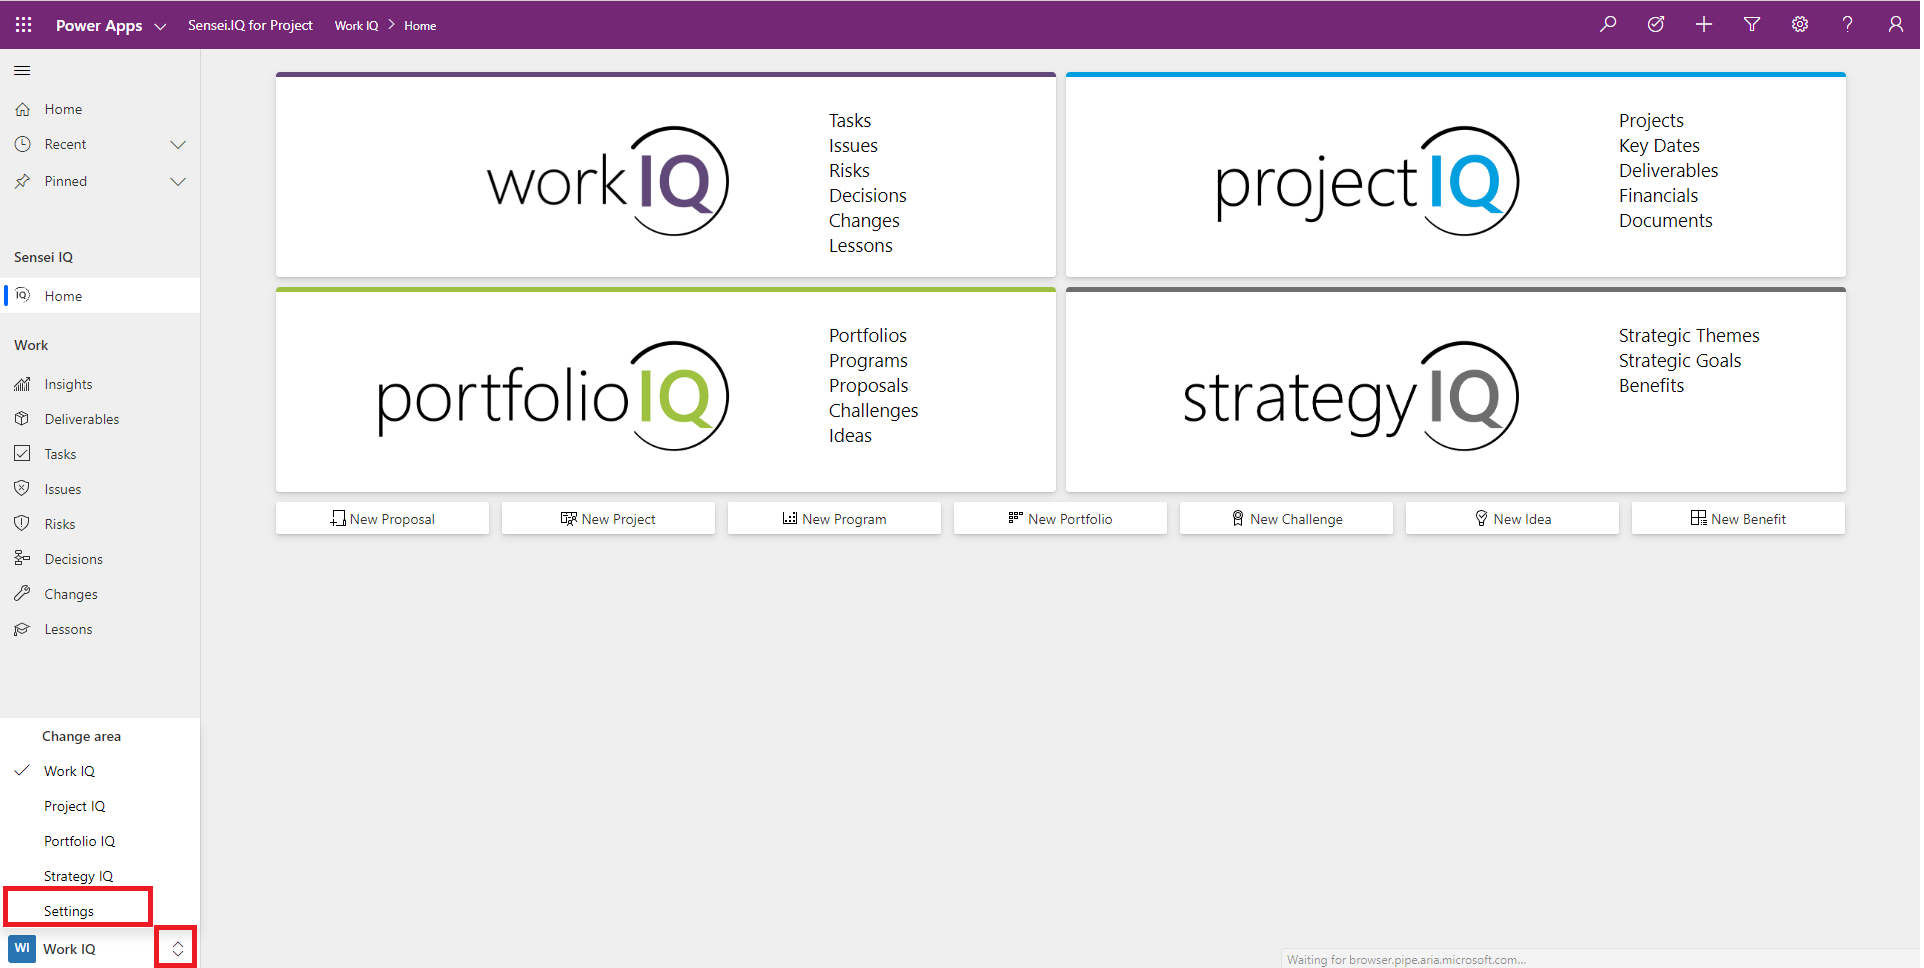
- Select Project Types from the left menu
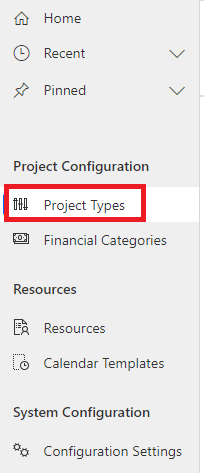
- Select to create a New Project Type (or select to edit an existing one, if you need to change its associated BPF Workflow)

- Enter the details for your new Project Type and the required tabs that you wish to display on the Project Form. Then select the Workflow tab on the Project Type form.
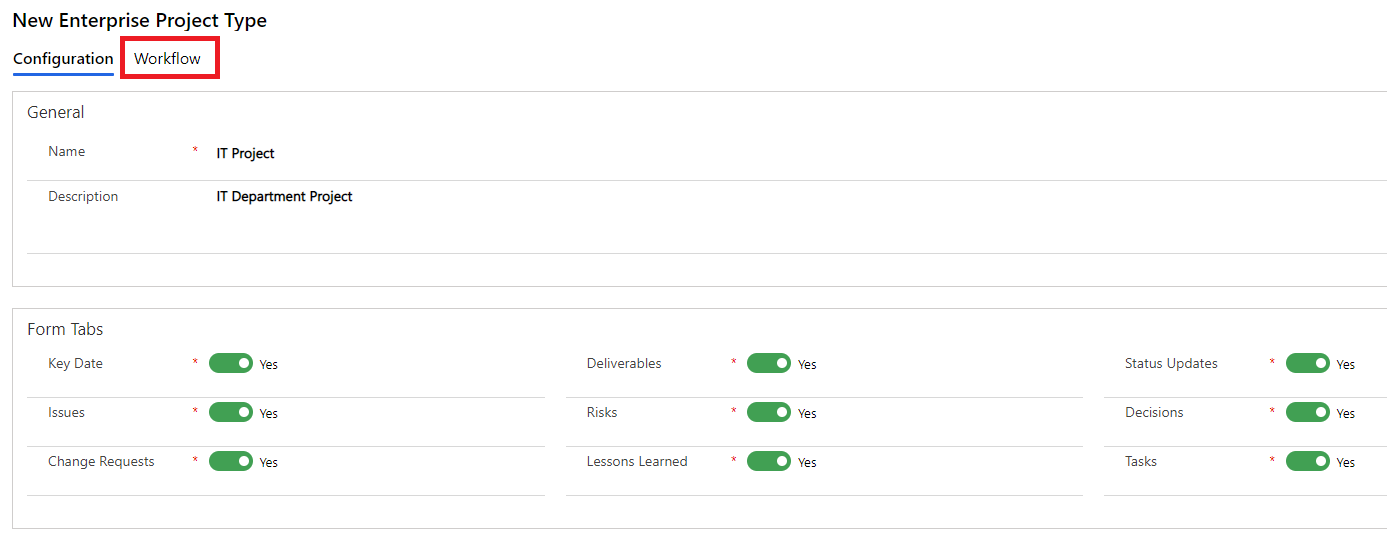
- In the Workflow Column, search for and locate the BPF that you created earlier.
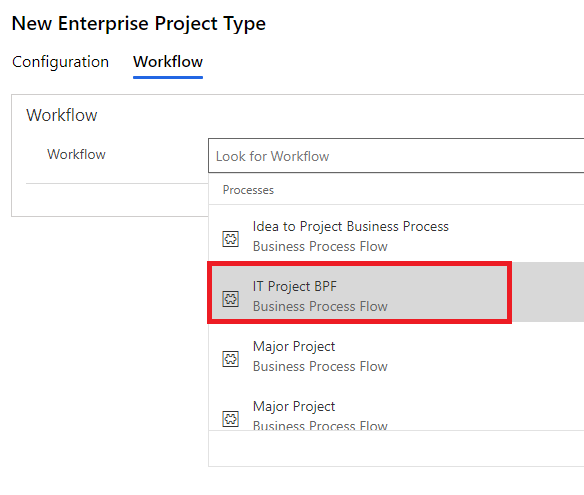
- Select Save & Close.
- Next, we need to make sure that the new BPF is available within the IQ app. Back within the IQ Enhancements Solutions in the Dynamics 365 Advanced Settings area, check whether the Sensei.IQ for Project model driven app is already part of your Enhancements Solution.
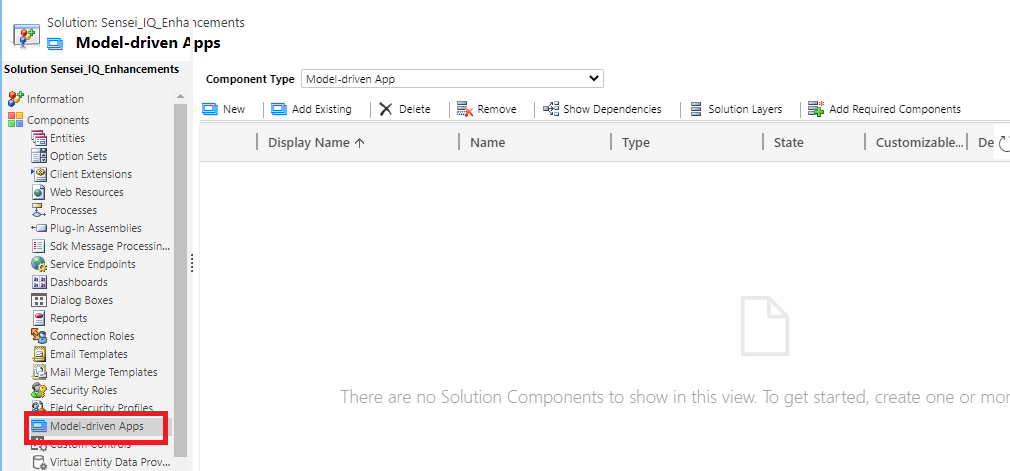
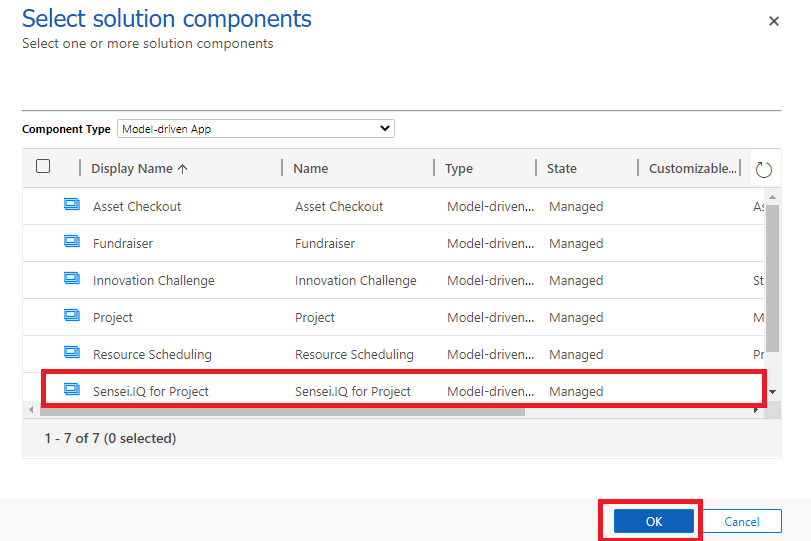
- If it is not yet added, use the Add Existing > Model Driven App option.
 and then select the Sensei.IQ for Project app and press OK
- Double-click the Sensei.IQ for Project model driven app to open it in Edit mode.
- In the App Designer, select the Business Process Flows object.
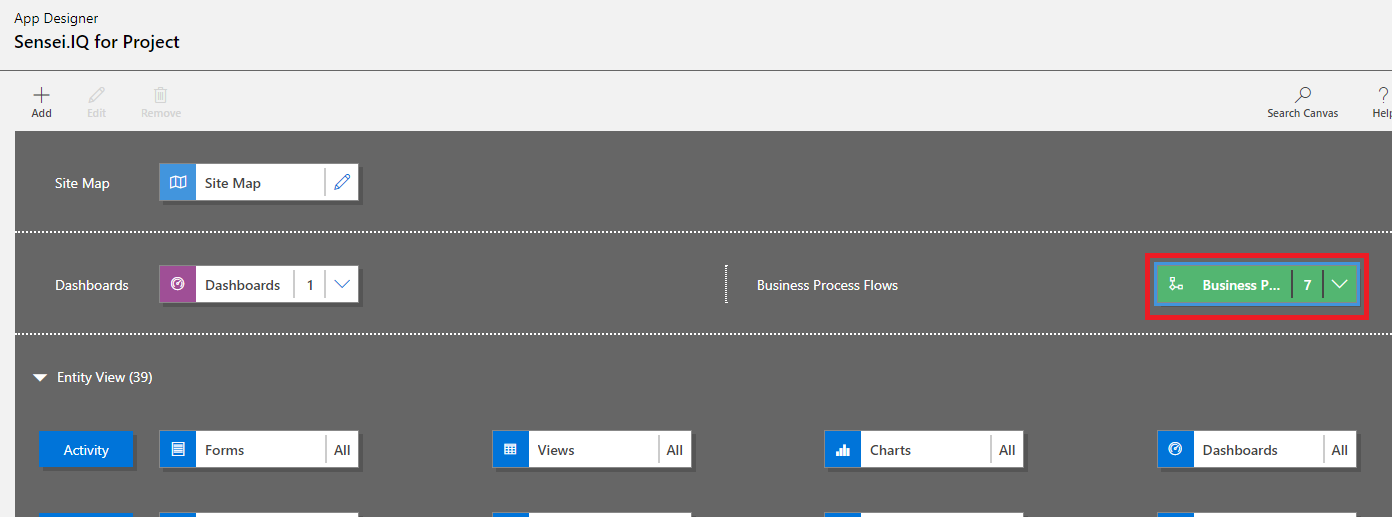
- In the list of BPFs that now appear in the right pane, select your new BPF
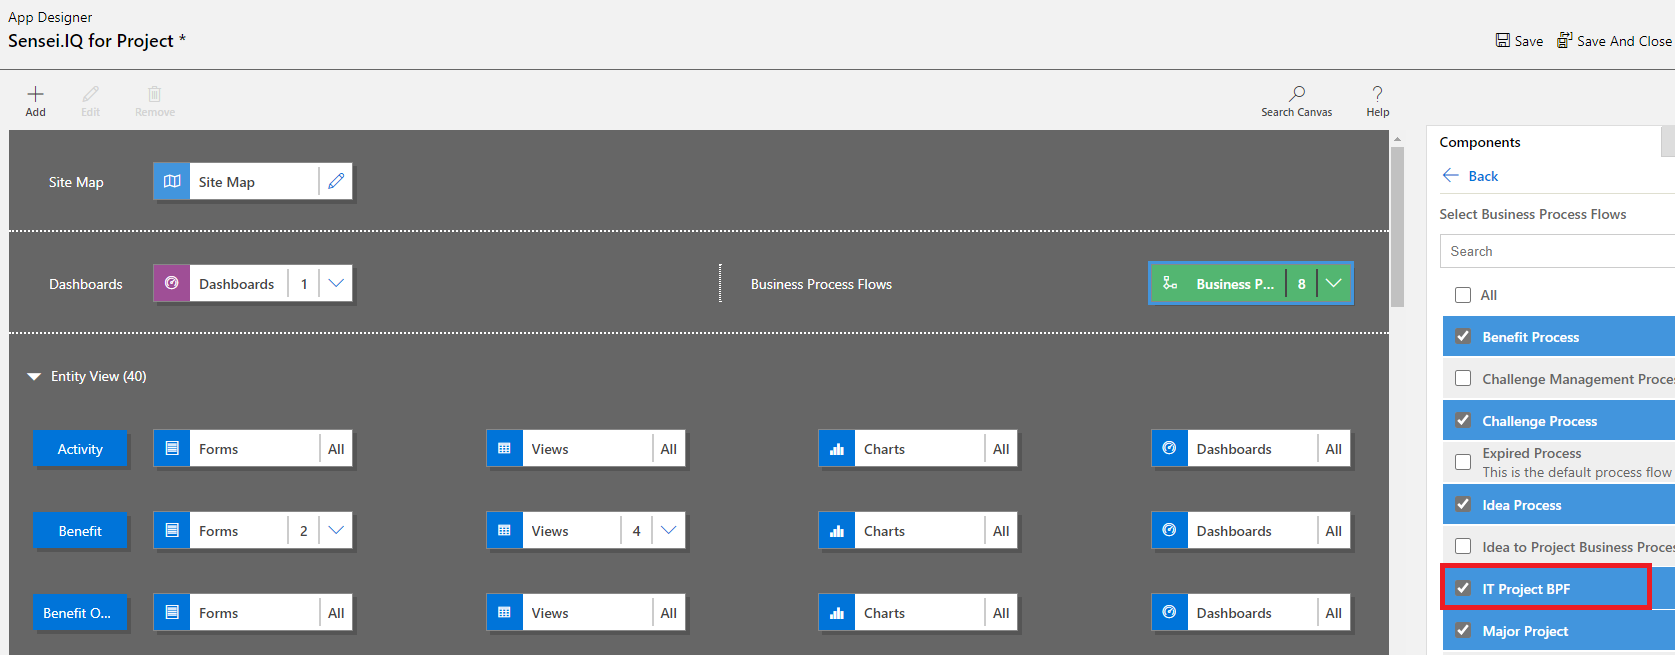
- Press Save and then Publish.

- Using the Dynamics Plugin Registration Tool, select to log in to your Environment
- If you have an issue installing the tool please check "nuget sources" and if missing you will need to run "nuget sources add -Name nuget.org -Source https://api.nuget.org/v3/index.json"
- Once connected to your environment, scroll down to locate the SenseiPlugin assembly

- Right-click (Plugin) SenseiPlugin.Sensei_SetProjectCurrentStage and select Register New Step
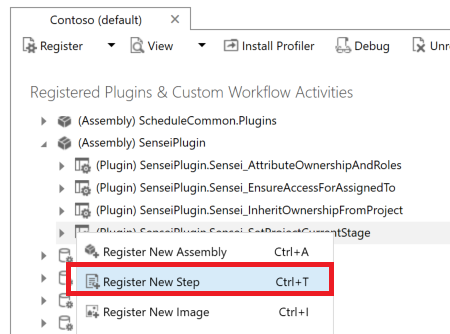
- Configure the Step with the following settings, then press Register New Step.
| Message | Create |
|---|---|
| Primary Table | { Select your BPF Table } |
| Secondary Table | {none} |
| Filtering Attributes | {none} |
| Event Handler | (Plugin) SenseiPlugin.Sensei_SetProjectCurrentStage |
| Step Name | Sensei.IQ for Project - Set Project Current Stage : Create of { Your BPF Table Name } |
| Run in User's Context | Calling User |
| Execution Order | 1 |
| Description | SenseiPlugin.Sensei_SetProjectCurrentStage: Create of { Your BPF Table Name } |
| Event Pipeline Stage of Execution | PostOperation |
| Execution Mode | Asynchronous |
| Deployment | Server |
| Delete AsyncOperation if StatusCode = Successful | Unchecked |
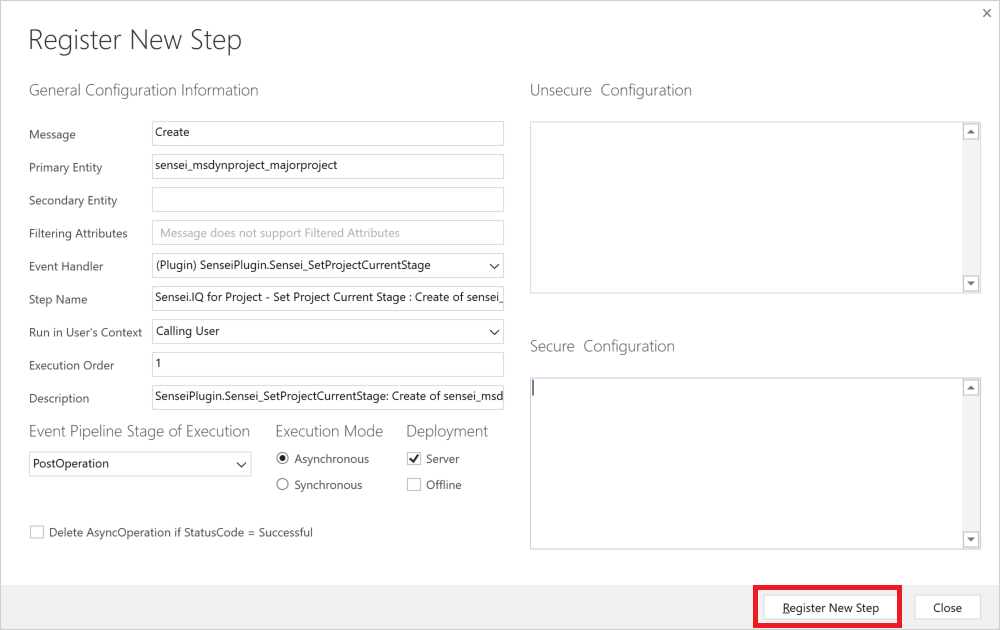
- Again Right-click '(Plugin) SenseiPlugin.Sensei_SetProjectCurrentStage' and select 'Register New Step' - this time we will add a handler for the Update operation
- Configure the Step with the following settings, then press 'Register New Step'
| Message | Update |
|---|---|
| Primary Table | { Select your BPF Table} |
| Secondary Table | {none} |
| Filtering Attributes | activestageid, completedon, modifiedon |
| Event Handler | (Plugin) SenseiPlugin.Sensei_SetProjectCurrentStage |
| Step Name | Sensei.IQ for Project - Set Project Current Stage : Update of { Your BPF Table Name } |
| Run in User's Context | Calling User |
| Execution Order | 1 |
| Description | SenseiPlugin.Sensei_SetProjectCurrentStage: Update of { Your BPF Table Name } |
| Event Pipeline Stage of Execution | PostOperation |
| Execution Mode | Asynchronous |
| Deployment | Server |
| Delete AsyncOperation if StatusCode = Successful | Unchecked |
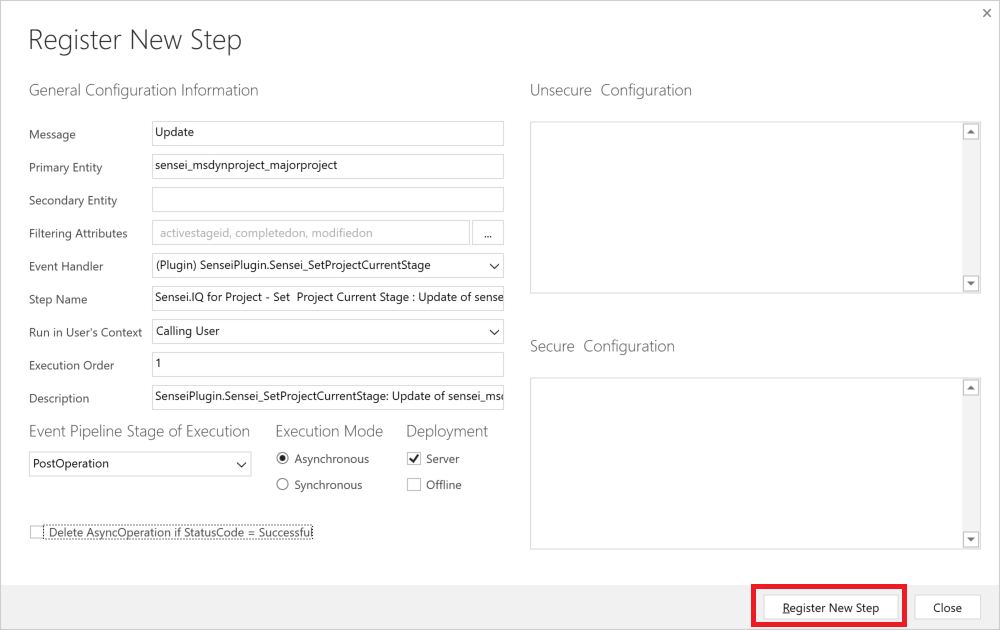
- After configuring these Plugin registration steps, whenever your BPF Table is used (e.g. when a Project moves from one stage to another) your Project will be updated with the Current Stage value.
- Your BPF should now work and display correctly within Sensei.IQ.

Unhiding a Command Bar Button
Various Command Bar buttons have been hidden from various Tables relating to the Sensei.IQ Solution. If there is a customer requirement to unhide any of these buttons, then the following procedure can be used:
- Create an Unmanaged Solution (if one does not already exist) in the customer environment and ensure you add to it the existing Tables that you wish to modify the ribbon for.
- Open Ribbon Workbench 2016 (either as web add-on in Dynamics or from the XrmToolbox desktop application).
- Select Open Solution

- Select to open your unmanaged Solution containing the Tables you wish to modify the ribbon for.
- Note: If Ribbon Workbench fails to load your Solution (because your Solution is large), try multiple times. Sometimes this error is transient.
- Once your Solution has loaded, ensure the Command Bar tab is selected
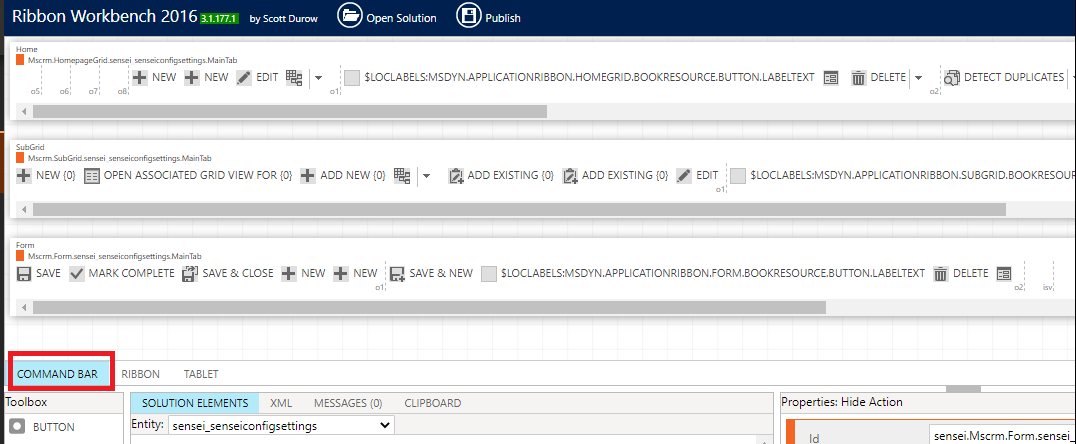
- Next, select the Table that you wish to modify the ribbon for
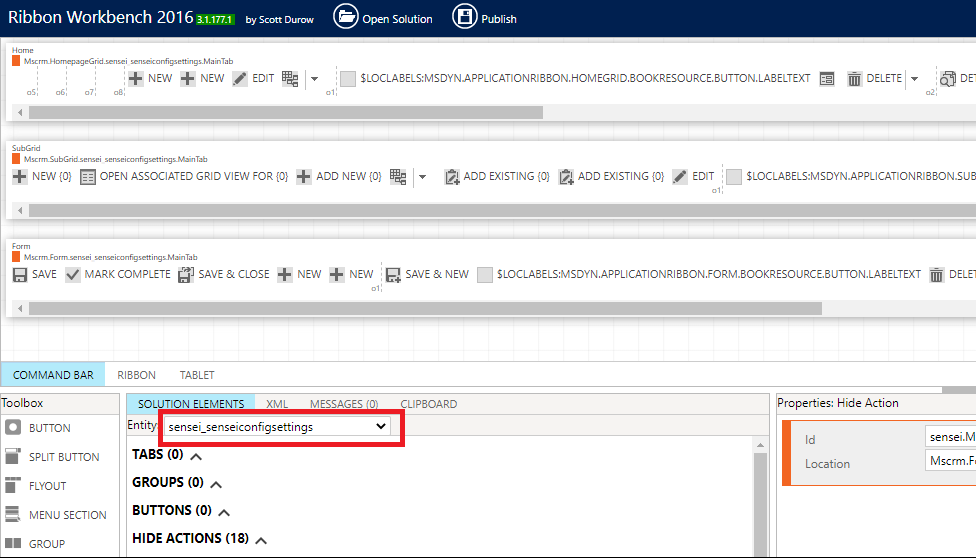
- Any buttons which have previously been hidden will be shown under the HIDE ACTIONS heading
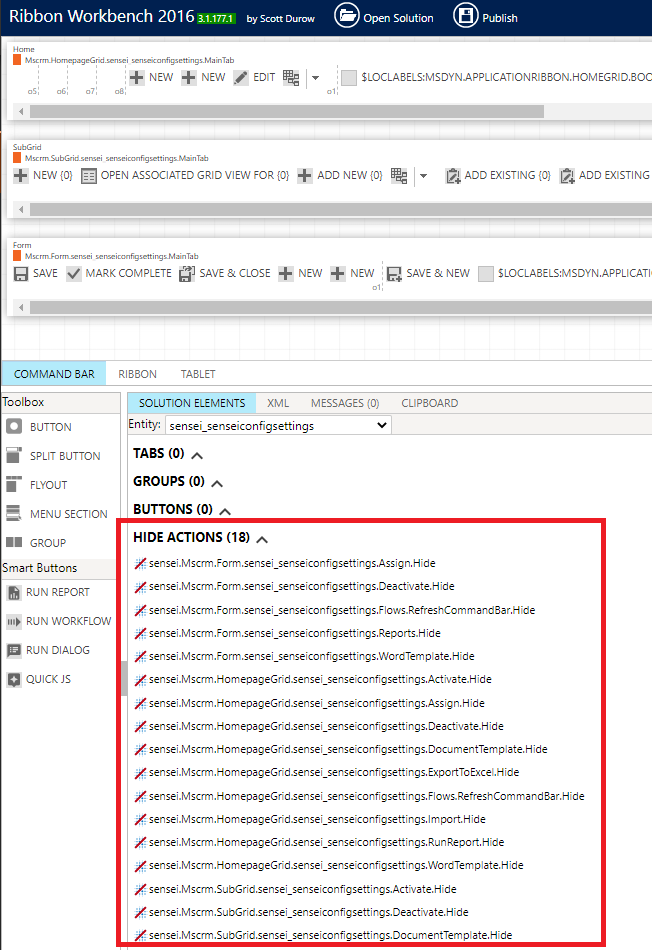
- To unhide a button, right-click the hide action that you wish to remove and select Un-Hide

- Click OK on the notification. Take note that you will only see the unhidden button after a publish operation (and only in Ribbon Workbench after subsequently reloading the Solution).
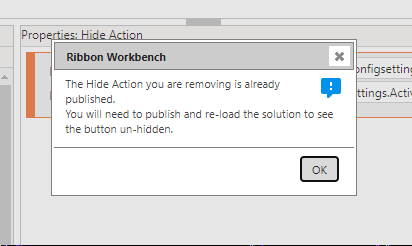
- Make the required changes to whichever Tables you wish to modify the command bar for.
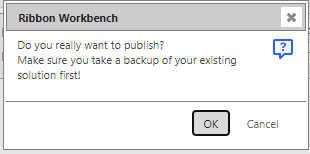
- Once you have completed your changes, select Publish

Click OK to confirm Publish operation.
Dealing with Custom Tables
As with all customisations to IQ, Sensei recommend creating an unmanaged Solution which will then contain your additions and modifications to IQ artefacts. Custom Tables are no different and should be created in your IQ Enhancements solution.
This section provides guidance on how to configure IQ to ensure that your custom Table is treated the same way as out of the box IQ Tables in terms of security and in particular inheriting ownership from the Project, Program or Portfolio that your custom Table is associated with.
The following configuration steps assume that you will have already:
- Created your Custom Table in your enhancements solution
- Added your Custom Table to the Project, Program and/or Portfolio form(s) as a tab with a subgrid
- Created a custom Security Role which provides access to your custom Table
- Added your custom Security Role to the users who require it
- If associated to more than one parent type, we highly recommend creating a Business Rule to ensure that your custom Table records can only relate to one Project, Program or Portfolio at a time. (If you were to relate your custom record to a Project and to a Portfolio, the ownership of your Table record could have unexpected results).
Note
When creating Tables that relate to a Project ensure that the relationship between the custom Table and the Project Table is not set to 'Parental'. Instead, configure the relationship as follows:
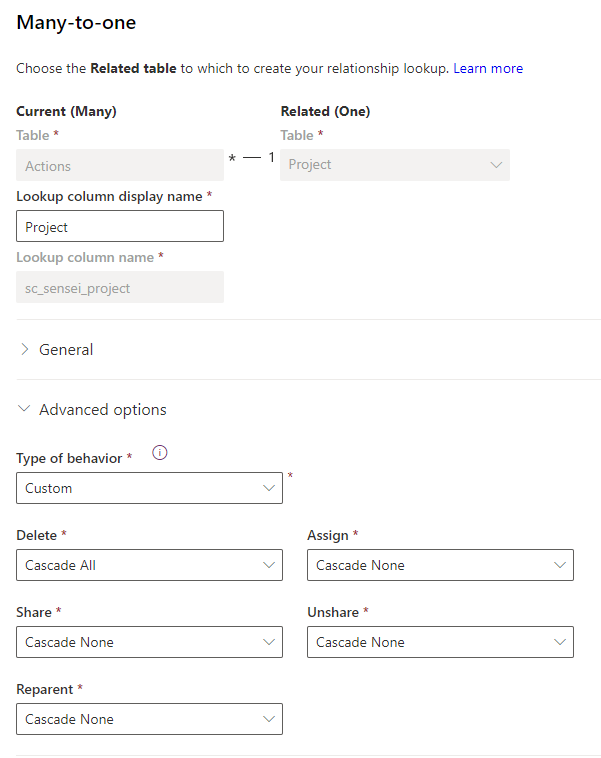
If your custom Table contains Lookup Columns to Project and/or Program and/or Portfolio, you will need to configure the Sensei Config Setting associated with each of those 'parent' Tables to ensure IQ is aware of your custom Table.
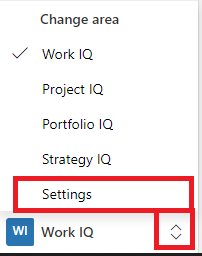
- As an IQ Admin user, open the Sensei IQ for Project app and navigate to the Settings area.
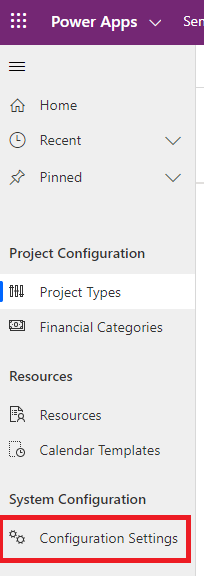
- From the left menu select Configuration Settings.
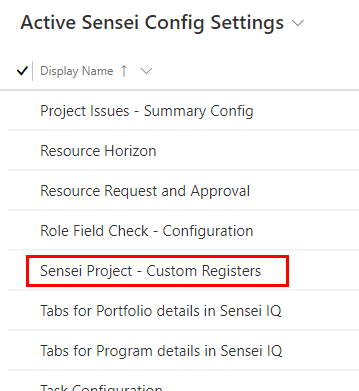
- Select the {Parent} - Custom Registers setting for the Parent of your custom Table. (Note: You will need to repeat these steps for each parent. e.g. if your custom Table relates to Projects and Programs, you will need to perform these steps for 'Sensei Project - Custom Registers' and 'Program - Custom Registers').
Note
If you do not see the corresponding settings item, switch to the Inactive Sensei Config Settings view, locate the setting and switch it to Active.
- Select the New Items button to add your new custom Table configuration.

- Enter details relating to your custom Table to define:
- Table Name: The internal name of your custom Table.
- Required Team Root Role Id: The Id of your custom security role (this role will be applied to any owner teams).
- To find the roleid GUID, from within the Sensei IQ app, click the Gear, Advanced Settings, Security, Security Roles and then click the custom Security Role.
- Copy the id value between the %7b and %7d values in the URL string, such as
https://xxxxxxxx.crm.dynamics.xyz/biz/roles/edit.aspx?id= %7bDB648CF5-9DF8-EA11-A815-000D3AD20D1D%7d
- Copy the id value between the %7b and %7d values in the URL string, such as
- To find the roleid GUID, from within the Sensei IQ app, click the Gear, Advanced Settings, Security, Security Roles and then click the custom Security Role.
- Parent Column Name Link: The internal Column name in your custom Table that relates the custom Table to its parent (in the case of a setting for Project - Custom Registers, this would identify the Project Column).
- Assigned To Column: If your custom Table has an Assigned To type Column, identify it by its internal name here.
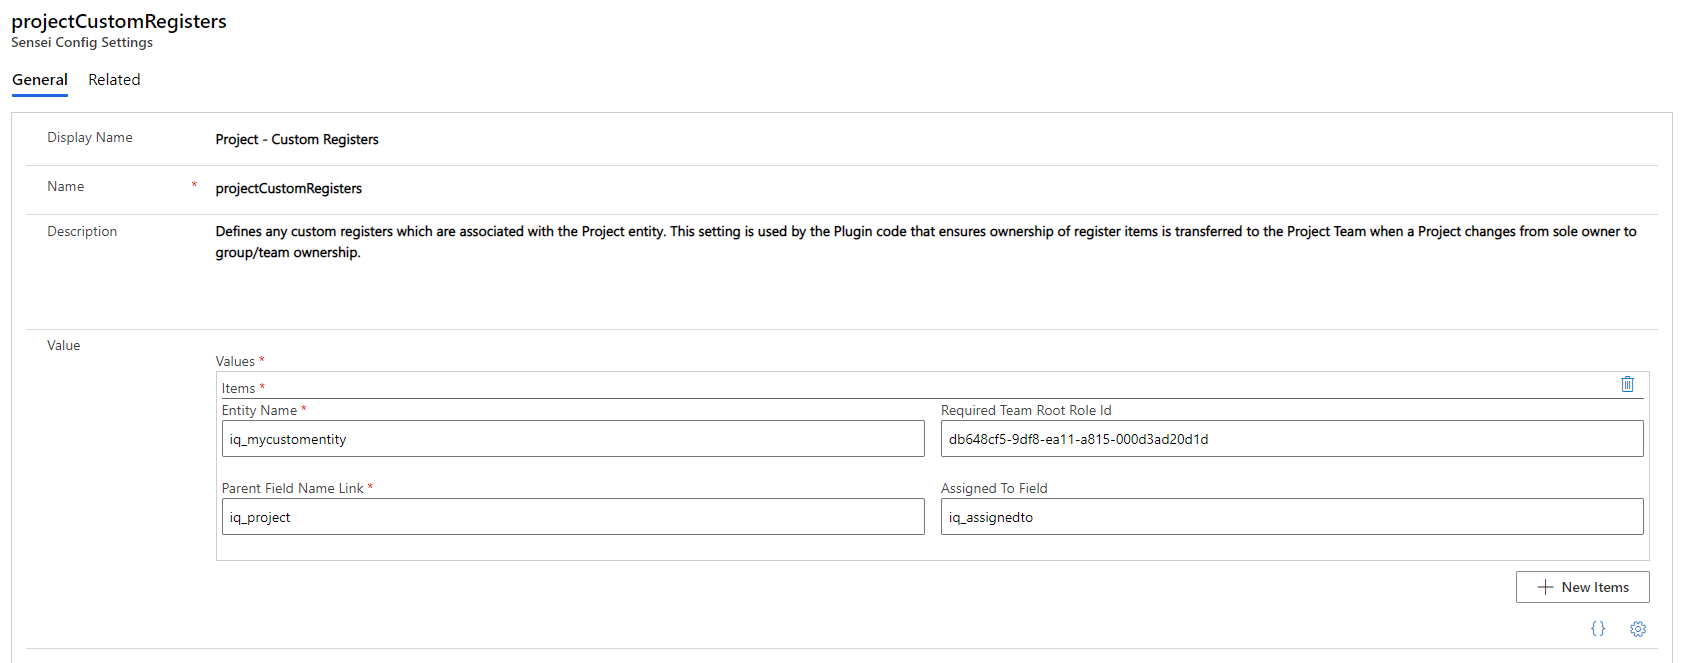
- Save your Config Settings item
- Repeat these steps for each parent (Project, Program or Portfolio) that relates to your custom Table.
You will also need to perform these next steps to ensure that the Sensei IQ Plugin code is triggered to correctly run when you create or update a custom Table record. These Plugin steps ensure that your custom Table records will be visible to members of a Project, Program or Portfolio team (as applicable). To perform these steps, you will need to use the Plugin Registration Tool available here.
- Launch the Plugin Registration Tool (PluginRegistration.exe) and select Create New Connection.

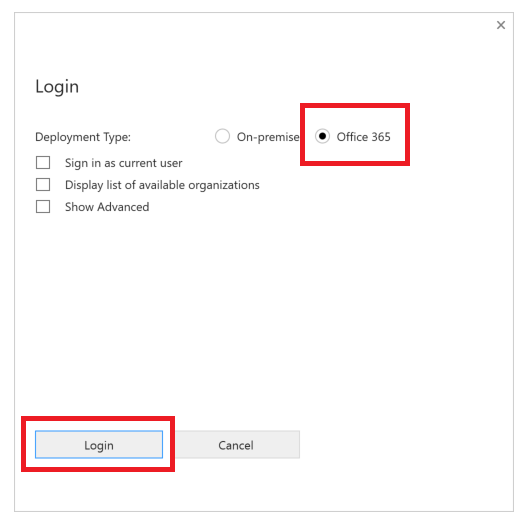
- Ensure you select Office 365, then press Login.
- Enter your credentials to log in to Microsoft 365.
- In the list of Plugin Assemblies, locate (Assembly) SenseiPlugin and click the arrow to expand.
- Depending on your implementation, SenseiAtsumeruPlugin is comparable to SenseiPlugin.
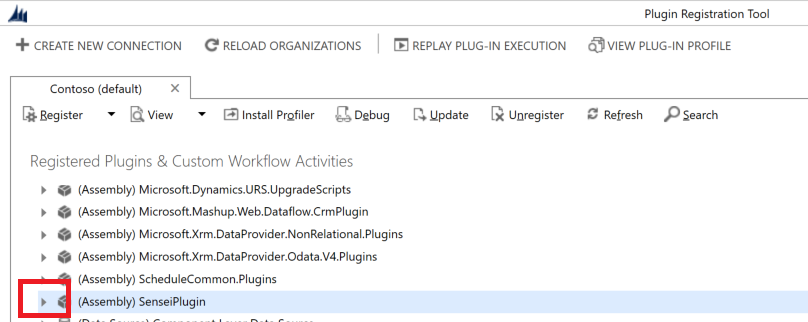
- Depending on your implementation, SenseiAtsumeruPlugin is comparable to SenseiPlugin.
- Locate (Plugin) SenseiPlugin.Sensei_InheritOwnershipFromProject and right-click and select Register New Step.
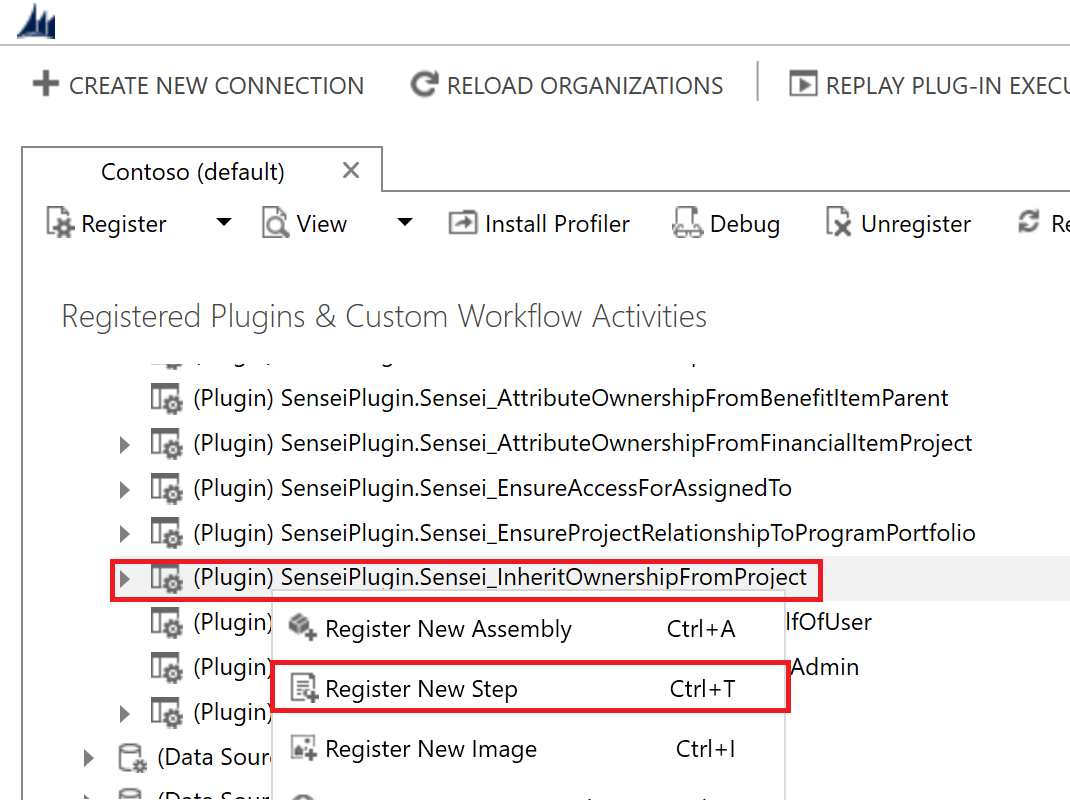
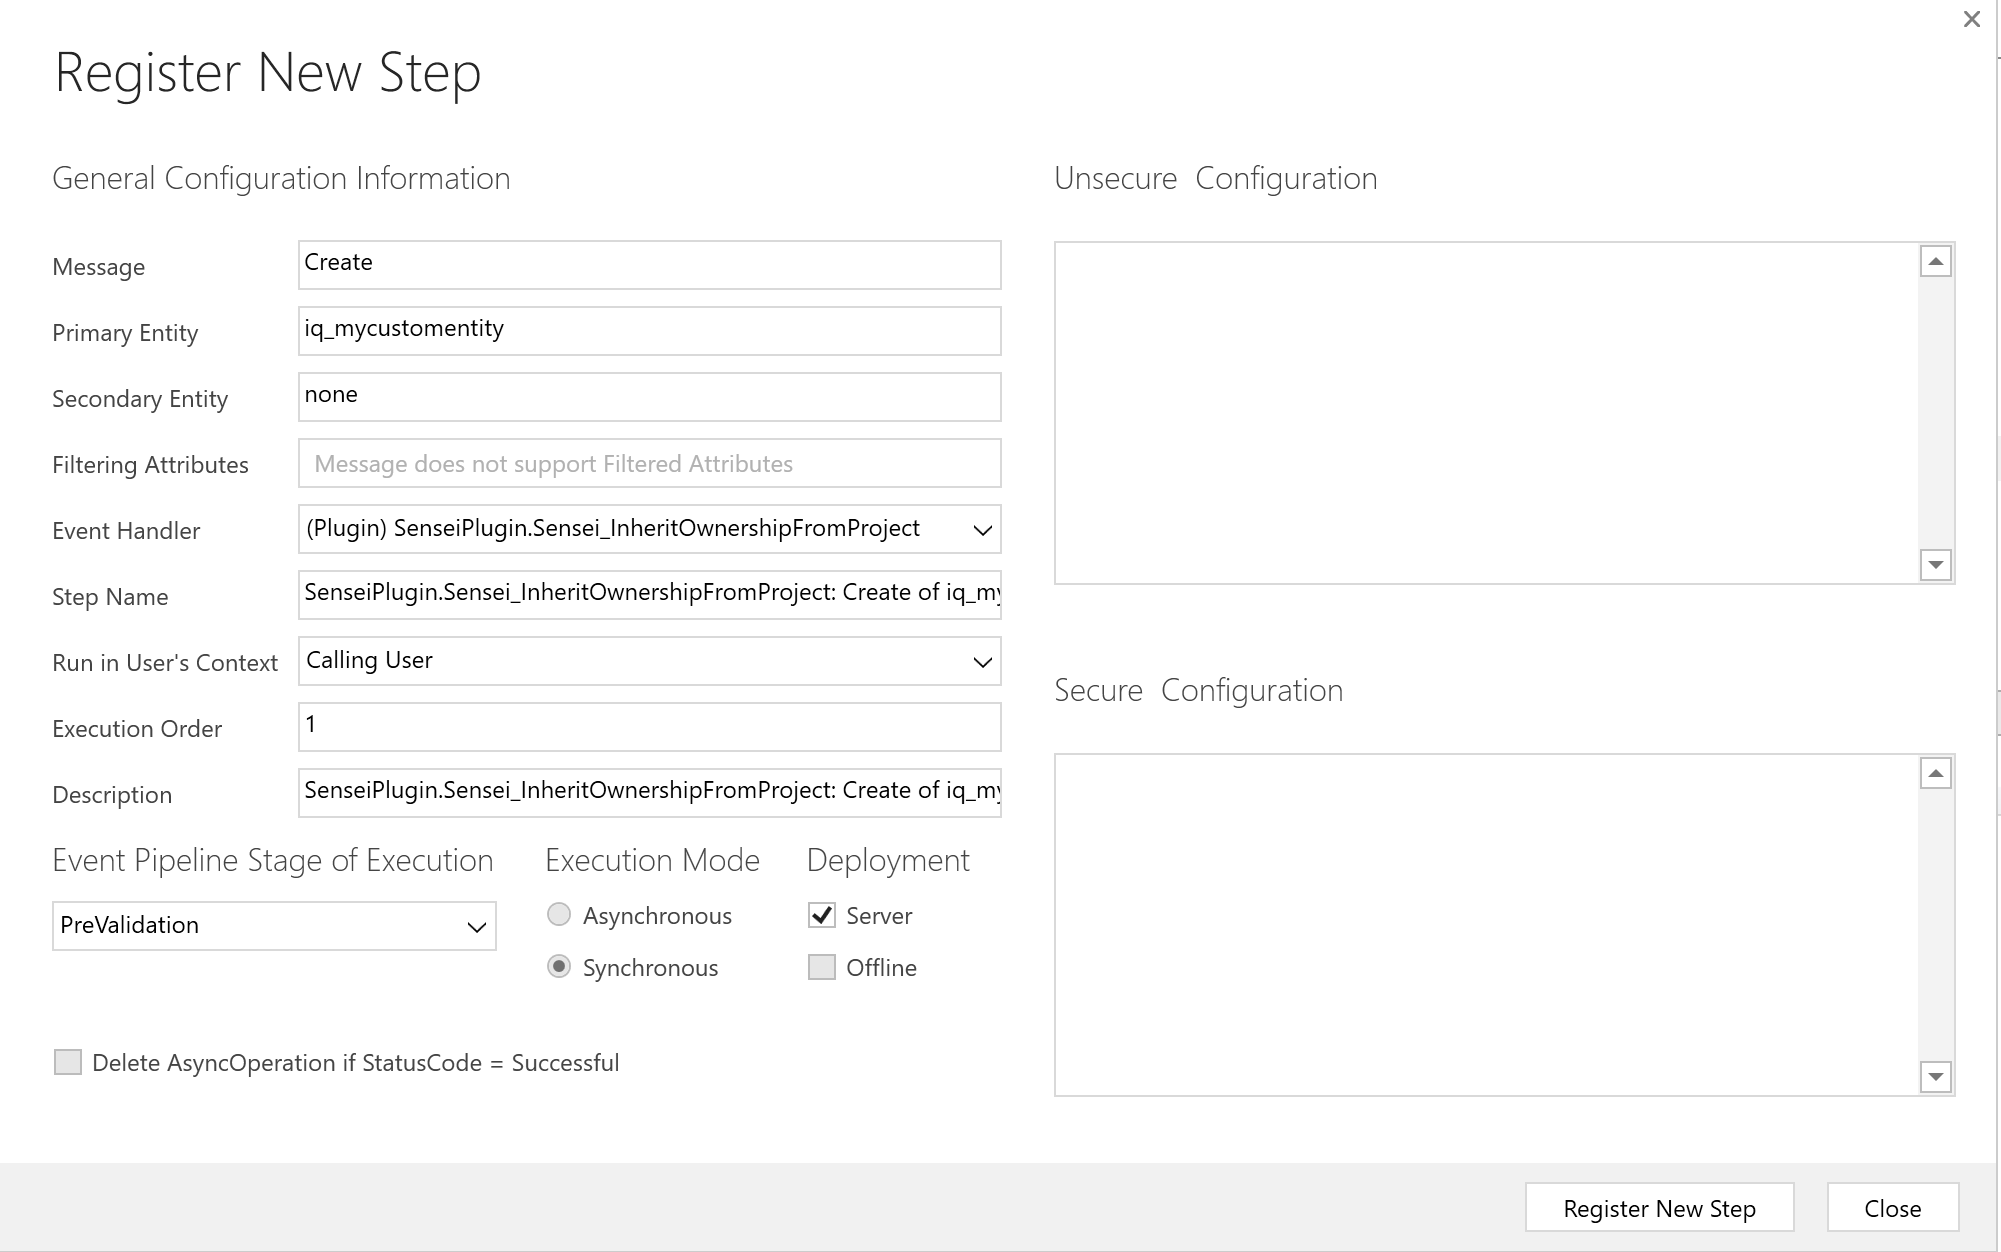
- Enter the following details, then press Register New Step. This will ensure that whenever a new record is created in your custom Table that the InheritOwnershipFromProject plugin code is run - which will ensure that your custom Table record is attributed the same ownership as the Project, Program or Portfolio that it is associated with.
- Message: Create
- Primary Table: {Enter your custom Table by its internal name}
- Secondary Table: {Leave blank}
- Filtering Attributes: {Leave blank - unavailable for a Create action}
- Event Handler: {Leave this set to (Plugin) SenseiPlugin.Sensei_InheritOwnershipFromProject}
- Step Name: {Add a name for your Plugin Step, or leave as per the default.}
- Run in User's Context: Calling User
- Execution Order: 1
- Description: {Add a description for your Plugin Step, or leave as per the default.}
- Event Pipeline Stage Of Execution: PreValidation
- Execution Mode: Synchronous
- Deployment: Server
- Perform the following steps only if your custom Table has an Assigned To Column which you have defined in the configuration settings. These steps ensure that if the person you have assigned to your Table record is not part of the Project/Program/Portfolio team, then the individual custom Table record will be shared with that person as an individual.
- From the Plugin Registration Tool, right-click (Plugin) SenseiPlugin.Sensei_EnsureAccessForAssignedTo and select Register New Step.
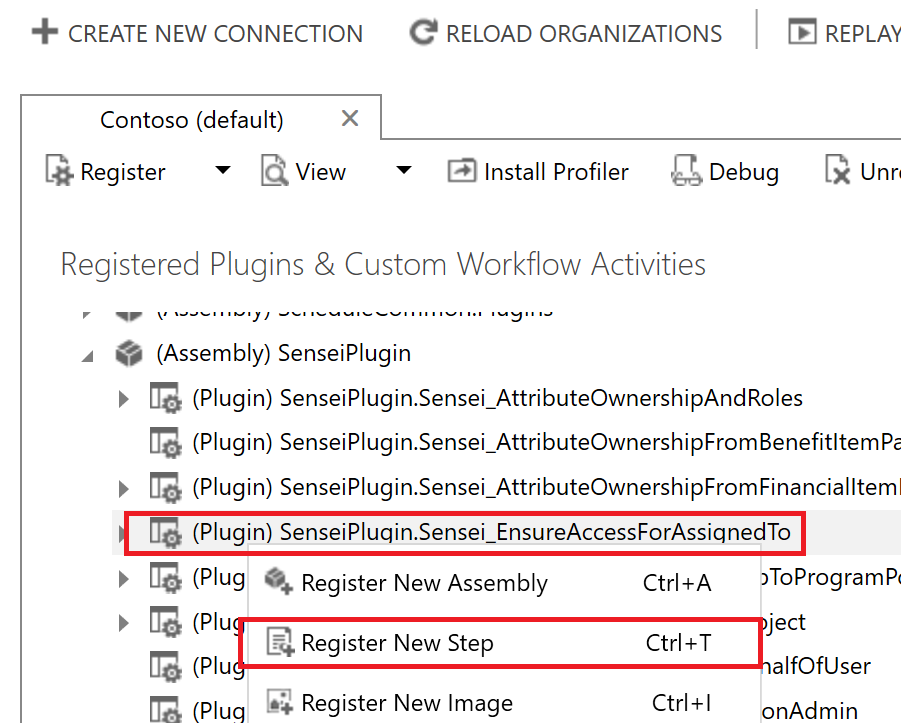
- Enter the following details, then press Register New Step.
- Message: Create
- Primary Table: {Enter your custom Table by its internal name}
- Secondary Table: {Leave blank}
- Filtering Attributes: {Leave blank - unavailable for a Create action}
- Event Handler: {Leave this set to (Plugin) SenseiPlugin.Sensei_EnsureAccessForAssignedTo}
- Step Name: {Add a name for your Plugin Step, or leave as per the default.}
- Run in User's Context: Calling User
- Execution Order: 1
- Description: {Add a description for your Plugin Step, or leave as per the default.}
- Event Pipeline Stage Of Execution: PostOperation
- Execution Mode: Asynchronous
- Deployment: Server
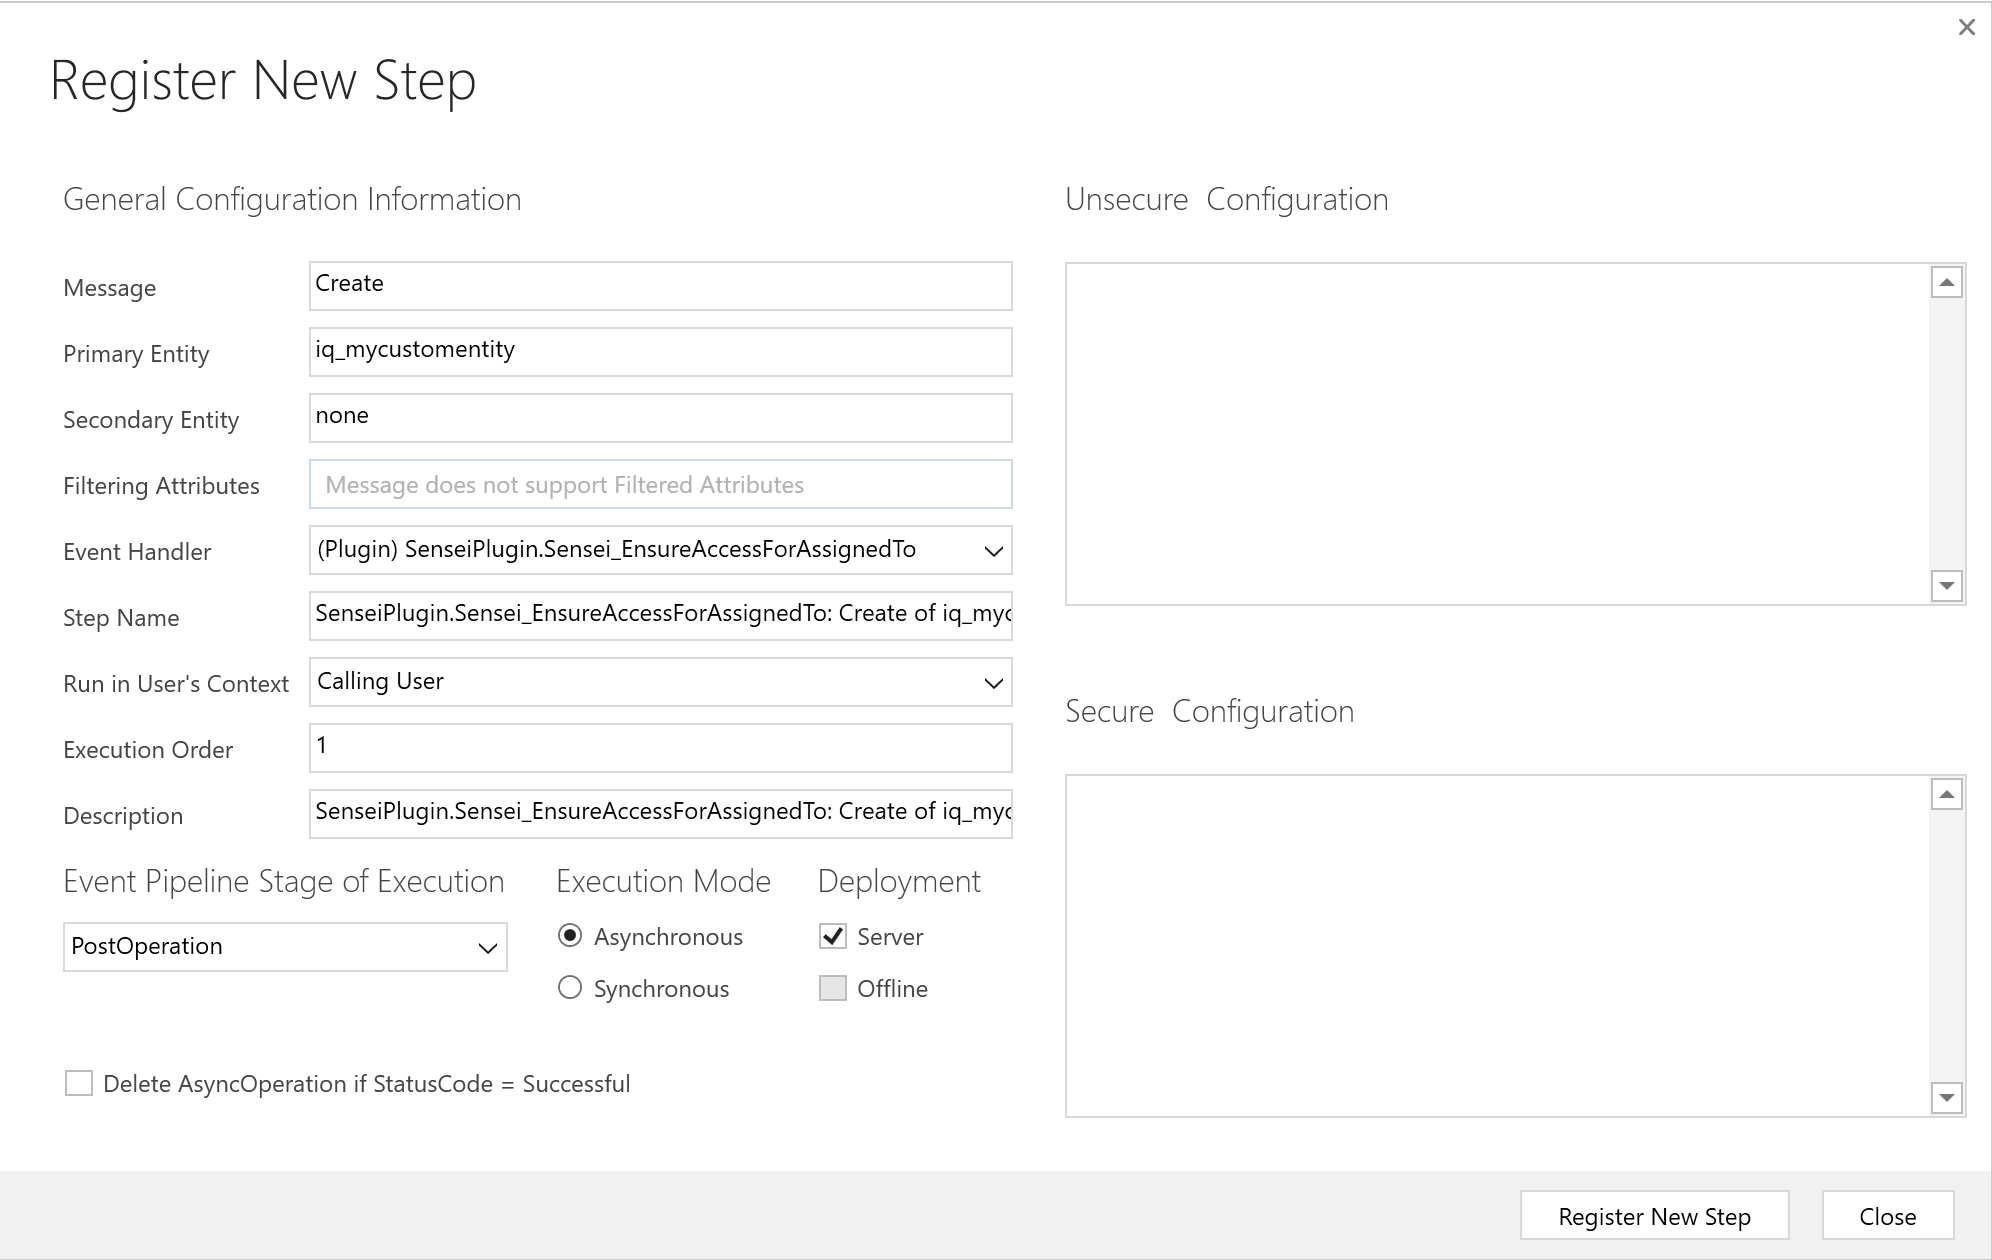
- Again right-click (Plugin) SenseiPlugin.Sensei_EnsureAccessForAssignedTo and select Register New Step.
- Enter the following details, then press Register New Step.
- Message: Update
- Primary Table: {Enter your custom Table by its internal name}
- Secondary Table: {Leave blank}
- Filtering Attributes: {Select your Assigned To Column}
- Event Handler: {Leave this set to (Plugin) SenseiPlugin.Sensei_EnsureAccessForAssignedTo}
- Step Name: {Add a name for your Plugin Step, or leave as per the default.}
- Run in User's Context: Calling User
- Execution Order: 1
- Description: {Add a description for your Plugin Step, or leave as per the default.}
- Event Pipeline Stage Of Execution: PostOperation
- Execution Mode: Asynchronous
- Deployment: Server
- Delete AsyncOperation if StatusCode = Successful: {Uncheck}
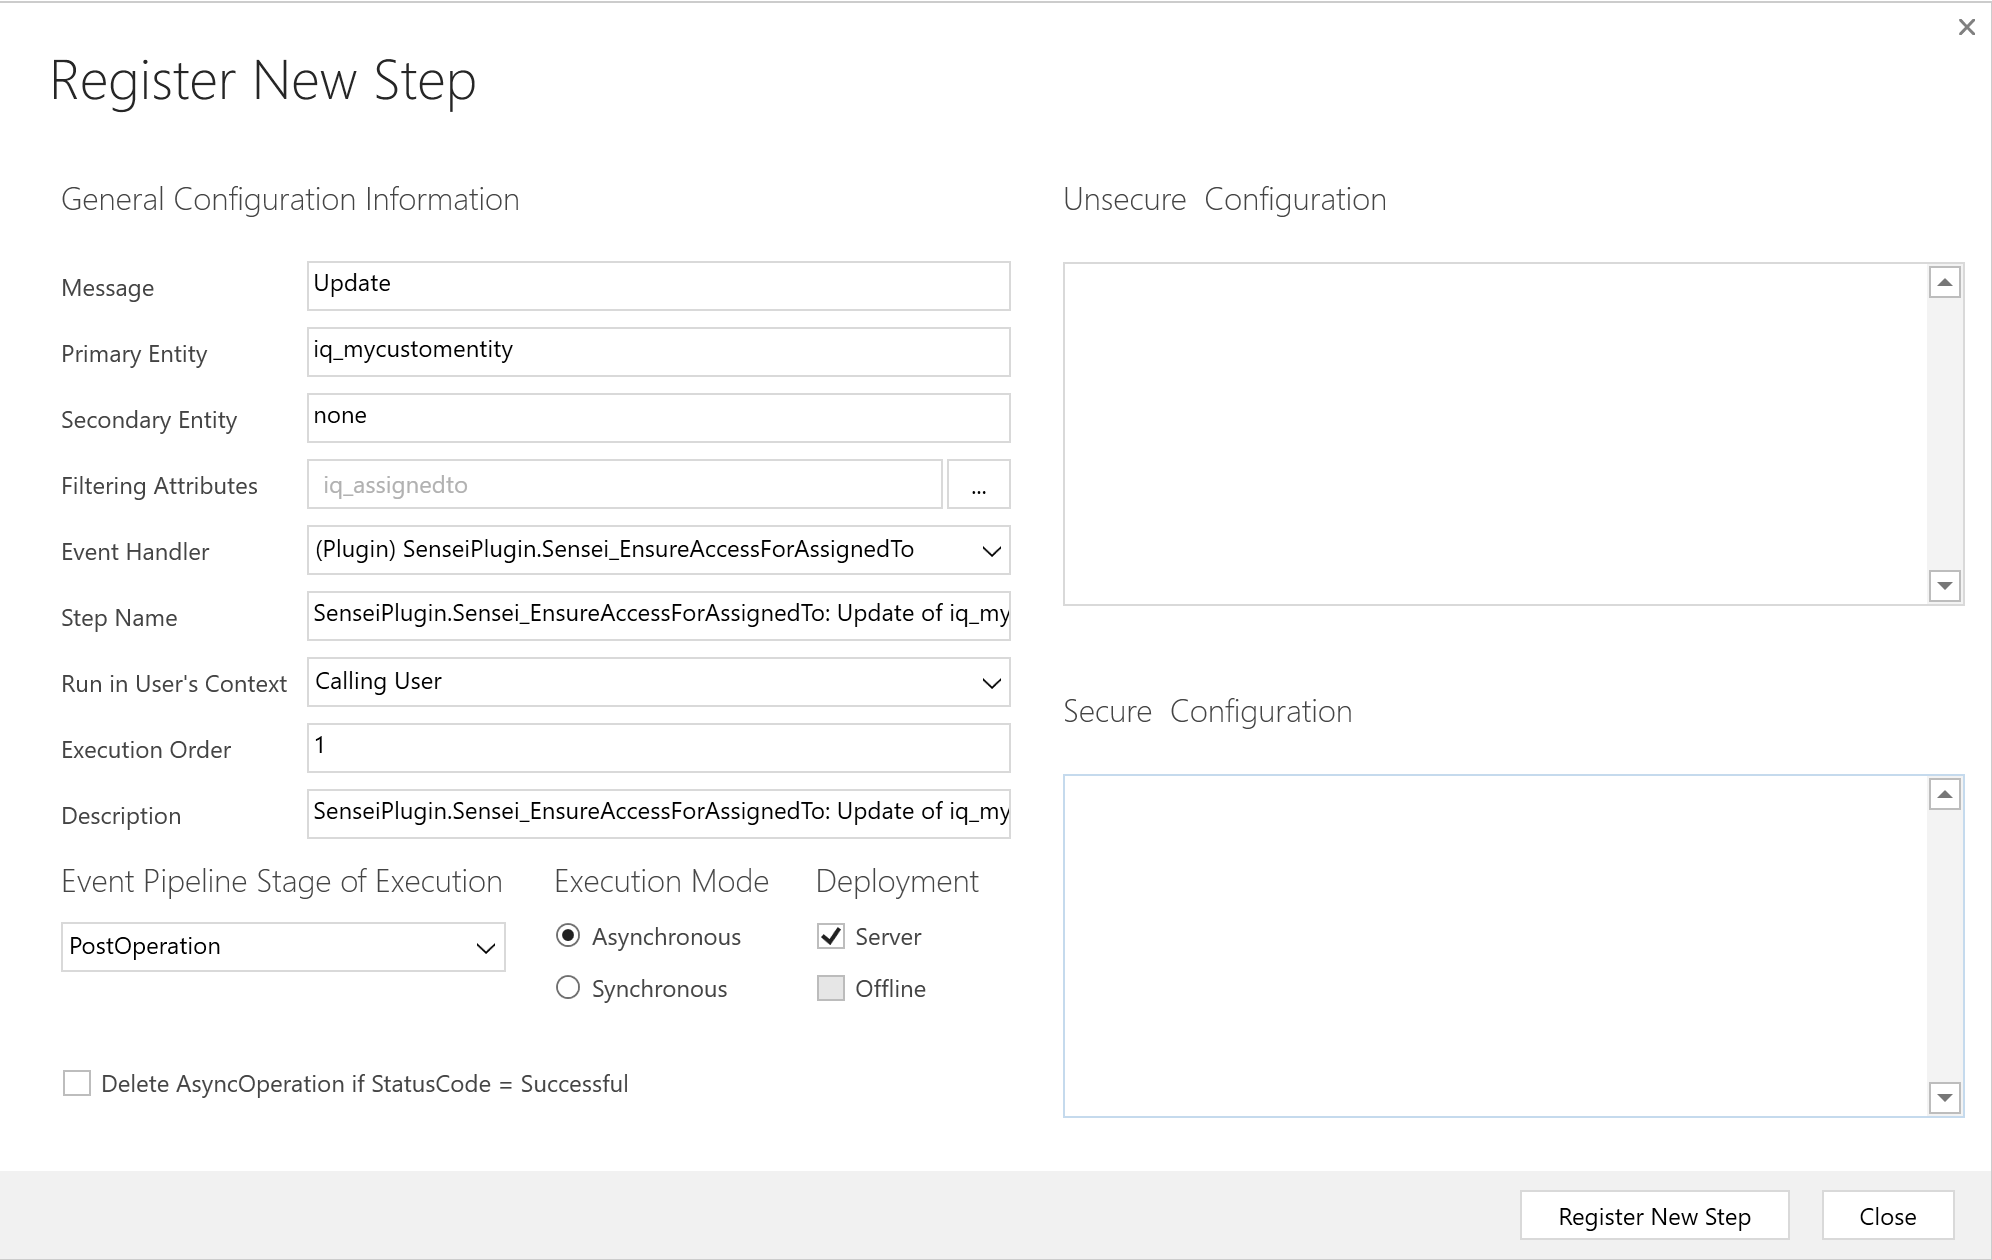
- Following best practices, you should add this custom plugin step to your custom Solution.
- Access your Sensei IQ Enhancements solution and select Add Existing > More > Developer > Plug-in step, then locate the newly registered step(s).
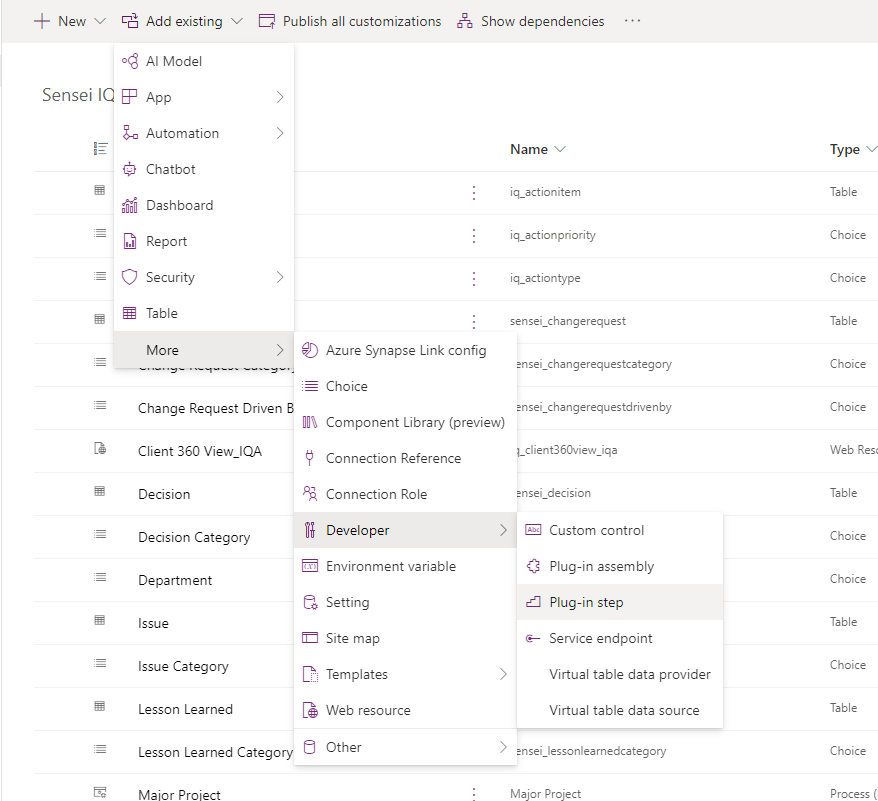
- Once added, publish all customizations.
- Access your Sensei IQ Enhancements solution and select Add Existing > More > Developer > Plug-in step, then locate the newly registered step(s).
Deep Deep Linking
In 2021.02.17.2 we introduced the Deep Deep Linking feature to assist with embedding scenarios including Microsoft Teams Tabs.
To embed a reference to a particular Sensei Project and Tab use the following URL format
https://<orgURL>/main.aspx?appid=<appID>&pagetype=entityrecord&etn=<entityName>&id=<entityID>&navbar=entity&extraqs=sensei_showTab%3D<tabName>%26sensei_hideHeader%3D1
The query string parts are:
- etn: The short form entity name e.g. sensei_project
- id: ID of the entity you wish to embed (guid)
- navbar: set to entity to remove the left-side nav bar
- extraqs: this is the parameter that holds the additional IQ specific deep deep linking controls
- sensei_showTab: is the name of the tab on the entity you wish to have be displayed. This is the internal name of the tab e.g. tab_tasks sensei_hideHeader: when included and set to 1 this also remove more surrounding chrome from the item.
Example:
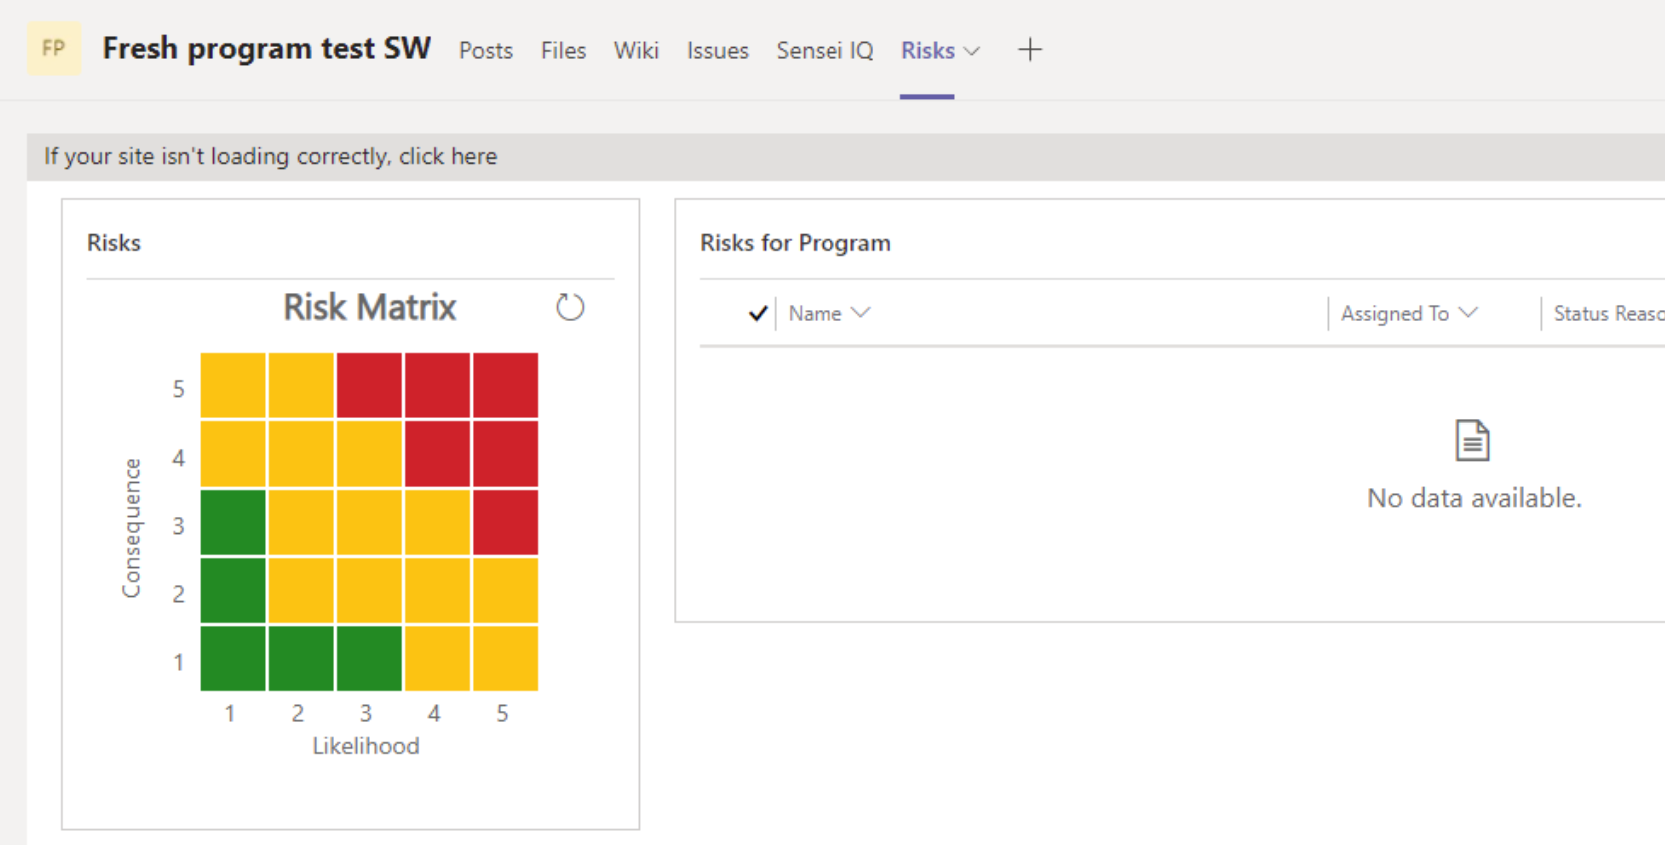
https://iq.crm.dynamics.com/main.aspx?appid=e1e44b74-6430-eb11-bf68-000d3a799817&pagetype=entityrecord&etn=sensei_program&id=e436ab00-134d-4eed-bcc9-d3ef9a6dde28&navbar=entity&extraqs=sensei_showTab%3Dtab_risks%26sensei_hideHeader%3D1
Using Notes/Annotations with Project, Programs and/or Portfolios
The information in this section relates to version 2022.06.07.2 and above of Sensei IQ.
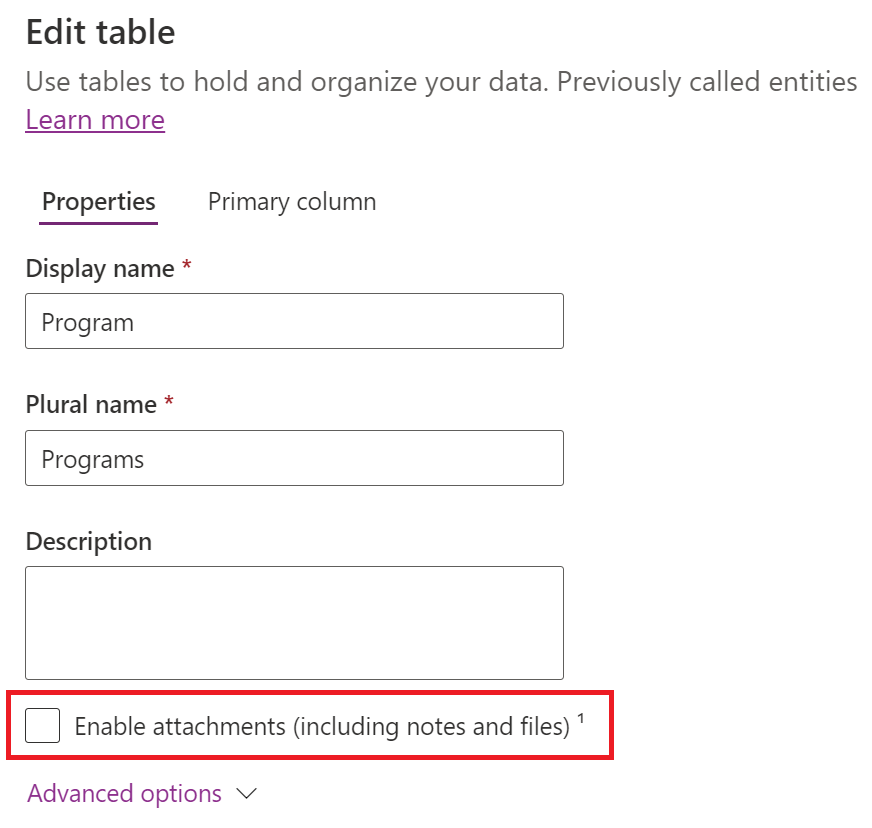
Dataverse provides the ability to turn on an attachments/notes capability on each Table/Entity. This can be turned on from the Table properties.
Note
Once this has been turned on, it cannot be switched off again for that Table.
After turning on the Attachments/Notes functionality, you would then need to expose this to the UI by adding a Timeline control to your related Table/Entity form. This will provide the mechanism for users to start adding Notes to the Project/Program/Portfolio.
Sensei IQ Security Roles are configured with the necessary permissions for users and owner teams to access Notes. Notes are treated as a special case in IQ and you do not need to configure them in the Custom Registers configuration settings.
However, if you intend to use Attachments/Notes for Projects, Programs and Portfolios, then you will need to configure a Plugin Step that runs on creation of new Notes to ensure that visibility of those Notes flows through correctly into IQ.
To perform these steps, you will need to use the Plugin Registration Tool available here.
- Launch the Plugin Registration Tool (PluginRegistration.exe) and select Create New Connection.

- Ensure you select Office 365, then press Login.

- Enter your credentials to log in to Microsoft 365.
- In the list of Plugin Assemblies, locate (Assembly) SenseiPlugin and click the arrow to expand.
- Depending on your implementation, SenseiAtsumeruPlugin is comparable to SenseiPlugin.

- Depending on your implementation, SenseiAtsumeruPlugin is comparable to SenseiPlugin.
- Locate (Plugin) SenseiPlugin.Sensei_InheritOwnershipFromProject and right-click and select Register New Step.

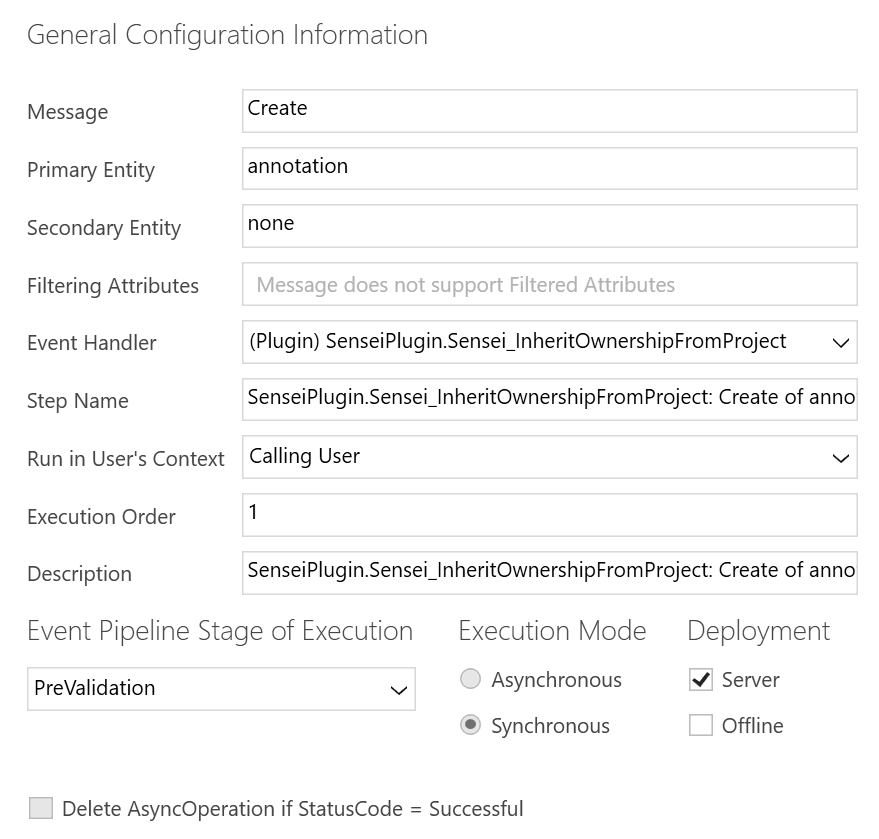
- Enter the following details, then press Register New Step. This will ensure that whenever a new record is created in your custom Table that the InheritOwnershipFromProject plugin code is run - which will ensure that your custom Table record is attributed the same ownership as the Project, Program or Portfolio that it is associated with.
- Message: Create
- Primary Table: annotation (this is the Dataverse internal name for the Notes Table/Entity)
- Secondary Table: {Leave blank}
- Filtering Attributes: {Leave blank - unavailable for a Create action}
- Event Handler: {Leave this set to (Plugin) SenseiPlugin.Sensei_InheritOwnershipFromProject}
- Step Name: {Add a name for your Plugin Step, or leave as per the default.}
- Run in User's Context: Calling User
- Execution Order: 1
- Description: {Add a description for your Plugin Step, or leave as per the default.}
- Event Pipeline Stage Of Execution: PreValidation
- Execution Mode: Synchronous
- Deployment: Server
Form Tab Loading
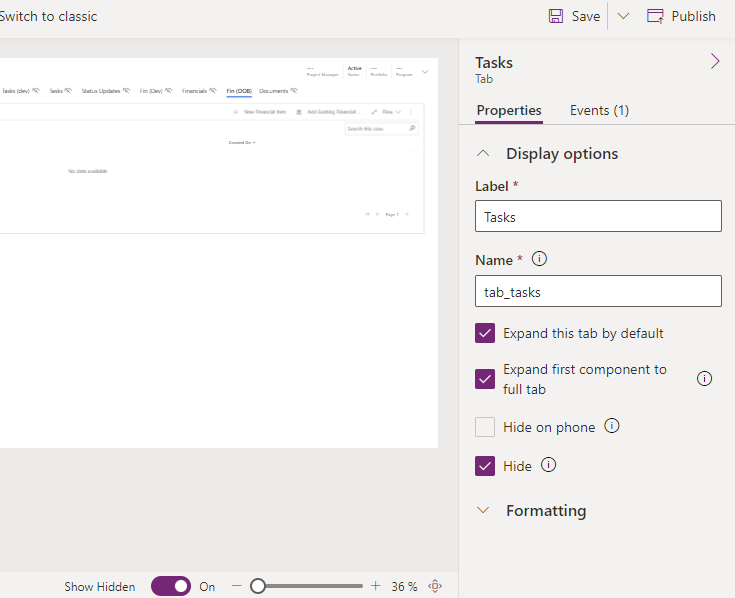
In "Kaizen - 2022.03.08.4" we have released some form loading improvements to reduce load time and the amount of flashing of tabs and forms. As part of this any conditional tabs have been made hidden to prevent the user from seeing the tabs and then them disappearing, instead we start them hidden and then show the ones that need to be shown.
To make your own custom tabs load smoothly like ours and not impact the user until they are actually required, please hide the tab in the form designer. Note you can make the designer show all hidden controls to allow you to work in the designer with them.
For Projects/Programs/Portfolios you should ensure the tabs are configured appropriately in the form tab visibility settings via the Project Types for Projects or the relevant setting for Programs and Portfolios.
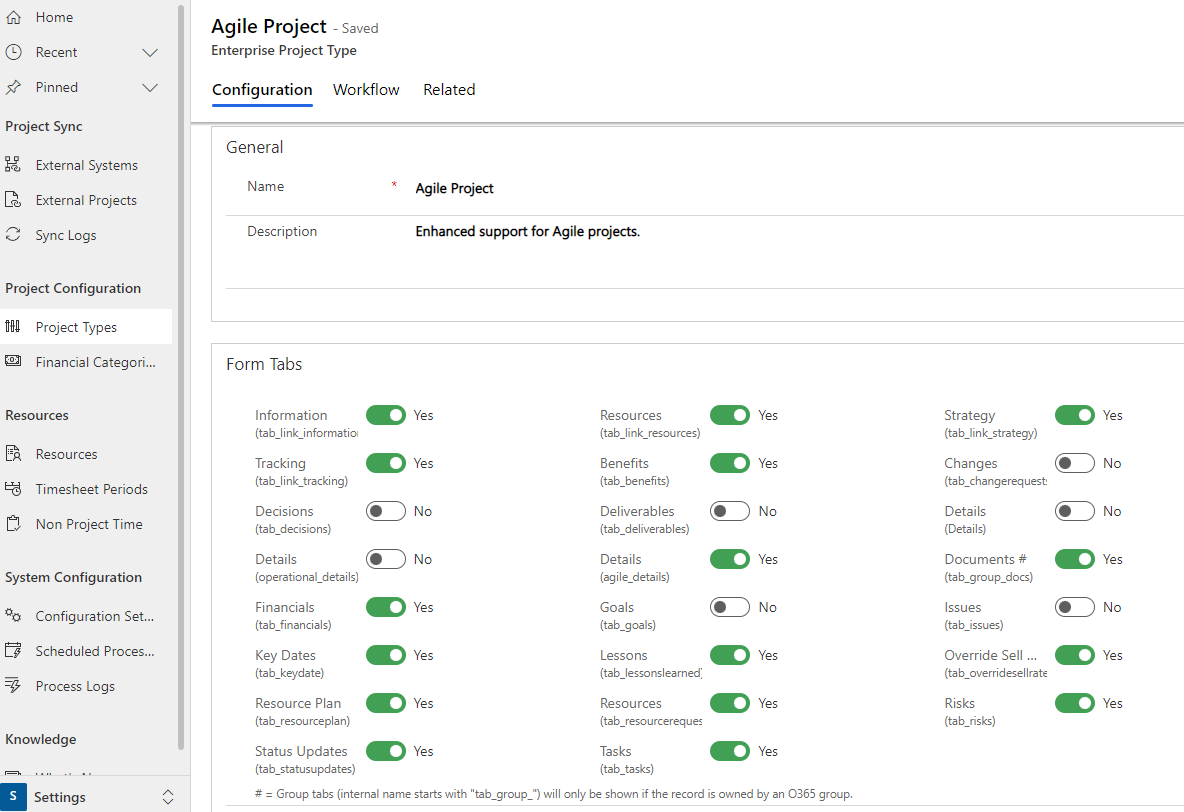
Project Form UI
The Project Form UI update includes changes to the Project Form which split tab content out across multiple Forms, ensuring that Projects are easy to navigate. With this update comes the introduction of 'link tabs' which provide easy navigation between Project Forms.
Add a new Project Form
A new custom Project Form can be added in an IQ environment and integrated with the Project Form UI functionality.
- Create a new Form for the Project Table and add the content to it that you wish to display to users.
- Ensure that your custom Project Form references the following Form On Load events:
If New Record Switch To Form
| Event Type | On Load |
| Library | sensei_SenseiProject.bundle.js |
| Function | sensei_SenseiProject.Generic.FormSwitcher.IfNewRecordSwitchToForm |
| Enabled | {checked} |
| Pass execution context as first parameter | {checked} |
| Comma separated list of parameters... | "59100881-fae9-4d5b-b520-44f769b21f6a" |
Note
Ensure that you wrap the parameter (which contains the form Id of the Project Information form) in quotes
Redirect Non-Default Form On Load
| Event Type | On Load |
| Library | sensei_SenseiProject.bundle.js |
| Function | sensei_SenseiProject.Generic.FormSwitcher.RedirectNonDefaultFormOnLoad |
| Enabled | {checked} |
| Pass execution context as first parameter | {checked} |
| Comma separated list of parameters... | "59100881-fae9-4d5b-b520-44f769b21f6a" |
Create Link Tabs on your custom Project Form which redirect the user to the other Project Forms.
See: How to Create Link TabsCreate Link Tabs on the out of the box Project Forms which redirect the user to your custom Project Form.
See: How to Create Link Tabs
How to Create Link Tabs
- To create a new Link Tab on a Form, select to edit the Form you wish to add the link tab to.
- Then, select to add a new Tab to your Form. Give the tab an internal name something in the format of 'tab_link_{NameOfForm}' (e.g. tab_link_mycustomform). You must begin the name of the form with 'tab_link_' prefix, otherwise it will not work. If your custom form has spaces in its display name, ensure that you replace those spaces with underscores in the internal link tab name.
- Add an On Tab State Change event to that Tab, as follows:
| Event Type | On Tab State Change |
| Library | sensei_SenseiProject.bundle.js |
| Function | sensei_SenseiProject.Generic.FormSwitcher.FormOnTabStateChange |
| Enabled | {checked} |
| Pass execution context as first parameter | {checked} |
| Comma separated list of parameters... | "{Id or Name of the Form you wish to redirect to when the tab is selected}" |
Note
Ensure that you wrap the parameter in quotes
Finance App Data Locking
There are Yes/No fields which can be set to lock fields for editing in the Finance UI.
The fields can be set on the following entities:
- Project (sensei_project)
- Project (msdyn_project) [for IQ PFTW Edition]
- Financial Item (sensei_financialitem)
In each case the fields are named as follows:
- Actual Cost Locked (sensei_actualcostlocked)
- Budget Locked (sensei_budgetlocked)
- Forecast Cost Locked (sensei_forecastcostlocked)
These Yes/No fields are not present on any input forms, they can currently only be set programmatically. Once set, users will be restricted from modifying the corresponding data in the UI. (e.g. if Budget Locked is set at the project level, users will not be able to modify Budget values across the entire project).
Date Field Formats
When creating Date based fields in a Dataverse Table, there are 2 primary options and each of those contains additional options.
The primary date types are Date Time and Date Only. By default when you create either of these field types, the Behavior field will default to 'User local'. You can optionally change this Behavior setting - but note that if you do, the UI will prevent you from changing it again.
Brief description of the types and how they might be used:
| Field Type | Behavior | Use Cases |
|---|---|---|
| Date Time | User local | This will store the date and time relative to the user who entered the data. The data is then presented to other users according to their own timezone - or as UTC via web services. This field type can be used to indicate the date/time of an event that occurred. E.g. When an approval action occurred. |
| Date Time | Timezone Independent | This stores the date and time that was entered by a user independent of that user's timezone. E.g. If a user enters 1/1/2022 at 7pm then that same date and time will be present to any/all users regardless of that user's timezone. |
| Date Only | User local | Behind the scenes still stores a Date Time but presents just the date to a user via the UI. The date is translated into the viewing user's timezone. (So would appear as 2022-01-01 in Australia but 2021-31-12 in US). Can't think of too many cases where you would want this behaviour. |
| Date Only | Date only | Behind the scenes still stores a Date Time, but the time component will always be stored as midnight and will present to the user regardless of their timezone. This setting is useful for when a user selects a Date value in the UI and expects other users to see that same date value. |
| Date Only | Timezone Independent | Again still stores a Date Time value and can be used to store a time component other than midnight (presumably programmatically as you cannot set it through the UI), and the same Date will be presented to all users regardless of their timezone. |
Business Process Flow (BPF) Field Locking
This feature enables the locking of past and/or future fields within different stages of the BPF process.
In the below example the locking is enabled for furture BPF steps as indicated by the locks present next to each of th fields.

Note
If current BPF step contains a field from a past/future BPF step value will remain unlocked.
Configuration
BPF Field Locking is disabled by default.
- In order to Activate. Navigate to Settings > Configuration Settings > Inactive Sensei Config Settings > Business Process Flow Field Locks
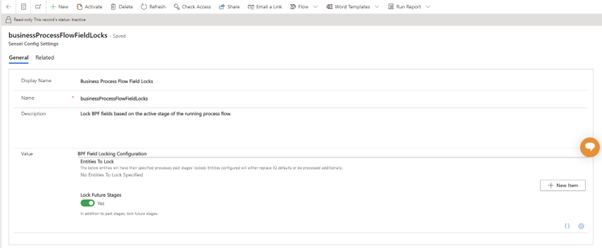
- Click Activate in the hot bar and confirm dialog.
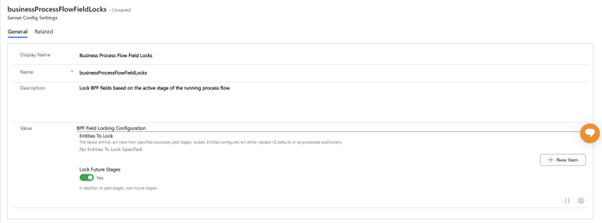
- Click “+ New Item” then we edit it by clicking on the pencil. This will bring up the following.

Add Entity Name.
Click “+ New Process” – then either click on drop down arrow or the box select a business Process Name
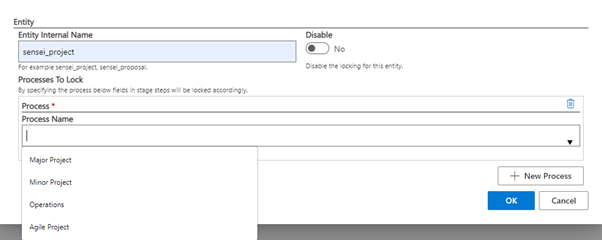
- Click “OK” confirm settings
Click Save in the hot bar to save setting
The BPF Field locking should now apply to the specified entity and past/future stages if selected to apply to future stages.
Dashboard Widget
What will be covered in the below sections.
What is it?
Known as WidgetDashboard Control, this control has the capacity to display a Table and/or a Chart with the same data fetched from Dynamics 365 queries.
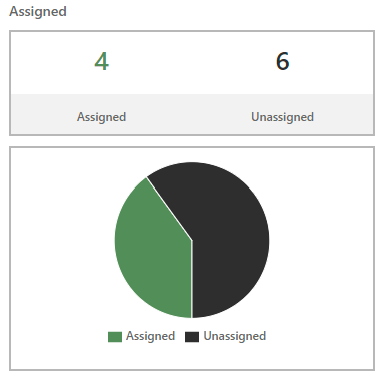
Example: Displays counts of Assigned and Unassigned tasks in Table and Pie chart formats.
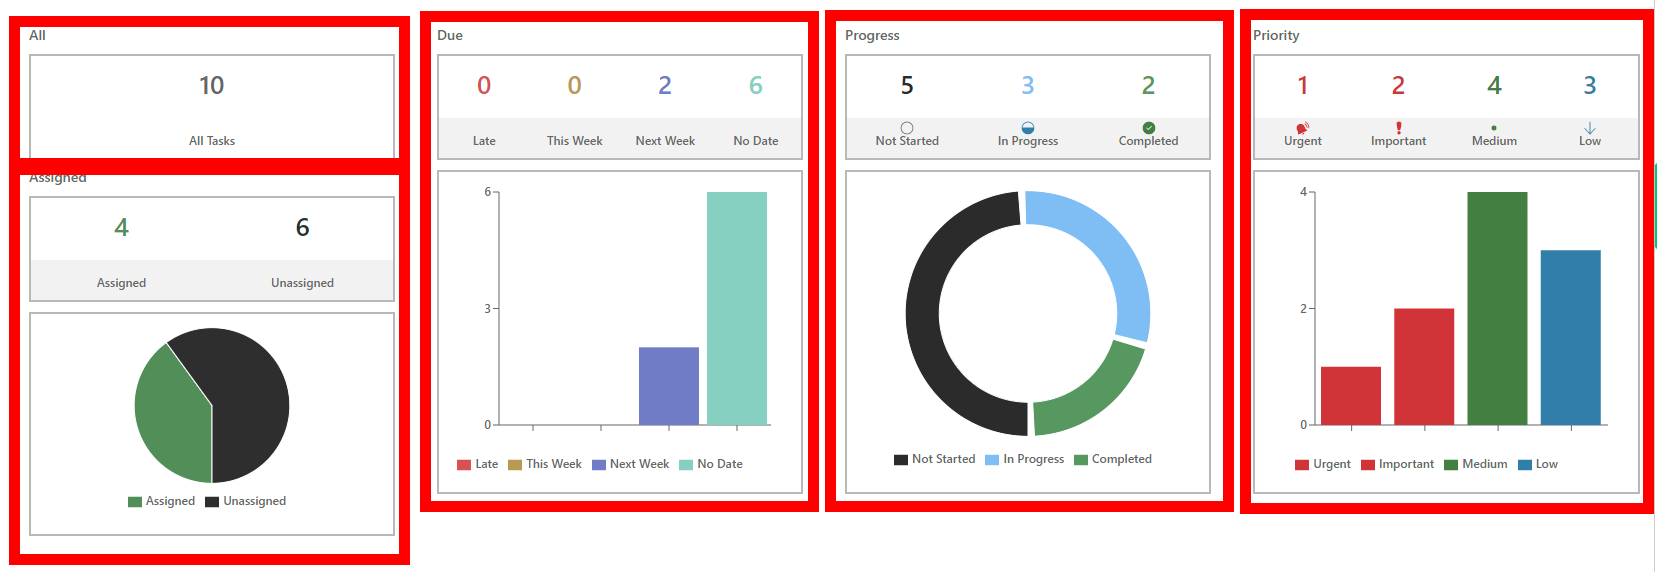 Example: shows five of the different ways this one widget can be configured
This widget has two key components; N Column based Table, and an optional Chart (Pie, Bar or Donut) which will represent the data from the table above.
How to setup a new instance of the widget
- Navigate to the desired form in the classic designer.
- Navigate to desired tab
- Click on desired tab
- Insert new SubGrid
- Drag in a field to be used as a dummy. i.e. "Location" field (sensei_location)
- Double click on the added Field and uncheck display label
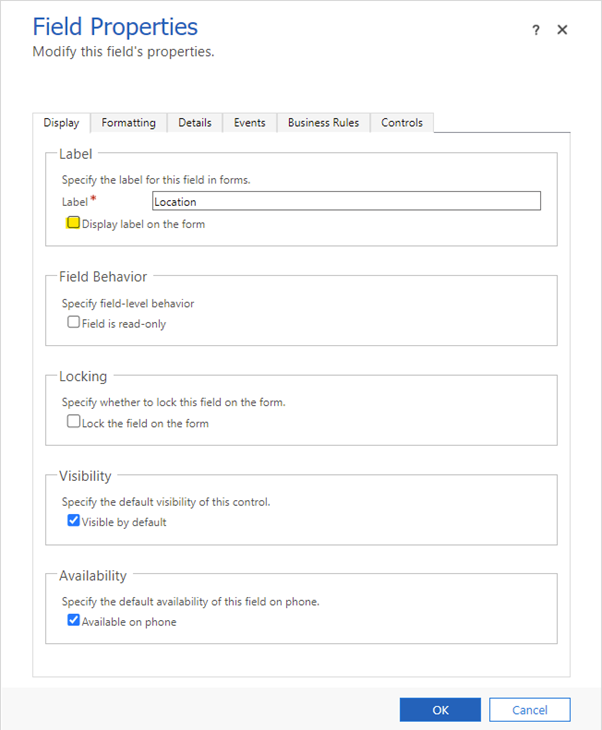
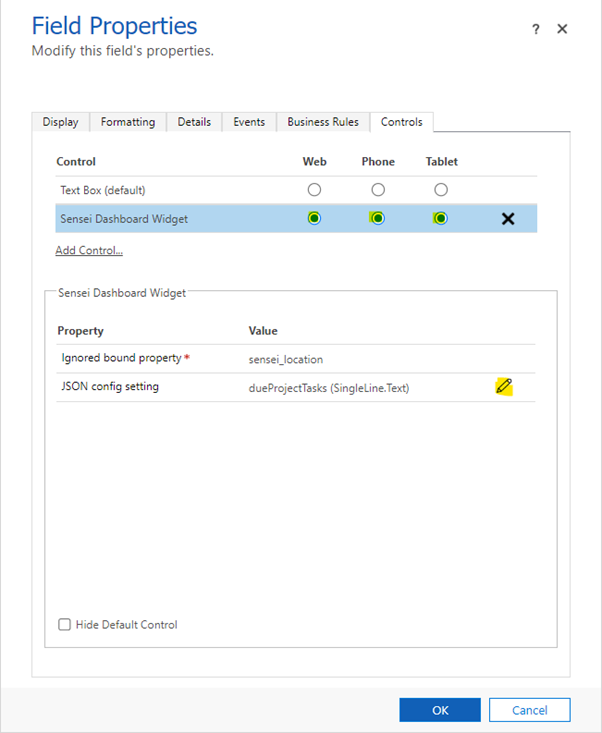
- Navigate to the "Controls" tab then Click Add Control and find "Sensei Dashboard Widget" and click Add
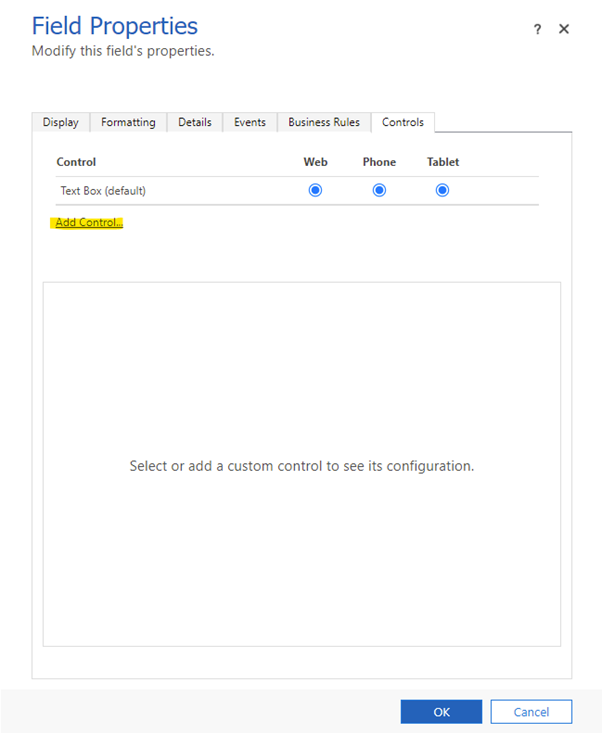
- Configure the settings - setting Web/Phone/Tablet to use the control then we edit the JSON config setting using the pencil
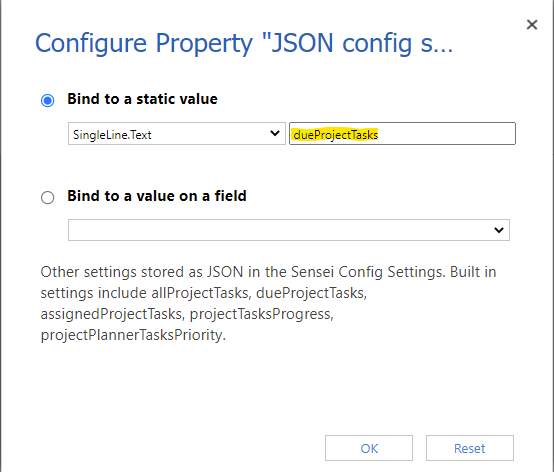
- Specify the desired config setting name that we will create shortly.
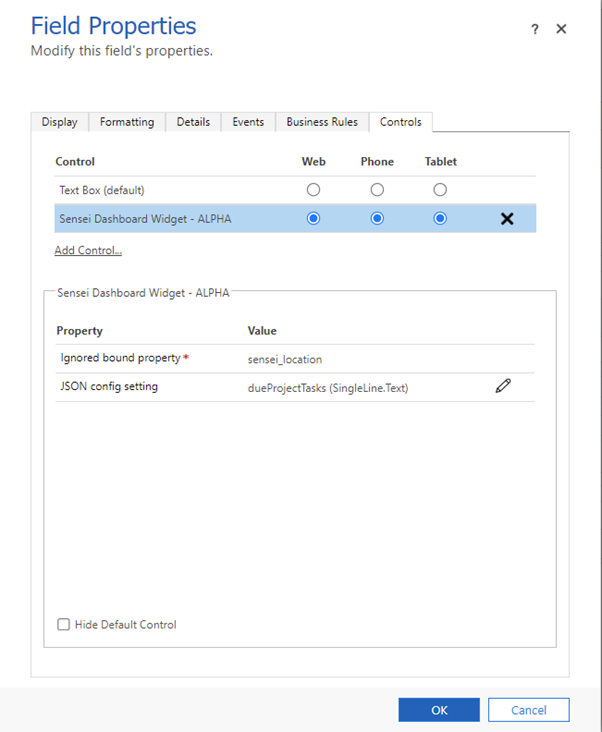
- When complete you should have a window that looks similar to the following. Click OK.
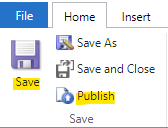
- Now Save then Publish the Form.
We are now going to create a Sensei IQ Setting. Navigate to the Setttings > Configuration Settings. Now Duplicate the current tab as we will use this later on. Now click "New" in the hot bar on the first tab.
The main things that need to be filled out is Display Name and Name, which Name should match what was set in step 10.
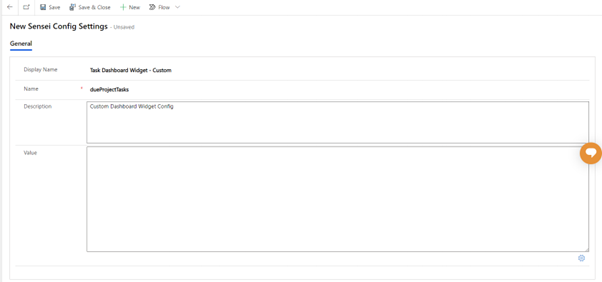
- Switch to second tab we duplicated earlier and locate an existing Active/Inactive Sensei IQ Setting for Task Dashboard Widget. Double click it to open it then Click the gear in the bottom right corner.
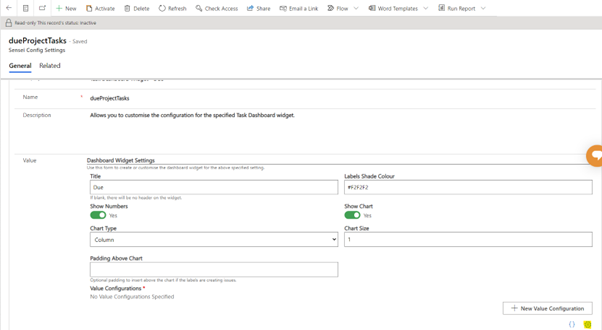
- Copy the contents of the two textboxes across to the first tabs gear icon, this will allow for easy editing of the configuration setting.
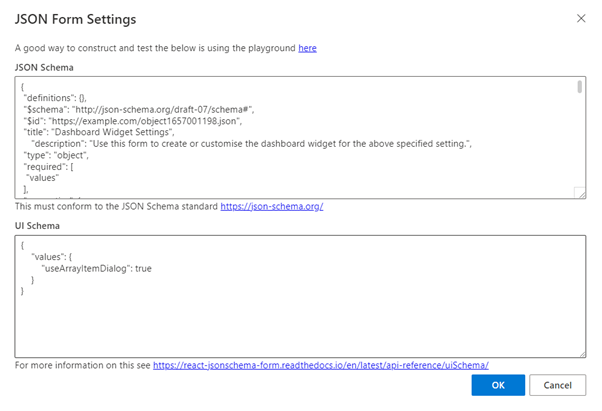
- Congratulations! You're now ready for the next step which is Widget Configuration found below.
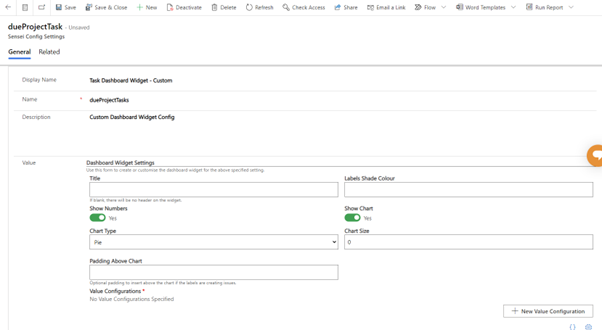
Widget Configuration
If you wish to customize what is shown in the widget you need to adjust the appropriate Sensei IQ Setting.
Found under Settings > Configuration Settings > Active/Inactive Sensei Config Settings
Each widget should have its own configuration setting configured while adding to form.
In the case of Planner the following configuration settings are overrides for default configuration of the widget.

There are two screens that allow for modification to how the widget is displayed.
Main Settings screen:
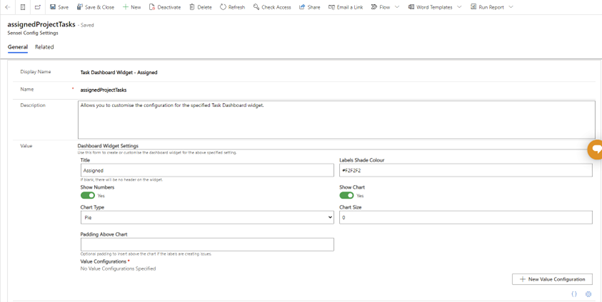
Has the following options:
| Option | Description |
|---|---|
| Title | Set the title on the widget. If blank, there will be no header on the widget. |
| Labels Shade Colour | This is the colour of the background of the labels found in the table. |
| Show Numbers | Toggle if the Table is to be shown. |
| Show Chart | Toggle if the Chart is to be shown. |
| Chart Type | Select form of Chart to be displayed (Pie, Column, Donut) |
| Chart Size | Increases the scale of the chart |
| Padding Above Chart | Optional padding to insert above the chart if the labels are creating issues. |
| Value Configurations | These are the values that are rendered in the Table and/or Chart. |
Value Configurations screen:
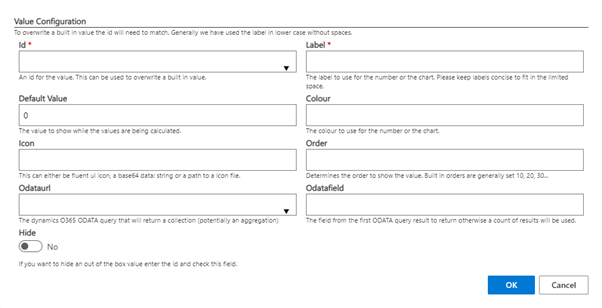
It has the following options:
| Option | Description |
|---|---|
| Id | An id for the value. This can be used to overwrite built in value. |
| Label | The label to use for the number or the chart. Please keep concise to fit in the limited space. |
| Default Value | The value to show while the values are being calculated. |
| Colour | The colour to use for the number or the chart. i.e. #FF0000 for red. |
| Icon | This can either be fluent ui icon, a base64 data:string or a path to a icon file. |
| Order | Determines the order to show the value. Built in orders are generally set to 10,20,30.. |
| Odataurl | The dynamics O365 ODATA query that will return a collection (potentially an aggregation) |
| ODatafield | The field from the first ODATA query result to return otherwise a count of results will be used. |
| Hide | If you want to hide an out of the box value enter the id and check this field. |
Editing an existing setting
- Activate the Deactivated Setting by using the top hot bar.
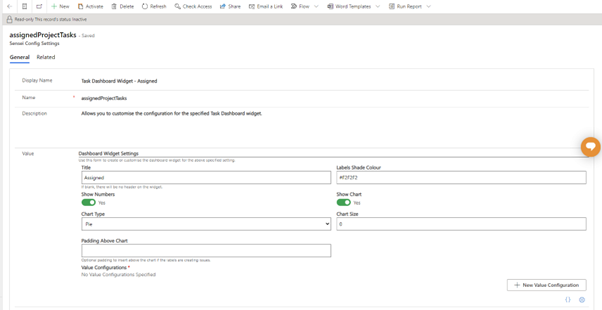
- Click + New Value Configuration to add a new value

- Click the pencil to edit it.
- We have a few options of what we can do > [!NOTE] To overwrite a built in value the id will need to match. Generally we have used the label in lower case without spaces.
Possible Customizations:
i. Hide an existing value. Enter the Id, then select Hide slider at the bottom of the page
ii. Override an existing value. Enter the Id, then Label as these are mandatory fields. All other fields if not filled in will default to the default configuration setting.
iii. Create a new value. Enter the desired Id (this must be unique), then Label that you want displayed. You will need to fill out all the following fields or it can result in No Data being displayed due to incorrect configuration.
Options to customize are as follows:
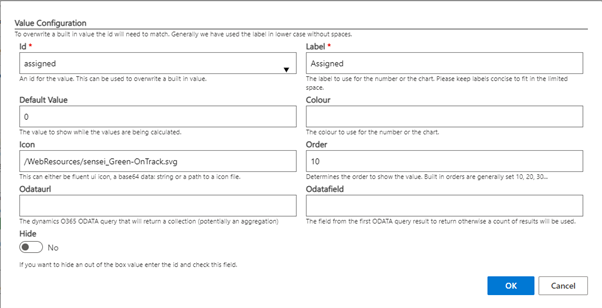
Example of Default configuration for Assigned:

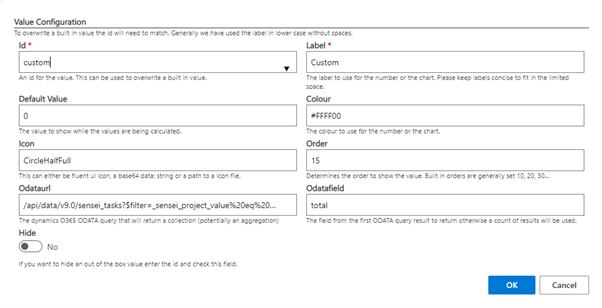
Example of Customized configuration setting for Assigned. In this example we have added a web resource as an icon to assigned. Inserted a custom yellow odata query with a custom fuent ui icon and we have changed the colour and added an icon to unassigned.
Example:
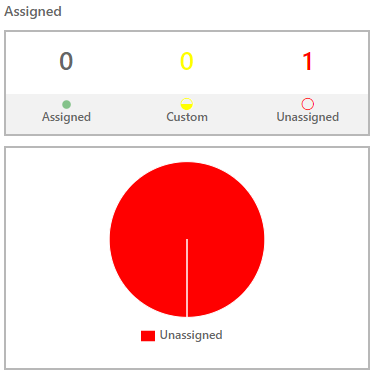
Assigned Configuration - override:
Custom Configuration:
Unassigned Configuration - override:
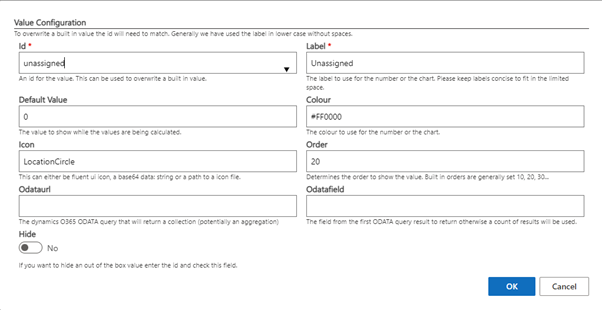
Default Value – The value shown while the values are being calculated
Colour – The colour used for the number of the chart starting with #
Icon – This can either be fluent ui icon, a base64 data: string or a path to a icon file
Examples are as follows:
- Fluent ui - "6PointStar"
- base64 image - "data:image/png;base64," ( represents the base64 encoded string)
- path to webresource - "/WebResources/sensei_Green-OnTrack.svg"
Order – Determines the order to show the value. Built in order are generally set 10, 20, 30 …
- in our example we set custom to be 15 which is inbetween 10 and 20.
Example of where Order of 15 is used on existing Assigned widget will place it in the middle of Assigned and Unassigned.
Odataurl – The dynamics O365 ODATA query that will return a collection (potentially an aggregation)
The Odataurl query is made up of the following pattern as a minimum.
Note
{{value}} denotes a value that should be substituted for by consultant. {parentId} will be substituted in.
/api/data/v9.0/{{entity_name}}?filter=_sensei_project_value eq "{parentId}"
This will be attached to the end of the current dynamics environment to generate the query. The following query will be counted as no aggregation value is provided.
i.e. https://orgXXXXXXXX.crmY.dynamics.com/api/data/v9.0/sensei_tasks?filter=_sensei_project_value%20eq%20%27{parentId}%27
URI Encoded:
/api/data/v9.0/{{entity_name}}?filter=_sensei_project_value%20eq%20%27{parentId}%27
Example of:
- Simple Count
/api/data/v9.0/sensei_tasks?$filter=_sensei_project_value eq '{parentId}' and sensei_resourceassignment_task_sensei_tas/any()
- Aggregation of values
/api/data/v9.0/sensei_tasks?$filter=_sensei_project_value eq '{parentId}' and sensei_resourceassignment_task_sensei_tas/any()&$apply=aggregate(sensei_taskid with countdistinct as total)
- Sum of financials
/api/data/v9.0/sensei_financialtransactions?$filter=_sensei_project_value eq '{parentId}' and sensei_type eq 955000000&$apply=aggregate(sensei_value with sum as total)
- Max date
/api/data/v9.0/sensei_tasks?$filter=_sensei_project_value eq '{parentId}'&$apply=aggregate(sensei_duedate with max as maxdue)
Odatafield – The field from the first ODATA query result to return otherwise a count of results will be used. In the above example a value total is used.
Note
If an Odataurl and Odatafield are not provided no data will be displayed for the chart.
Sub Tab Control (Coming Soon)
The Sub Tab Control provides the capability of configuring a Form so that each section that exists within a Tab will appear as a Sub-Tab within that Tab.

To use the Sub Tab Control you will need to:
- Configure the Form that you wish to use the control on
- Add a Configuration Setting specific to your use case which identifies the sections that the Sub Tab Control will show/hide
First, identify the Form in Dataverse that you would like the Sub Tab Control to appear on.
Ideally in an Enhancements unmanaged Solution, add a reference to that Form and then open the Form in Edit mode.
Once your Form has opened in Edit mode, select 'Switch to classic' to edit the Form in Classic mode.

Next, identify or create the tab that you wish to use the Sub Tab Control within. We will be configuring the Sub Tab Control to show/hide the Sections that exist within that Tab. So if you do not have any existing content in the tab, go ahead and create a couple of Sections and add to those Sections whatever content you want to appear within it.
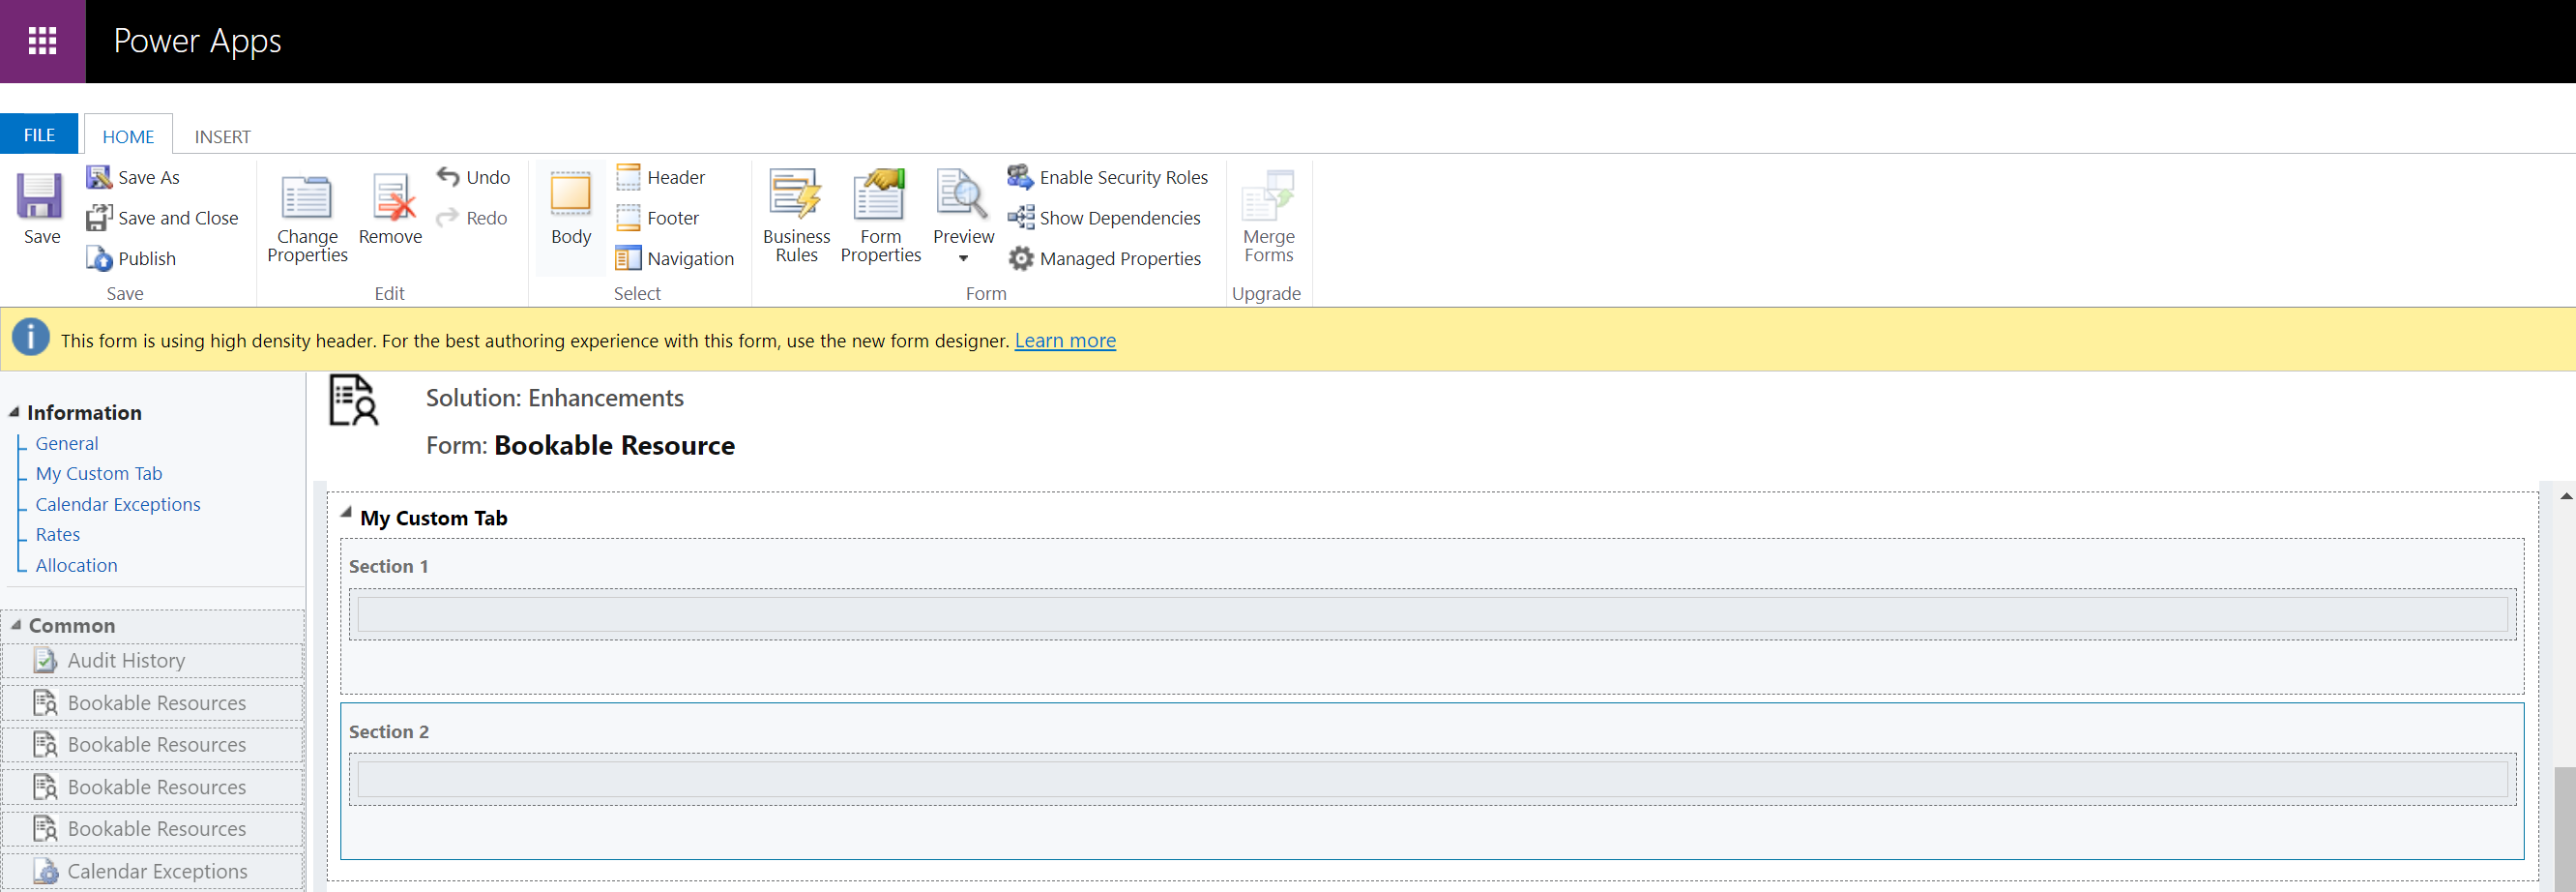
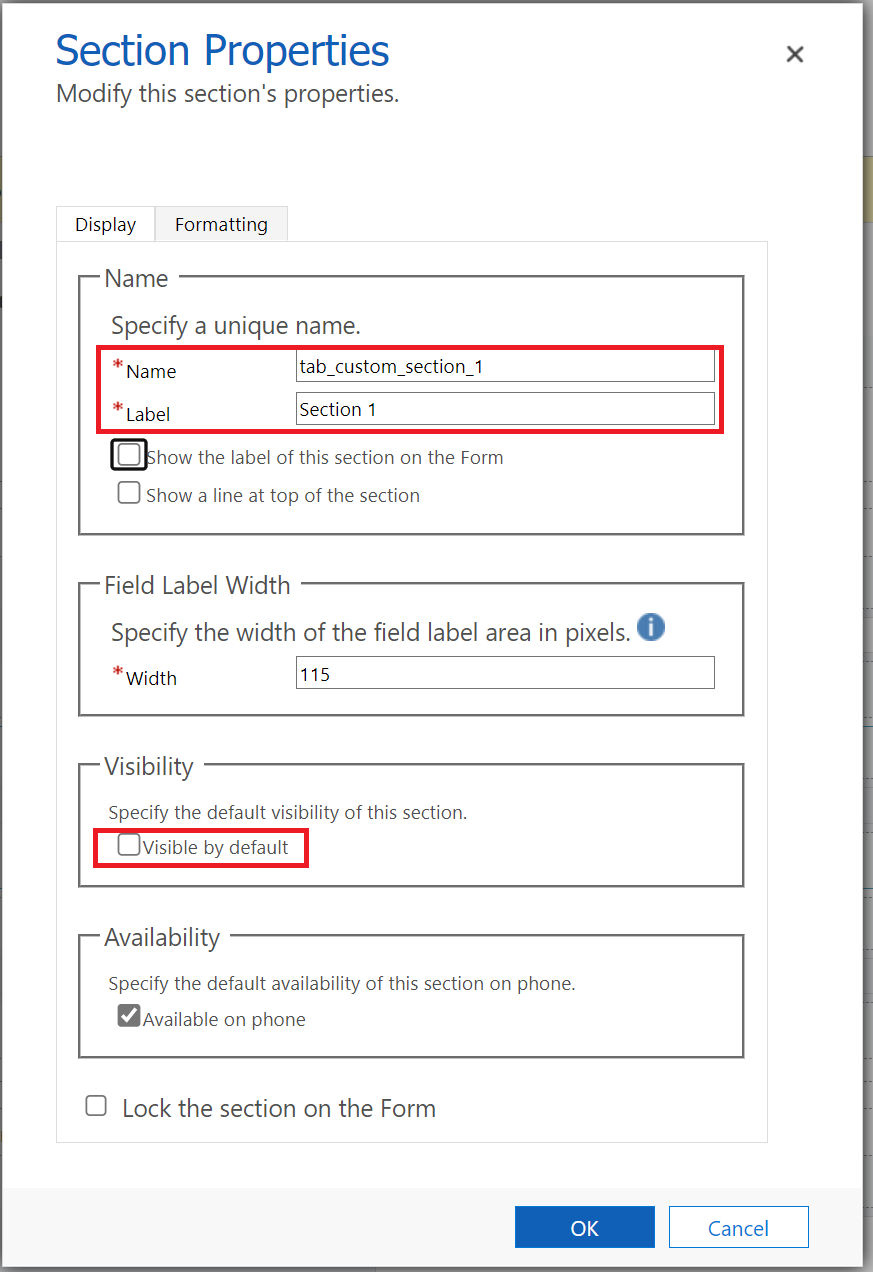
Ensure that the Sections within the Tab have an appropriate Name and Label - it is this 'Label' field of the Section that will determine the name of the Sub Tab. Also unselect the checkbox for 'Visible by default' in the Section settings. This will ensure that the Sub Tab Control controls its visibility. It is recommended to use Sections which are configured with one column of full width.
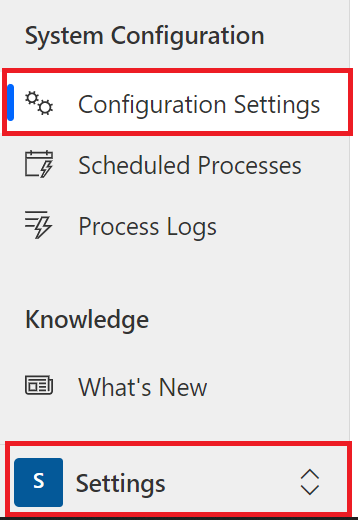
Next, in a new browser tab (keep your Form open in Edit mode, you'll return here in a moment) navigate to the IQ app and from the Settings Area open Configuration Settings.
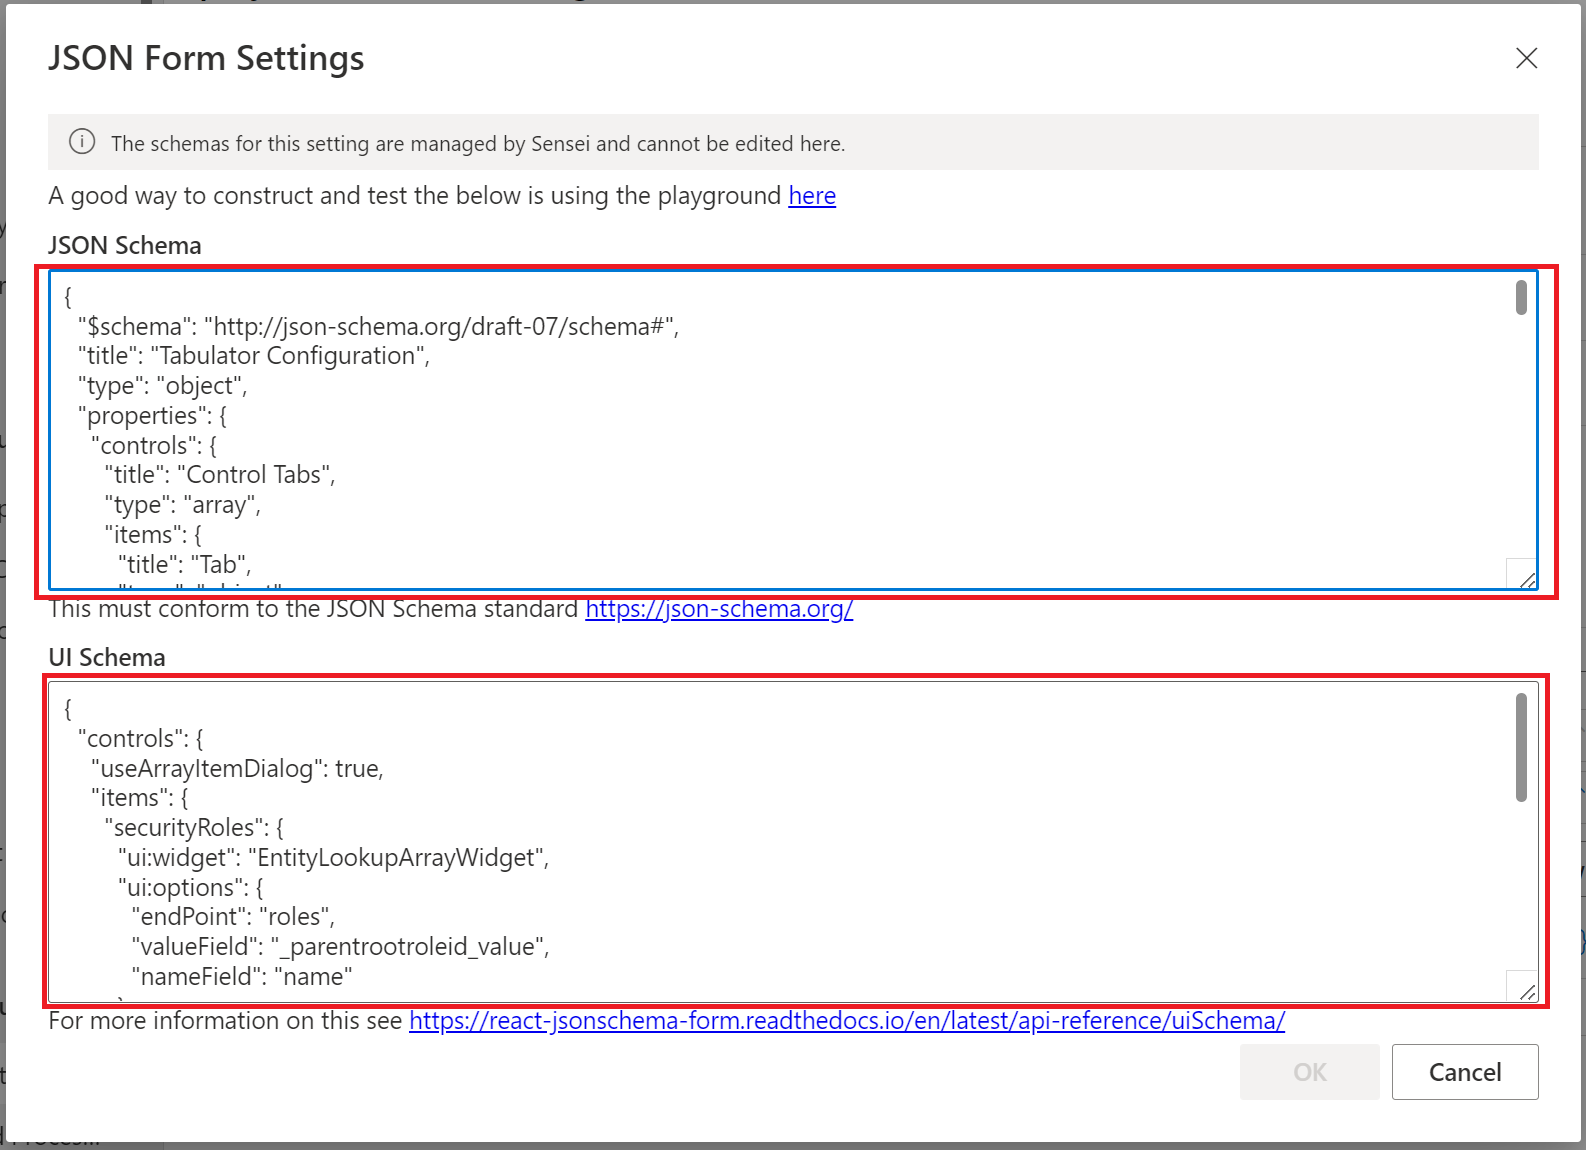
Locate a setting that is shipped with IQ that contains configuration for a Sub Tab (e.g. Project Finance Tab Config). Open that Setting. In the bottom right corner, select the cog open to open the 'JSON Schema' and 'UI Schema' in read-only mode. Copy those values to a plain text editor, making sure you select and copy the entire value - not just the visible text. Keep the text editor open, you'll need these values in a moment.
Close the setting and select to add a new Configuration Setting

Enter the following details for your new Setting:
| Field | Value |
|---|---|
| Category | { Enter the Settings category that you would like your new setting to be grouped under. } |
| Display Name | { Enter a Display Name that describes your new setting. } |
| Name | { Enter a unique and succinct Name for your new setting. Do not include Spaces. } |
| Description | { Enter a brief Description for your new setting. } |
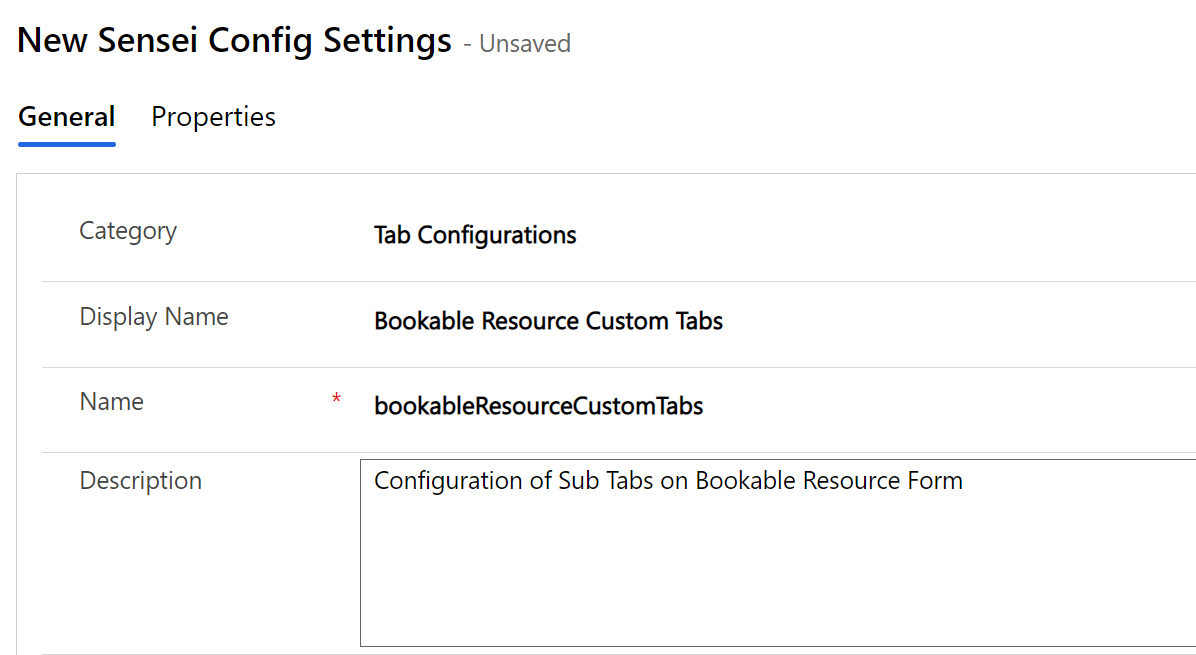
At this point, Save your new Configuration Setting, then select the cog icon at the bottom right corner of the Value field.
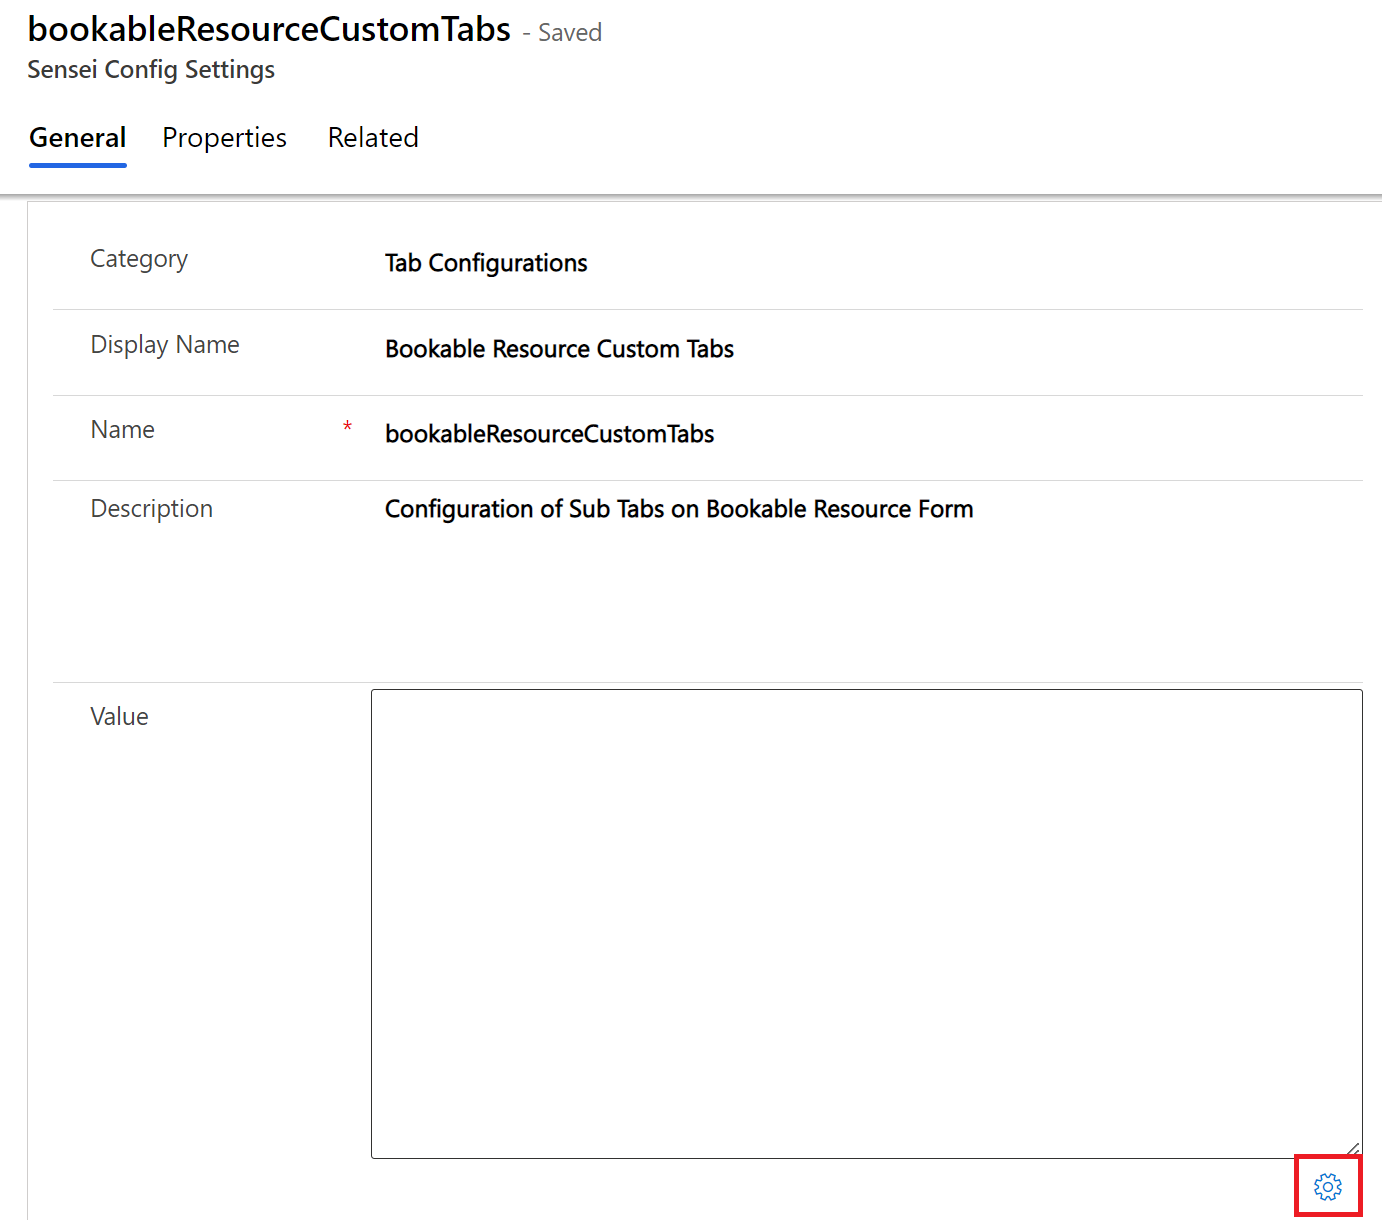
Refer back to the text editor where you copied the 'JSON Schema' and 'UI Schema' values from a shipped IQ Tab Configuration setting, and copy those values (without modification) into the dialog box for your new Configuration Setting, then press OK.
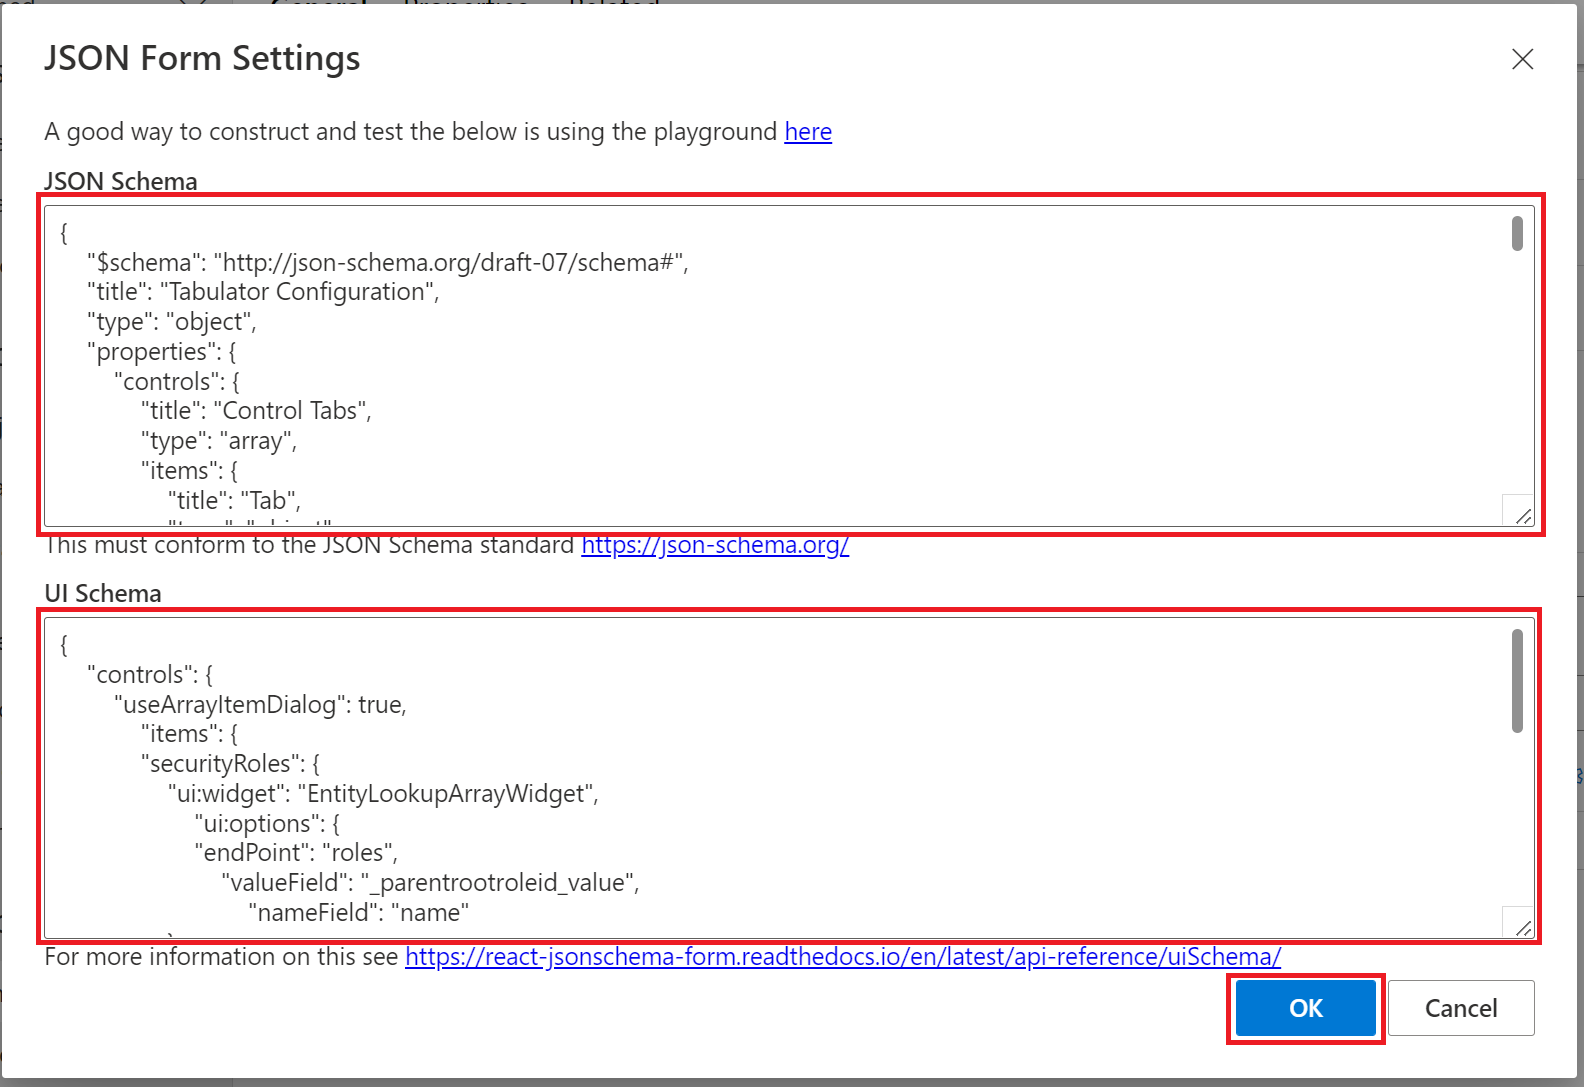
You should now see the UI for the Sub Tab settings appear in the Value field. Select '+ New Tab' as many times as needed to create one instance for each Section that you wish to show/hide in your Form's Tab area'. In this example we have 2 Sections to show/hide in our Custom Tab, so we are adding 2 tab sections to the setting. We will configure these in a moment.

Select the Edit icon next to the 'Tab 1' placeholder setting.

In the dialog window for the configuration of your Sub Tab, enter the following details, then press OK:
| Field | Value |
|---|---|
| Control or Section Internal Id | { Refer back to your browser tab that contains your Form in Edit mode and open the Section Properties for your first section. Enter the Name property exactly as it appears. } |
| Dependent Config Setting | { Optional: Select/enter a Configuration Setting that you would like to control whether the Tab is visible at all. The Configuration Setting must contain a boolean value or a boolean value within the Schema of that setting. } |
| Dependent Config Setting JSON Path | { Optional: If you have specified a 'Dependent Config Setting' and the boolean value are targetting is within the Schema of that Setting (e.g. not a direct Boolean value), then specify here the JSONPath that can be used to target that boolean value (e.g. $.nameOfProperty). If the config setting you referenced in 'Dependent Config Setting' has a direct boolean value, then leave this field blank. } |
| Flip Boolean | { Optional: If a Dependent Config Setting has been specified, the default behaviour will be for a value of 'true' to Hide the SubTab. Select Yes for this setting if you would like a value of 'false' to Hide the SubTab. } |
| Always Hide | { Optional: Switching this setting to Yes will allow you to Always Hide a SubTab. This is particularly useful in instances where you are choosing to Hide a SubTab setting that is shipped in IQ. } |
| Security Roles | { Optional: If specified, will restrict the SubTab visibility to those users with at least one of the selected Security Roles. } |
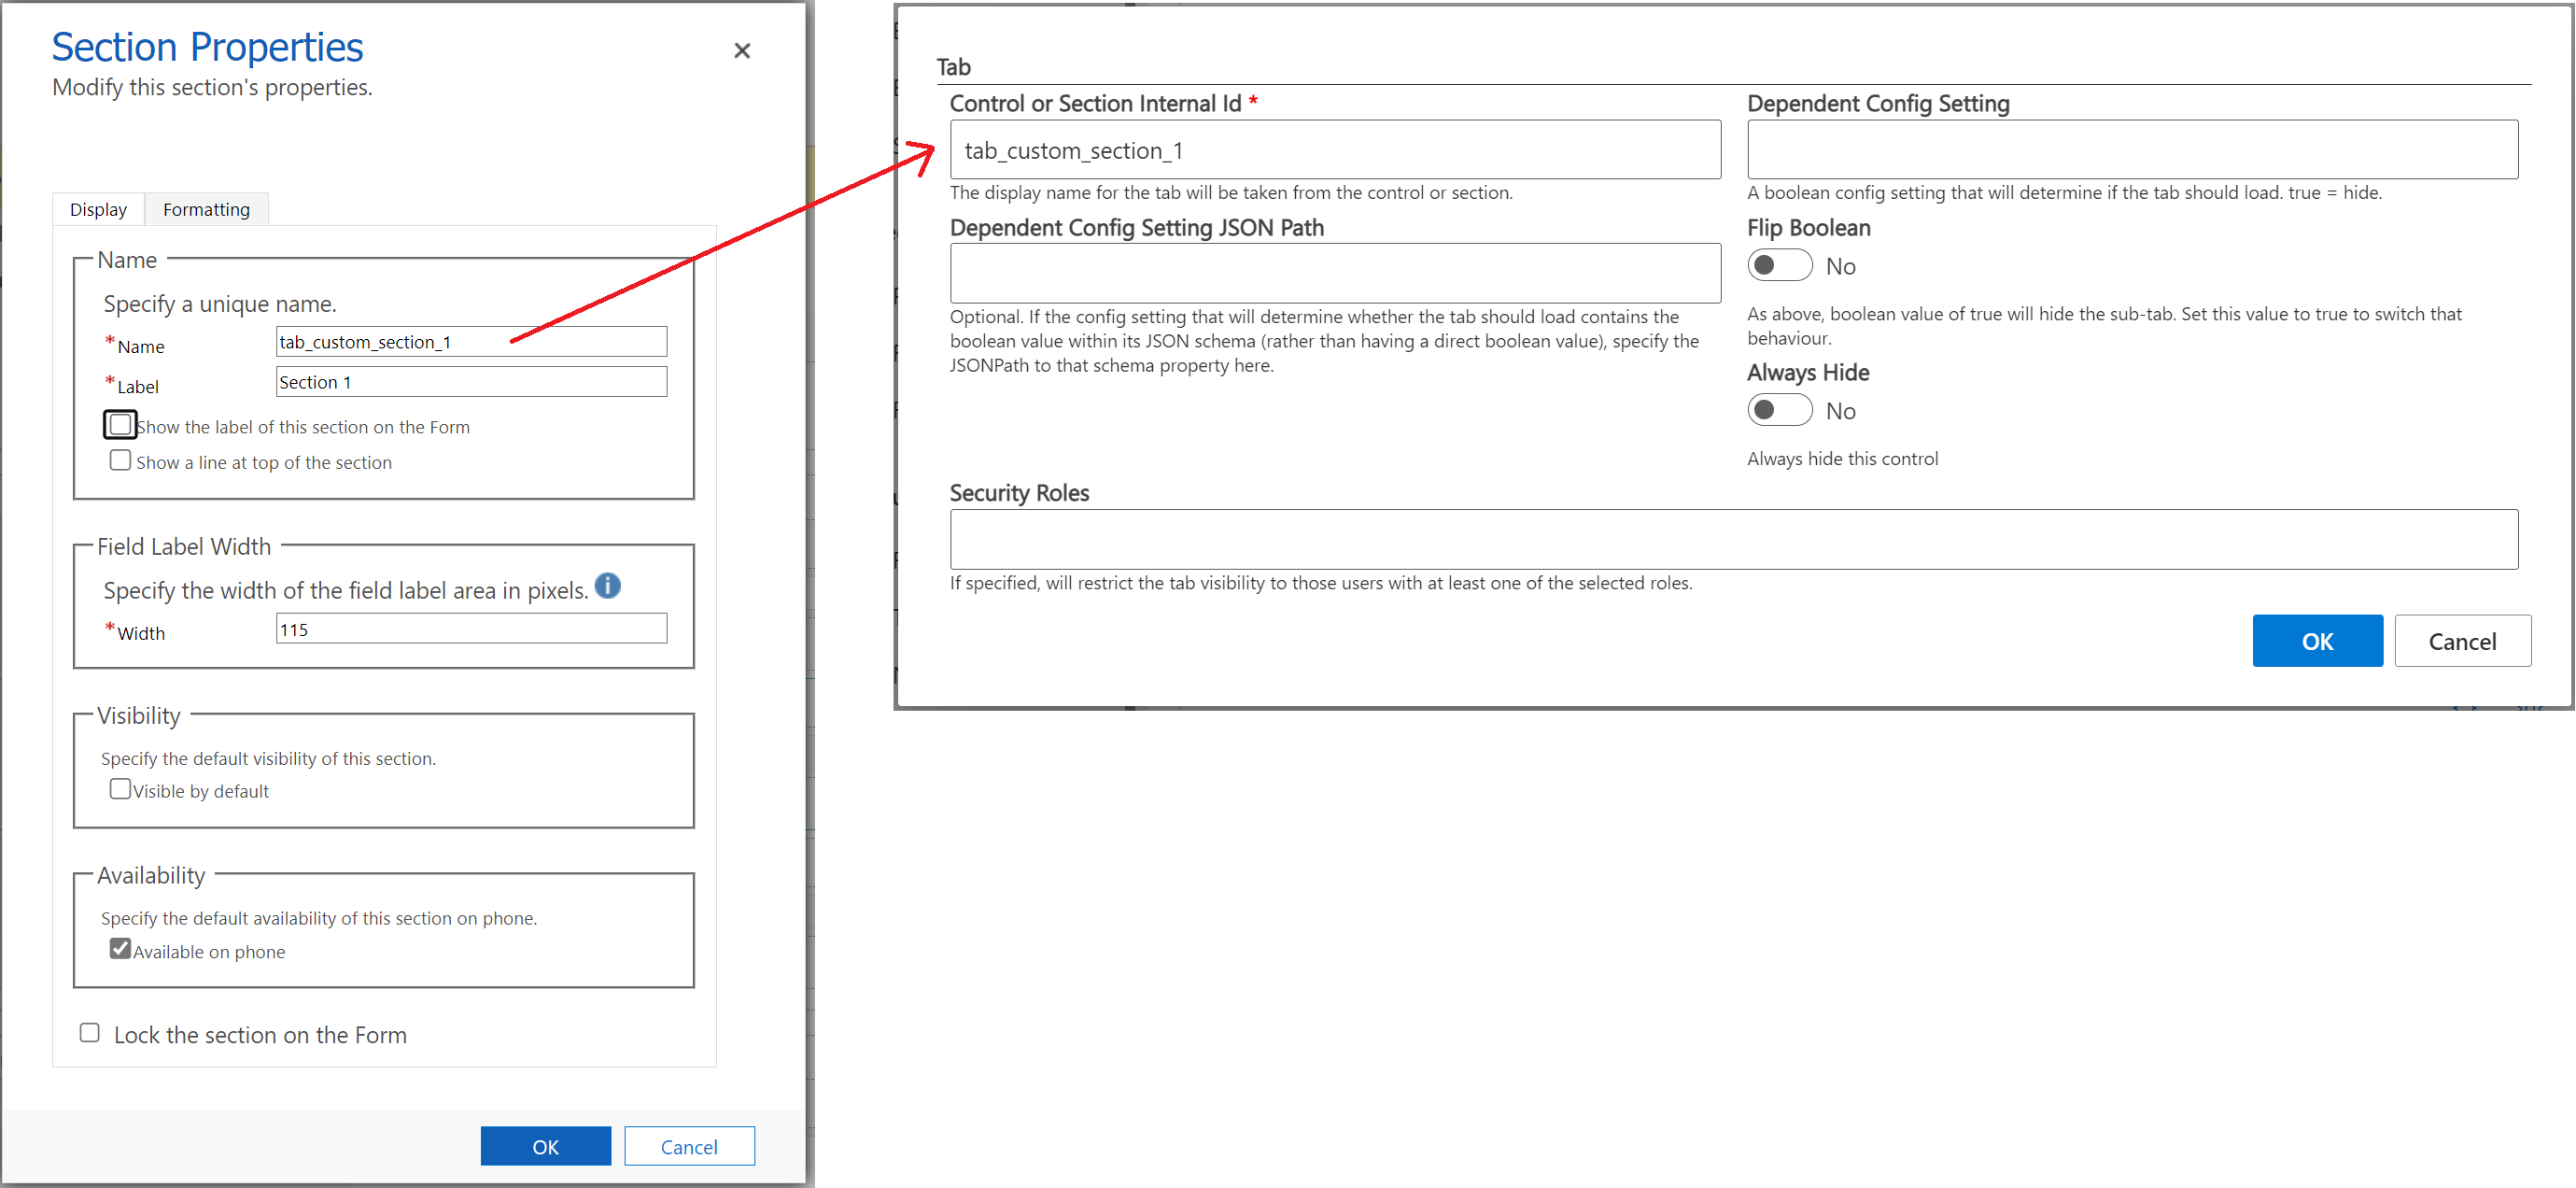
Repeat for all remaining SubTab setting placeholders that you created.

Select to Save your Configuration Setting.
Next, return to your browser tab that contains your Form in Edit mode. Add a new single column Section to appear as the first Section in the Tab. Within that new Section, add a form single line of text field to the Section. It can be any single line of text field, including a field which already appears elsewhere on the form.

Double click the form field to open its properties.
- Ensure that 'Display label on the form' is unchecked
- Ensure that 'Visible by default' is left checked
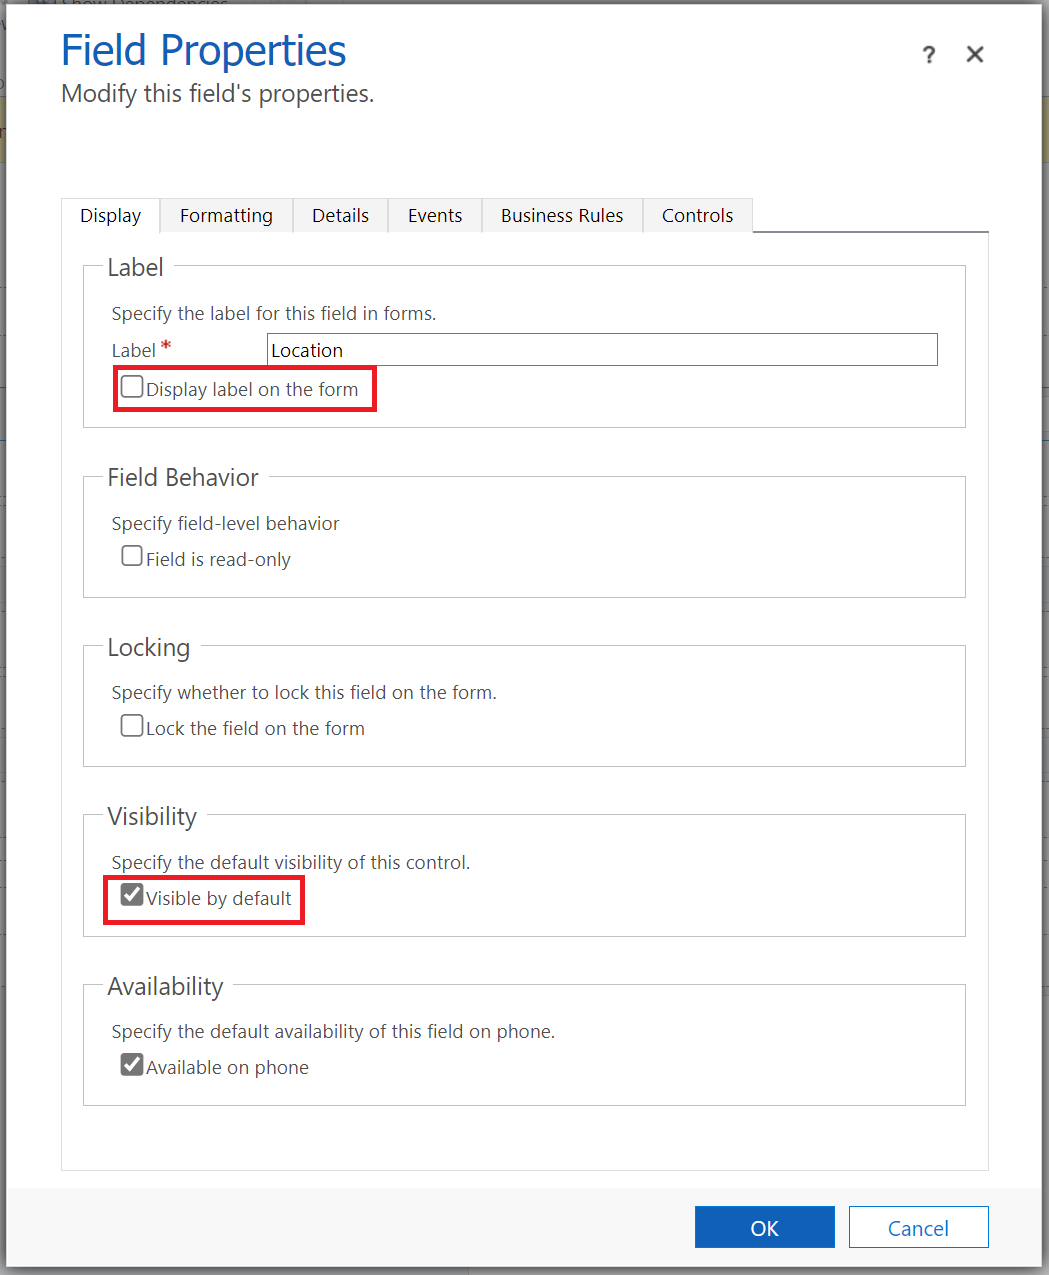
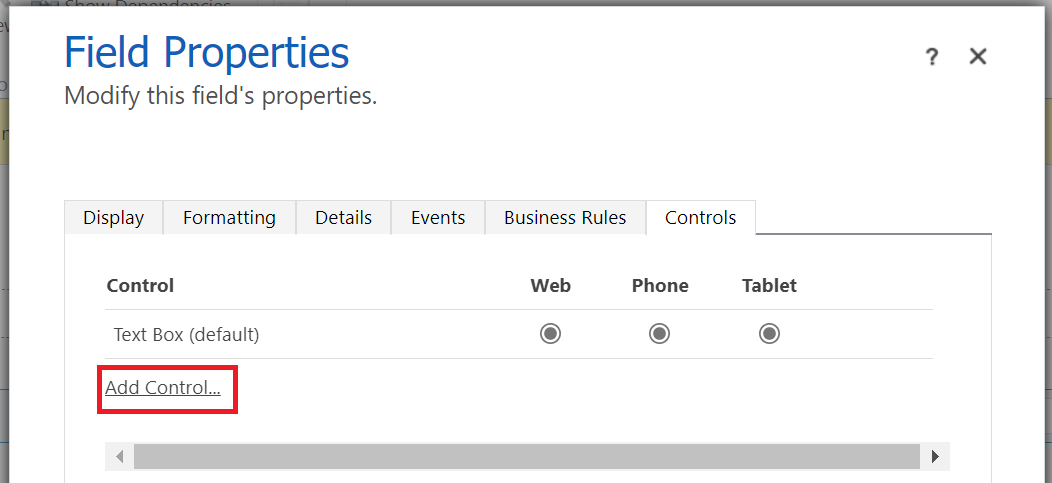
Still within the Field Properties dialog, select the Controls tab.

Select 'Add Control'
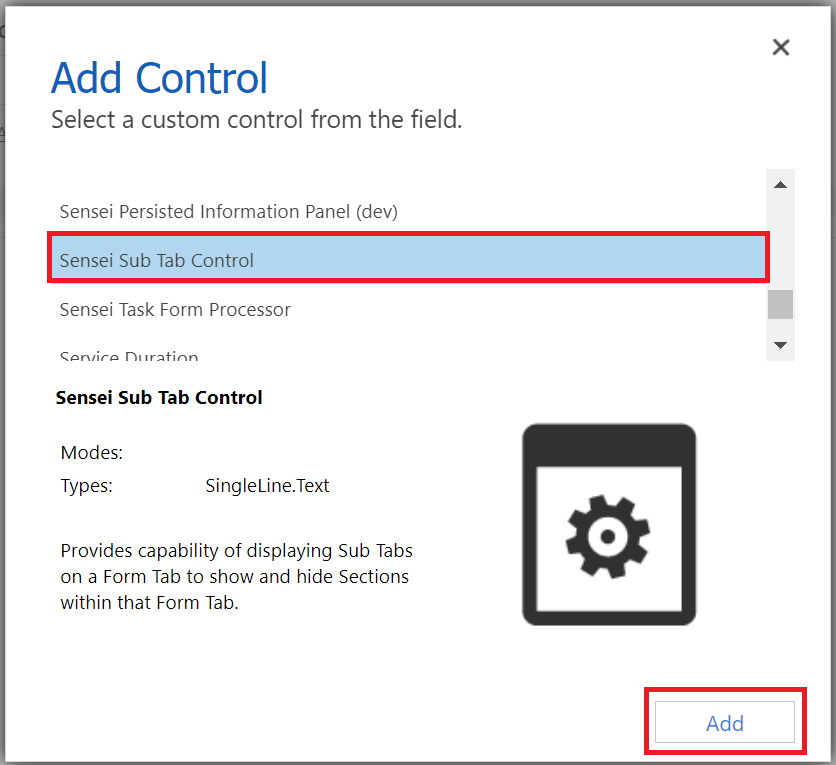
Select 'Sensei Sub Tab Control', then press 'Add'
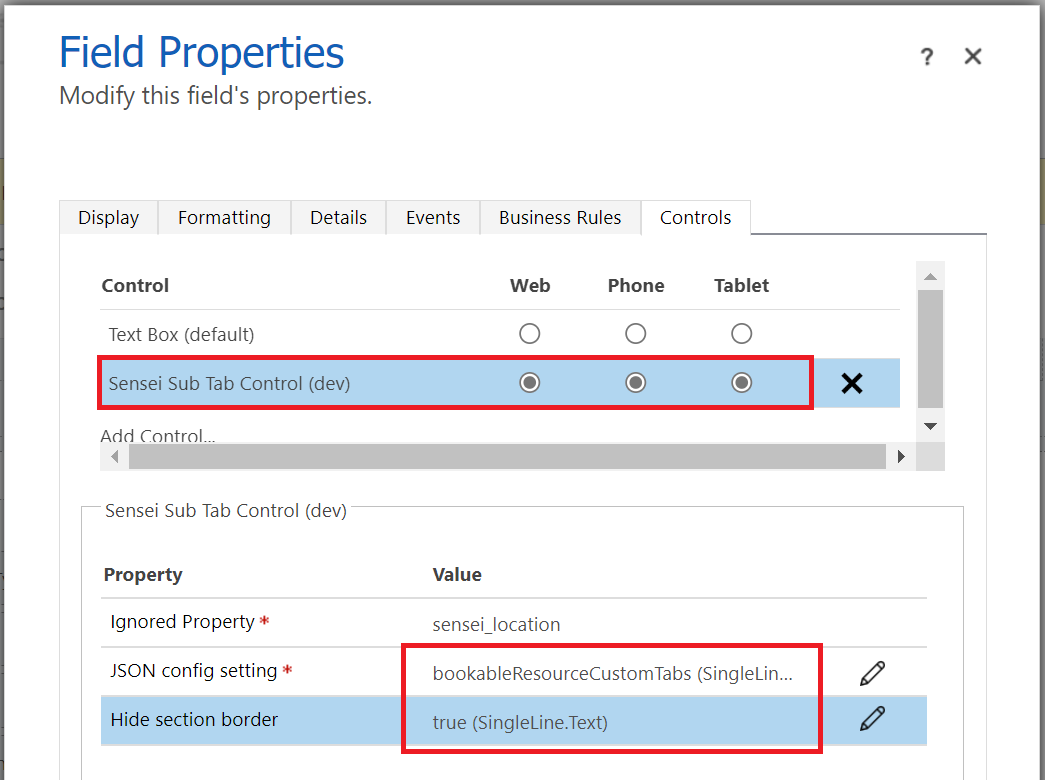
Select the control to display for Web, Phone and Tablet, then configure the following properties:
| Property Name | Value |
|---|---|
| Ignored Property | {This is ready only and will contain the name of the field that you selected to house the control } |
| JSON config setting | {Enter the Name field (not the Display Name field) of the Configuration Setting that you created earlier} |
| Hide section border | true |
Save and Publish your Form. Your SubTabs should now be viewable when used in the IQ app.

Limitations
- Sub Tabs are not currently able to participate in deep deep linking.
- When switching between SubTabs, users are not prompted to Save modified data. This could lead to perceived data loss scenarios depending on the contents of the SubTabs.
- Sub Tab control cannot be used in conjunction with any of the following Tabs that are shipped in IQ (due to those tabs having special configuration to allow a single control to appear full screen in the tab section):
- Bookable Resource form - 'Allocation' tab
- Project Information form - 'Tasks' tab
- Project Resource form - 'Resource Plan' tab
- Proposals form - 'Resource Plan' tab
- Timesheet form - 'General' tab
- Note that the 'sub tabs' that appear directly within the Tasks control on the Project form are hard-coded within that Control and are not configurable.
- Please be careful not to add too many SubTabs to a single Tab. Adding too many sub tabs to a single tab will result in some subtabs not being visible/selectable on the page.
- Warning: Moving existing out of the box top level tabs to become sub-tabs should be done with caution. Moving them will break any direct links you have created to those items. In addition, doing so may create ongoing technical debt to ensure that future feature releases are not hidden from you by your customization layer.
My Work Canvas App
If the client would like to modify which views get displayed for a particular entity, the consultant can update this by doing the following:
Open 'My Work in Sensei IQ' in Edit Mode (you will need to be logged in via the owner of the app in order to do this).
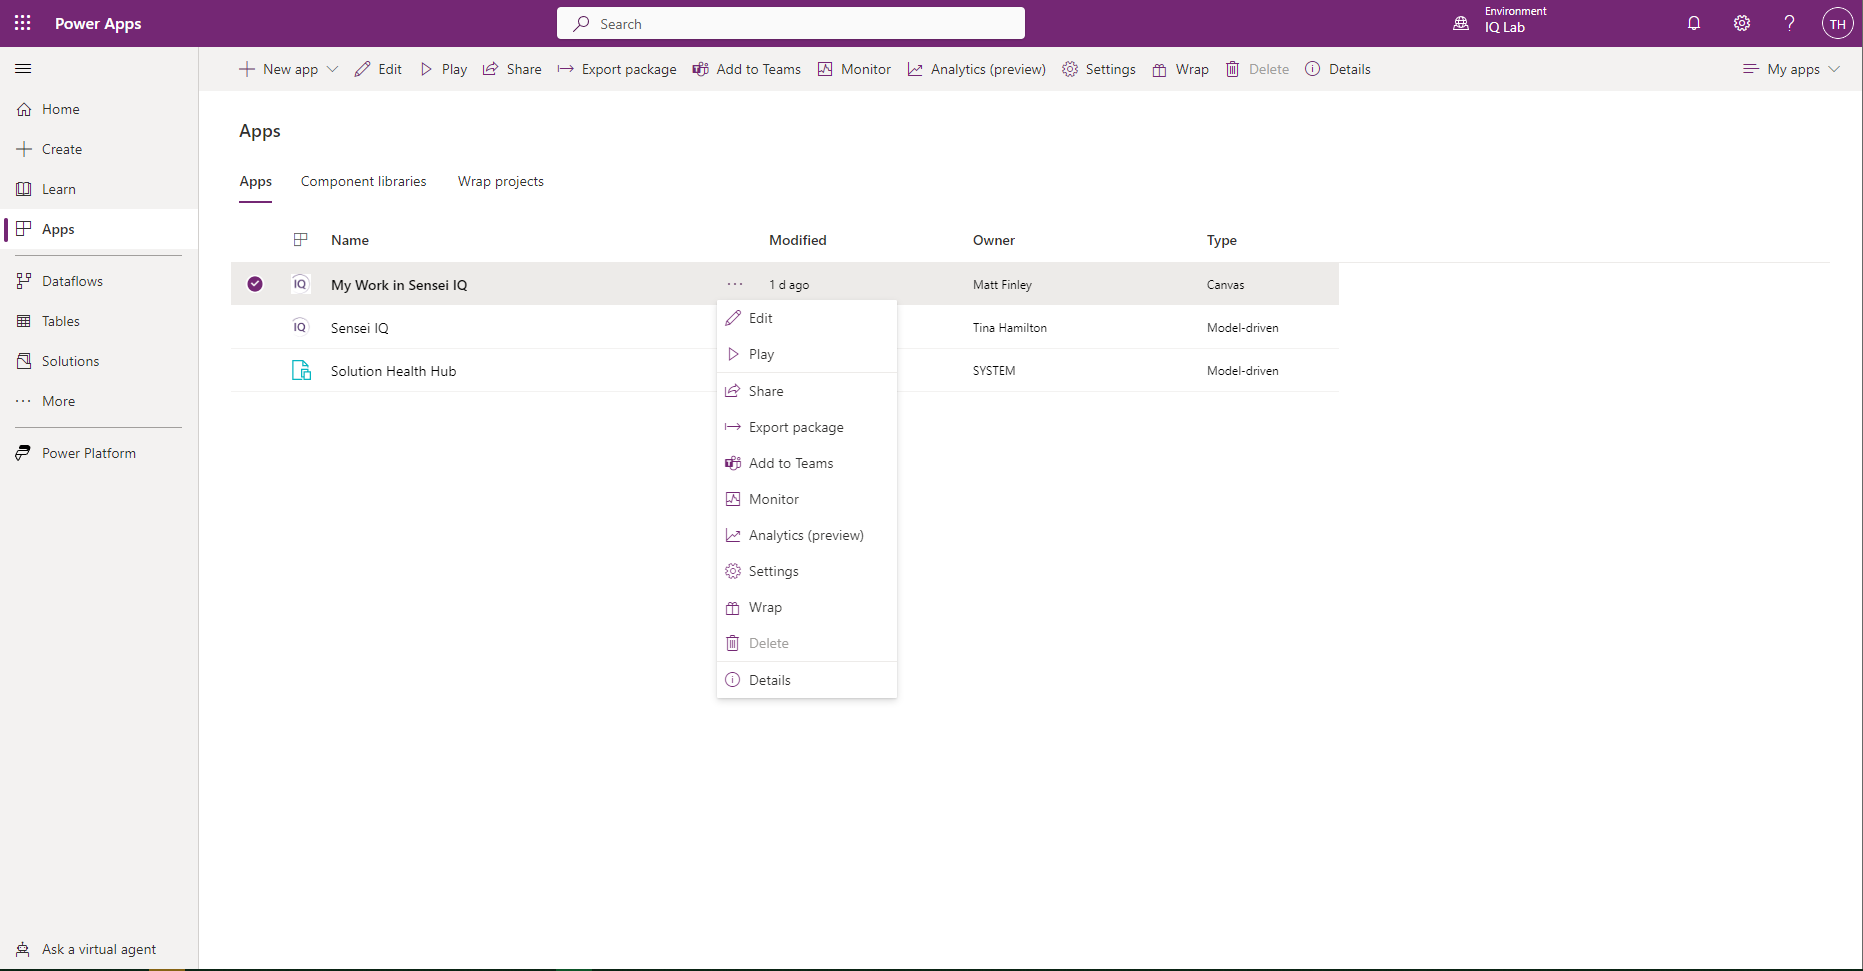
When the app loads, navigate to the 'OnStart' function of the app -> Select 'App'
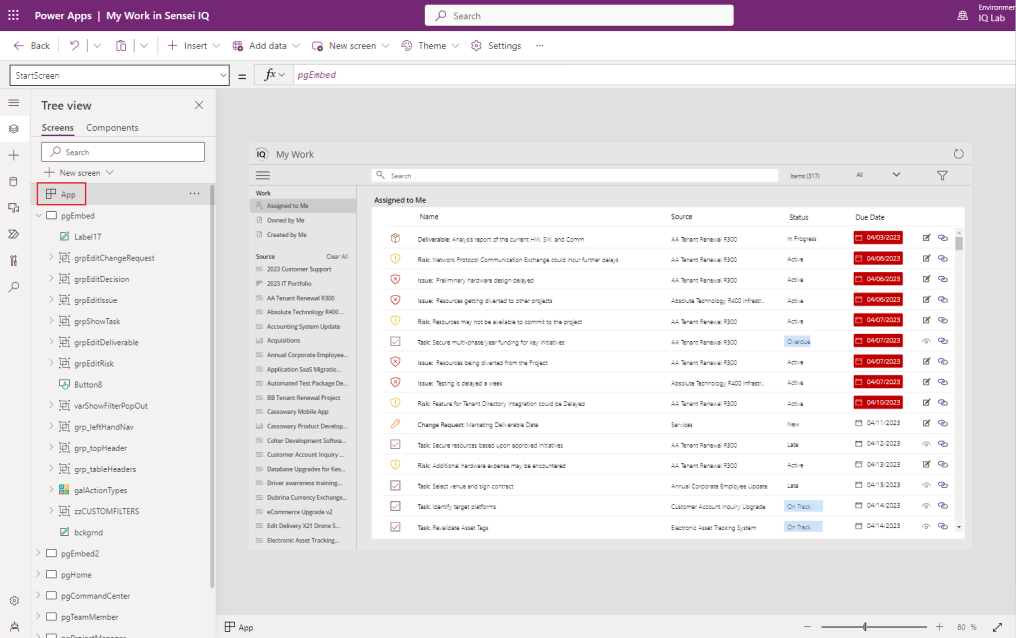
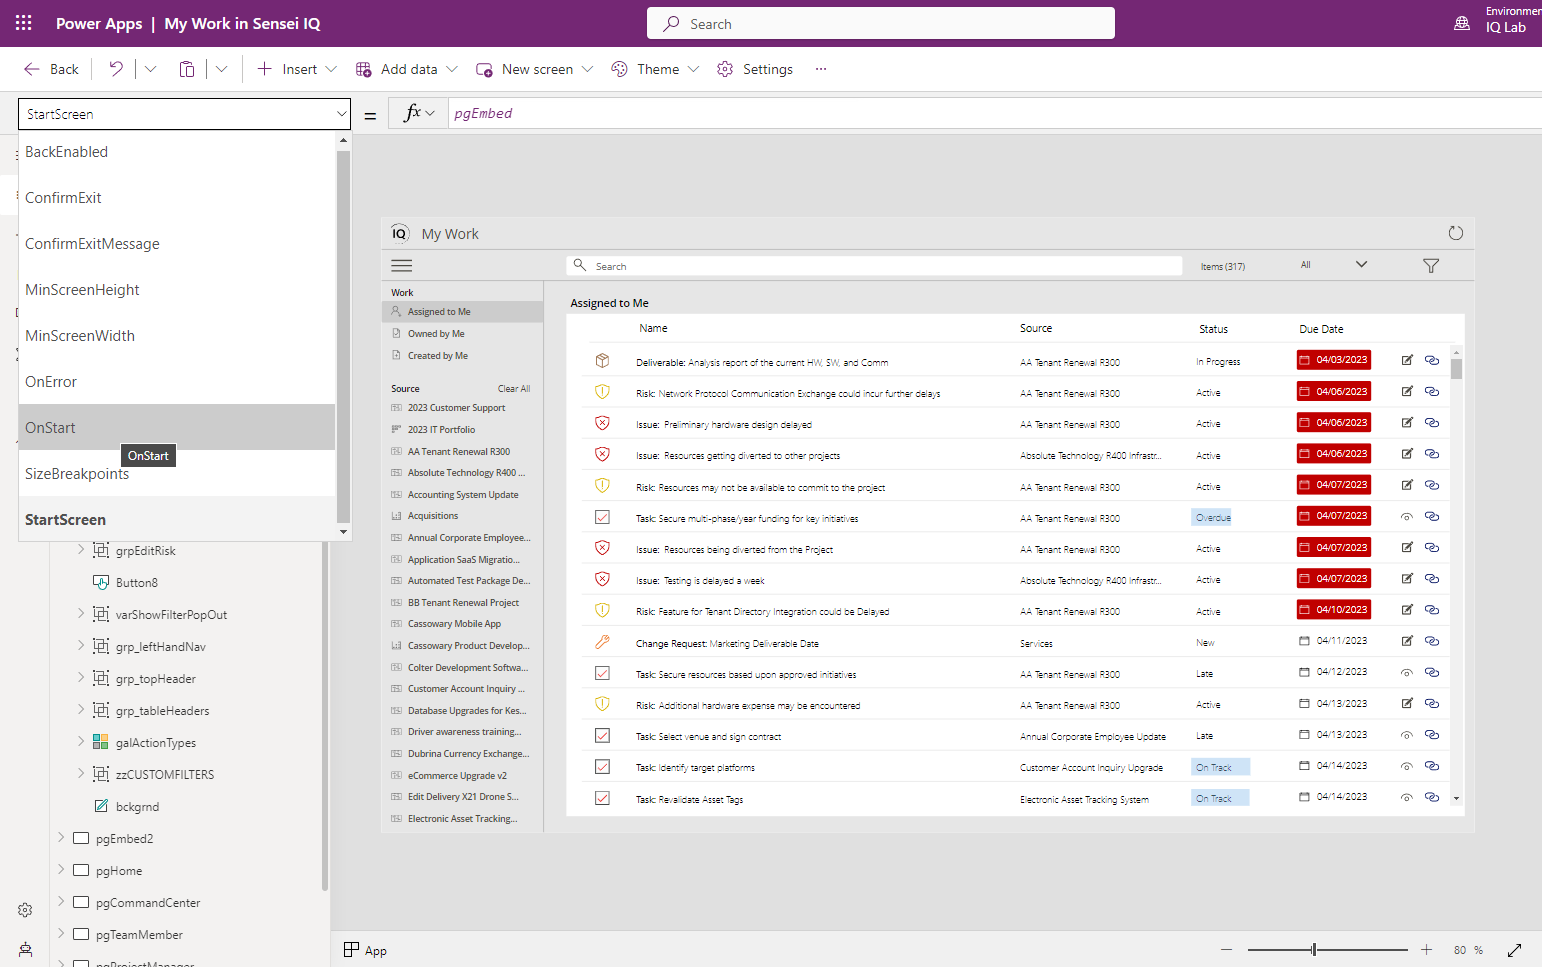
Change the dropdown to OnStart
Find which entity view you would like to change within the executable code. For Example, Risks, Deliverables, and Project Tasks)
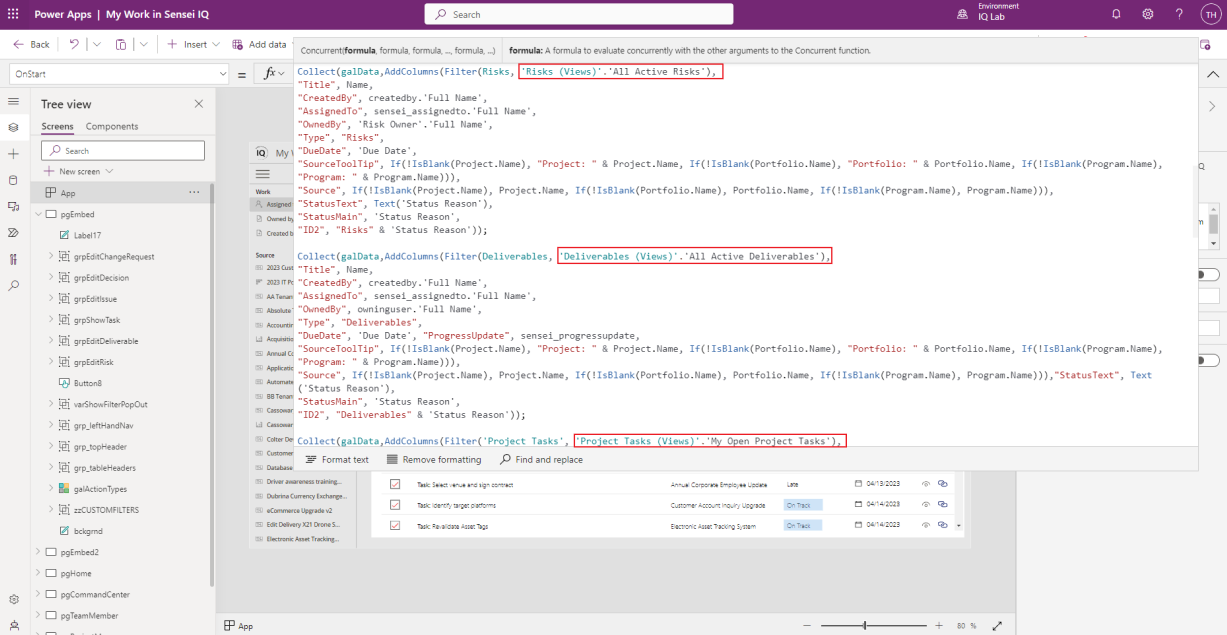
Simply replace after 'xxx (Views)'. to your desired view.
Filter(Risks, 'Risks (Views)'.'All Active Risks') ---> Filter(Risks, 'Risks (Views)'.'My Active Risks')